

Introduction: DIY Surround Sound Headset


I've always liked the idea of having surround sound in a headset for making games feel more immersive. I've tried many different models over the years, both the virtual surround types and the ones with multiple drivers. None ever seemed to get surround sound quite right. I have heard people say that it's because the drivers are too close together, but I think it's for a different reason. I believe that in order to get surround sound in a headset, regardless of the distance between the drivers, the sound needs to actually come from different directions. In order to test my theory, I decided to build a set of surround sound headphones with that principle in mind.
Things you will need:
- 3M Peltor H10A Earmuffs
- 3 pairs of Koss KSC75 Headphones
- A rotary tool, or a drill and a saw
- A hot glue gun
- Zip ties of multiple colors (specifically green, black and yellow)
- Something you can write permanently on plastic with, like a marker
- A ruler or tape measure
- Rubber bands
- Some tape
Before I get started, I wanted to explain that if some of the details on the pictures don't seem quite right, like if there are some parts on them that I said you wouldn't need or if there are cuts, holes or markings (or a lack thereof) where there shouldn't be any yet (or at all), it's because I had to revise the way the headset was put together as I went along with the project. I did that both to get the best sound out of the headset and because it kept falling apart, lol! I will try to write instructions as accurately as possible so that you are not confused by the pictures and add notes to clarify details in the pictures if I feel it's necessary.
Step 1: Prepare the Headphones for Mounting

I chose these Koss headphones because, despite being incredibly cheap, they sound pretty darn good. I didn't want to sacrifice sound quality for cost-effectiveness when building this since I wanted to make something I would actually want to use and listen to and that other people would want to make and use as well. These also had the added benefit of being easy to take apart and integrate into my headset idea.
Before you remove the ear clip, label each driver with the side it goes to, as I did in the picture. Do this for all 3 pairs of drivers. You don't want to get the sides mixed up. Once they are all labeled, remove the ear clips by simply pulling with a little bit of force.
Step 2: Marking the Earmuffs 1


I chose these 3M earmuffs for this project for a couple of reasons. I figured ear protection headsets were made to be used for long periods of time, so they must be somewhat comfortable. And they are...somewhat. They also looked like they were large enough to fit three of the Koss drivers inside. They are pretty close, but not quite. They were still good enough for the purpose, though, so I used them anyway.
As you can see from the first picture, the drivers are about 45 mm in diameter. To have the drivers centered around the ear, I marked that length around the midpoint of the earmuffs, as you can see in the second picture. The midpoint conveniently happens to be the little stud the headband attaches to. Measure roughly 23 mm up and down from that point and mark the distances with dots like in the picture. Do this for both sides of the earmuffs, left and right, and do it both in the front and in the back. Once you do, draw a line going across the red plastic. Make the line as straight and perpendicular to the black plastic parts as possible. See the next step if that isn't very clear.
Step 3: Marking the Earmuffs 2


Disregard the doofus in the pictures. Anyway, as you can see there are lines running across the red plastic. However, once the headset is on, the earcups tilt down a little. I wanted the drivers to face the ears dead on, not with a slight tilt (I'm particular like that) So, to correct that, I put the headset on and stood in front of a mirror, to gauge how much tilt the headphones had. I then drew small marks above the outside end of the lines I drew before (barely visible on the first picture), From which I then drew another line that connects to the starting point of the original line (as seen on picture 2) The goal was to make the lines perpendicular to the floor when the headset is on. You may or may not need to do this at all depending on how big your head is or how anal you are about details like these. If you are happy with the original lines, then you can still proceed, but I don't know how that will affect the directionality of the sound of your finished headset.
Step 4: Marking the Earmuffs 3


Once you are happy with your lines, you'll need to connect them by drawing another line around the outside of the earcups. I found that using rubber bands could help me draw the line as evenly across as possible, as you can see in the pictures. Avoid putting any pressure on the rubber band with your marker. Just use it as a guide and gently draw the line with your marker against it. This was kind of tricky, but if you have the eye and skill to do it without the rubber band and are happy with the results, more power to you.
At this time, it's also a good idea to pick which side of the headset will be the left and which will be the right, then label accordingly. As you can see from the pictures, I did this after cutting up the headset, which resulted in a lot of headaches. So do it now, while it's nice and simple. You should also remove the grey foam inside the earcups. You can just pull it out with your fingers, but be careful not to damage it, since you'll need it later.
Step 5: Cutting Up the Earmuffs


Using a rotary tool or a saw, cut into the earcups along the lines drawn earlier up to the red plastic portion (but don't cut into the red plastic). After cutting along both lines, you should be able to remove the outside shell of the earcups. This shell has some foam which you can remove and throw away. The shell should have come off in three parts, top, middle and bottom. We only need the middle portion for the headset, so you can throw the other two small pieces away. there is also an inner cup that you need to remove and dispose of as well.
Once you have the headband and ear cushions without the cups, drill holes through the red plastic as indicated in the picture. these are for the zip ties that will hold the headset together. I used a 15/64 size drill bit, but it all depends on the size of the zip ties you have at hand, so use whatever size you need. Also drill holes on the shell piece saved from before. This is the piece where we will mount the drivers. Notice I drilled the holes after mounting the drivers. That was pretty risky, so it's best to do it now. I marked the picture with the locations where I drilled the holes, since they are kind of hard to see on the picture, but as long as they are in those general locations, they don't have to be exactly the same.
Step 6: Marking the Shell and Labeling the Cables


We're almost ready to mount the drivers, but we need to do a couple of things first. On the shell, try to measure as well as you can where the halfway point on the inside face of the shell is, then mark it with a line. This is where the center set of drivers, which are the stereo/front side channels, will be mounted. You want to make sure these lines match as much as possible on both of the shells for each side of the headset, so that all the drivers are mounted as similarly as possible, so the headset doesn't sound weird.
Now we have to label each set of drivers for the channel they will output. The easiest way in my opinion is to wrap a color zip tie around the jack, as you can see in the picture. That way you will always know which jack goes where when you need to plug them in. The colors you need are green for stereo/front channels, black for the rear channels, and yellow for the center/subwoofer channel.
Step 7: Mounting the Drivers


Pick a side to start mounting the drivers to their respective side shell. I found it's better to do a whole side at a time, so I started with the left, as you can see in the pictures. For the middle driver, line it up with the line drawn on the shell earlier, and hold it like in the first picture, pinched from the top, with the cable coming straight down in line with the...line. From underneath, apply some glue between the driver and the shell while you keep it pinched from above. It will be glued at an angle, but this is fine since the driver will be perpendicular to your ear once you put on the finished headset. Once it's set in place, you can move on to the rear driver. Place it on the shell as indicated in the pictures, as close as you can to the middle driver, and making sure it's centered between the top and bottom edges of the shell. Make sure you have the correct side driver for the correct side shell and that you glue it in the correct location! As you can see on the second picture, this is where the rear left channel driver (as identified by its zip tie) needs to be glued to. It's easy to get the drivers all mixed up, so be careful and take your time. Once you are done with the rear driver, mount the front driver the same way you did the rear one. Once you are finished, repeat everything on the other side. Remember to make sure you don't get your drivers mixed up.
Step 8: Assembling the Headset

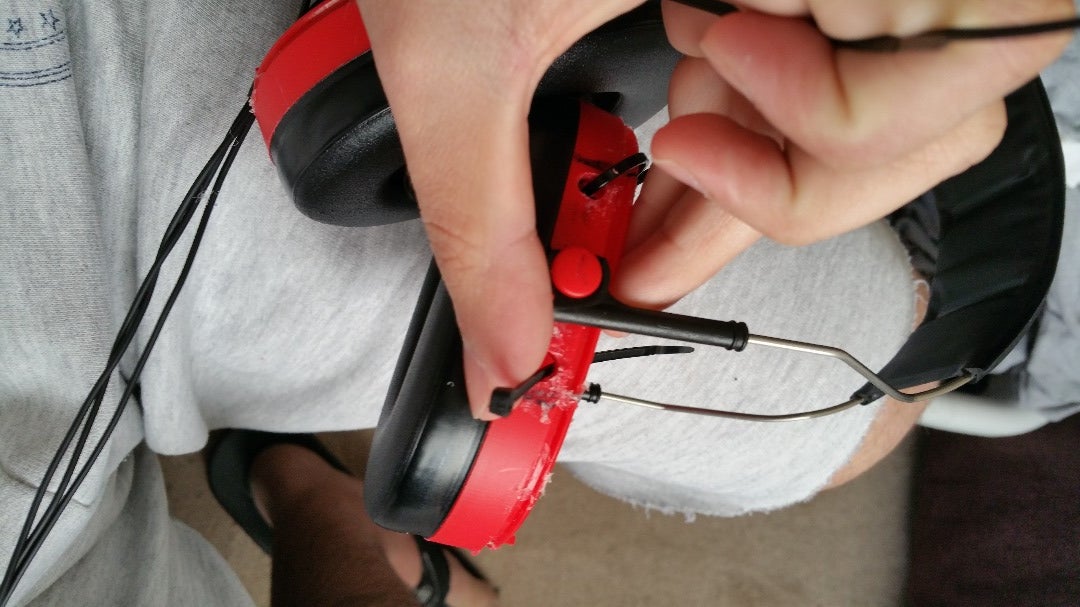


To put the headset together, start by threading zip ties through the "Driver Assembly" as in the first picture, which you can zip down. These will serve as anchor points for the other zip ties that hold the driver assembly to the headband. Next, thread small zip ties through the holes in the red plastic on the ear cushions, as in the second pictures. Do this on all four holes, on both sides of the headset. Zip these closed, but not all the way. Now position both driver assemblies inside the red plastic ring as shown on the third picture. Line up the edges of the shell with the lines originally drawn on the red plastic part and your assemblies should be in the proper spot. Now this part can be confusing: thread a zip tie through the half closed one in the red plastic and under the "anchor" zip tie, as you can hopefully discern in the fourth picture. Tighten both this zip tie and the one going through the red plastic little by little, so they pull the driver assembly snugly against the inside area of the ear cushions. This needs to be done for each of the zip ties going through the red plastic, so eight in total. After you trim the excess, they should look like in the fifth picture.
Step 9: Tyding Up and Afterthoughts


You're pretty much done! the last important thing to do is to stuff the gray foam back inside the ear cups so that it's pressed against the drivers, as you can see in the pictures. This will help the sound travel better from the drivers to your ears, so the headset sounds normal and not like you were holding it away from your ear, like it does without the foam. And you can also now add some cable sleeves to keep all the cables looking nice and tidy. I haven't had time to do it, so I just settled for some electrical tape, as you can see in the second picture.
So, was this headset worth the effort after all that trouble? Surprisingly, yes! But first, the downsides. This headset is not winning any beauty awards, unless the category is "post-apocalyptic" And even though i used something meant to be worn for a long time as a base to build this on, it can get uncomfortable after a couple of hours. But that may be because my head isn't exactly small, so your mileage may vary. It's all clamping pressure, though. The headband feels very light, so no headaches from that. The headband isn't adjustable, though, so there's that to consider as well. As for the positives? the sound quality is pretty good! It's not as good as my Sennheiser HD 650s (I mean, come on!), but they definitely are almost as good my Astro A50s, although less boomy. Where they really shine is with the surround sound! I think my theory on the importance of the driver placement was right, because I can pick up the direction sounds are coming from easily and pretty accurately. In Assassin's Creed Unity, for example, I can close my eyes, spin the camera in place, and still know without looking where a particular yelling pedestrian is in relation to the camera point of view.
So overall, except for the minor annoyances listed above, I think this headset turned out pretty great and I'm pretty proud of it, especially because I was able to prove (to myself, at least) that great surround sound can actually be possible with headphones. But hey, it's not like I'm trying to sell you the headset, so if you don't believe me, you can just put it together and hear for yourself!

Participated in the
Explore Science Contest

Participated in the
DIY Audio and Music Contest


