

Introduction: Dancing Ribbon Rings


With my niece's birthday (6 years old!) coming up, I was searching around for something to get her when I discovered these beauties: Dancing Ribbon Rings.
These would make awesome party favors for a little girl’s party! They’re quick and easy, and relatively inexpensive. They would also work great in Easter or May Day baskets, or make them red-white-and-blue for the 4th of July, or Christmas-them-up for stocking stuffers!
You can download a PDF of this tutorial on my website.
Step 1: Materials & Supplies


An easy (and cheaper) substitute would be shower curtain rings if you’d rather use plastic, and they come in a variety of colors. However they are designed to pop open, which may lead to pinched fingers, and they're kind of goofy shaped.
Materials Needed:
- 1-3/8" wood clip rings; Measure approx. 2" inner and 2-3/4" outer diameters.
- 3/8" poly satin ribbon: (3) 18-ft. spools per pair of rings for triple-colored ring sets.
- a lighter, or matches and a candle
- craft, fabric, or tacky glue (optional)
Step 2: Remove Hardware From Rings.


Unscrew the eye hooks with clips from all the wooden rings.
Step 3: Measure and Cut Ribbons.


- To make triple-colored ring sets, you’ll need at least three(3) 18-ft. spools and it will make one pair of rings.*
- To make 5-colored ring sets, you’ll need at least five(5) 18-ft. spools which will be enough to make two pairs of rings.*
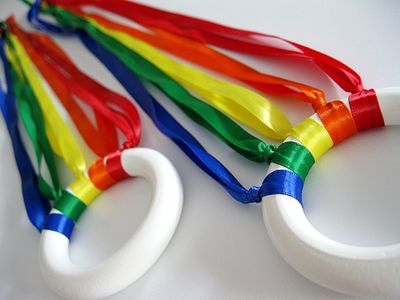
Step 4: Knot Ribbons Onto Rings.

Fold ribbon halfway through ring and knot; you’ll have approx. two feet of ribbon hanging from the ring. I’m not sure what the "technical" name is for the knot that I used, but it’s the same way you would tie a balloon closed.
If desired, you could use the optional glue to secure the knotted ribbons in place so they don't slide around on the ring.
Step 5: "Heat Seal" Ribbon Ends.
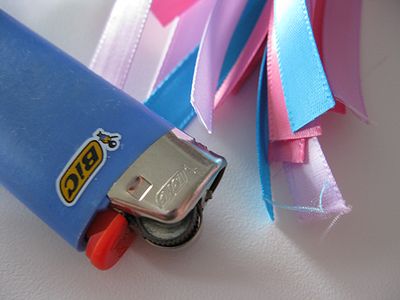
Use a lighter (or lit candle) to finish the ends of the ribbons and prevent fraying. Quickly pass ribbon edge through flame, it doesn’t take much and you don’t want to scald the ribbon.
Step 6: Repeat, Repeat, Repeat!

You could make a single or a matching set. There are thousands of color combinations! You could try with different sizes, textures and lengths of ribbon. The possibilities are endless!


