

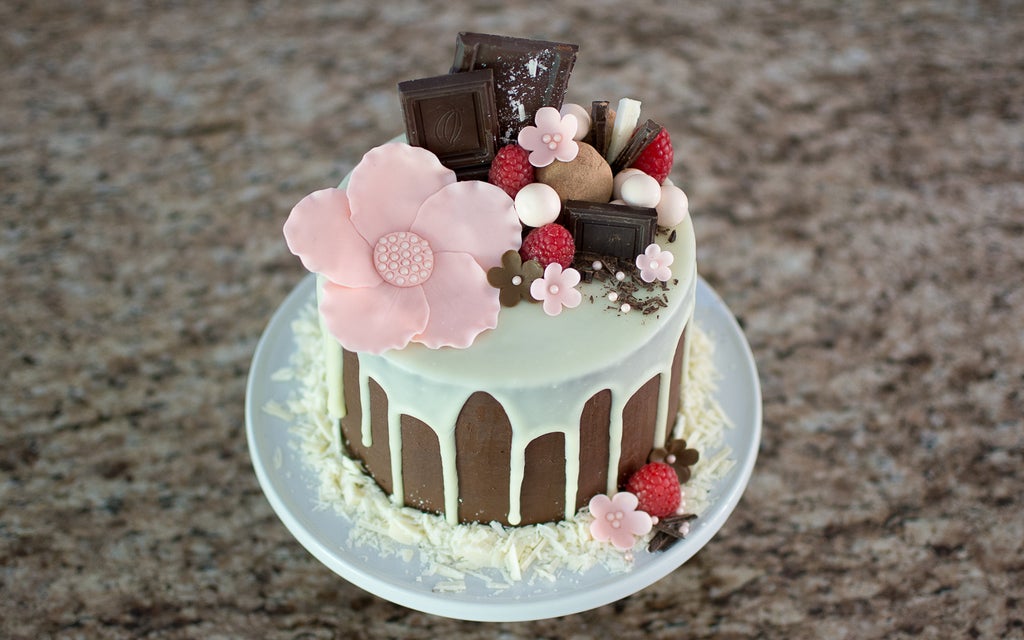
Introduction: Decorated Drip Cake


Drip cakes are a huge trend right now in cake decorating. A drip cake is traditionally a ganache covered cake that has thinned ganache (or glaze) dripping down the sides. Drip cakes can be decorated in any way imaginable. We will be using store-bought candies and fondant flowers to decorate with. This cake would be perfect for a small wedding, an anniversary, or a birthday party.
In the next five steps you will complete a beautifully decorated drip cake!
Drip cakes can be make up to 3 days in advance, however, I recommend making the cake as close to the event date/time as possible to ensure a fresh delicious cake. If you plan on making the cake ahead of time store it at room temperature and cover lightly with plastic wrap. This will keep unwanted things off of the cake; like pet hair, dust, human hair, flies! There is no need to wrap it tightly. The ganache is holding in all of the moisture in the cake for you!
If you are going to transport a cake on a cake stand the best way is to have someone hold it while driving to your destination. Unless very well secured the cake will topple over when you turn the first corner. That would be very sad!! If you make your cake on a cake base or cake drum it can safely sit on the floorboard or in the trunk of the car assuming it won't be sliding around as you drive!
This instructable is a breakout lesson from my Cake Decorating 101 collection. If you are interested in learning more about cake decorating or for cake recipes please take a look!
Step 1: Drizzle Cake With Ganache

Drizzling a cake with warm chocolate ganache should take about five minutes tops!
You will need:
- 2 ounces quality white chocolate chips, chocolate bar, or almond bark (I say 'quality' because if you use something cheap like vanilla baking chips they will literally burn and catch on fire!! Not a good situation, trust me, I've tried it!)
- microwave safe bowl
- spoon
- off-set spatula
- cooled ganached cake
HOW TO MAKE GANACHE DRIPS
1. Place white chocolate in a microwave safe bowl.

2. Heat the chocolate in the microwave for 30 second bursts, on high, until it becomes a runny and smooth consistency. Lumps are not welcome! You can add food coloring at this stage if you wish to have colorful drips.


3. Transfer your ganached cake from the turntable to a cake base, a cake drum or a cake stand by prying the cake off the turntable with a sharp knife. This won't take much effort. If the tape stays on the bottom you can leave it on so the cake sticks on the base. If it comes off that's fine too. If you will be traveling with the cake I would recommend securing it to the base in some way.

4. Drop a spoonful of melted chocolate on the top of the cake near the edge and using your spoon, gently push the chocolate over the edge and let it drip down the side.
If you want long drips (that flow to the bottom) make sure your cake is at room temp. If you would like shorter drips place your cake in the fridge for 10ish minutes to cool the cake. This will allow the white chocolate to harden quickly as it touches the cake slowing the drips. I used a room temp cake to achieve the drips seen in the photos.
5. Repeat this process all around the edges.

6. Once you have achieved satisfactory drips place a spoonful of the melted chocolate on the top of the cake to cover any dark chocolate. Smooth with an offset spatula.


7. Place cake in the refrigerator for about 10 minutes to set and harden the drips.
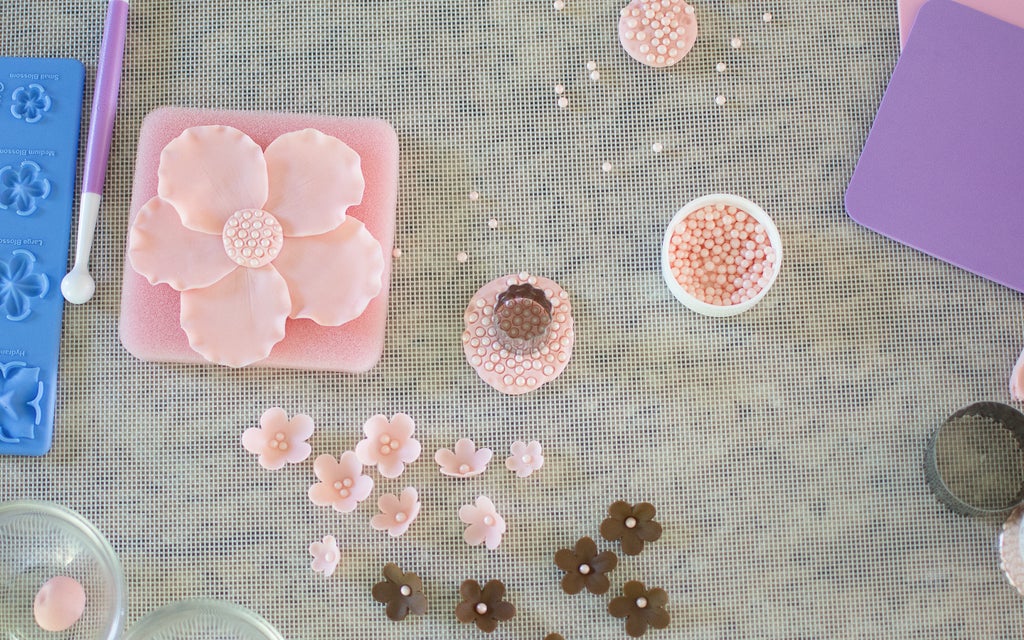
Step 2: Large Fondant Flower

You are going to love this step! Fondant flowers do not require much skill unless you want them to look identical to a real flower. There are many cake artists who take the time to make flowers botanically correct and they are gorgeous, but that could be a whole other class! For the sake of simplicity and learning new skills we will be making free-form, unique flowers. :)
You will need:
- rolling mat, other silicone mat, or lightly greased countertop
- sharp paring knife - this makes it easier to lift small fondant pieces of the rolling mat
- circle cookie cutters, a small mouthed glass, shot glass, or any other small circular item that could cut fondant
- petal foam or a piece of craft foam (usually 20¢ at the craft store)
- fondant
- clear vanilla extract or vodka
- rolling pin
- ball head sculpting tool or a dry finger
- sugar pearls, optional
- small, shallow bowl
- toothpick

MAKING THE FLOWER
1. Roll out a small amount of fondant (I'm using a pale pink) on your rolling mat with a rolling pin.

2. Cut out six circles (I like to cut one or two extra in case I tear one) of the same size. I used a 1 1/4 inch round cutter.

3. Remove excess fondant and wrap in the foil it came in. Set aside.

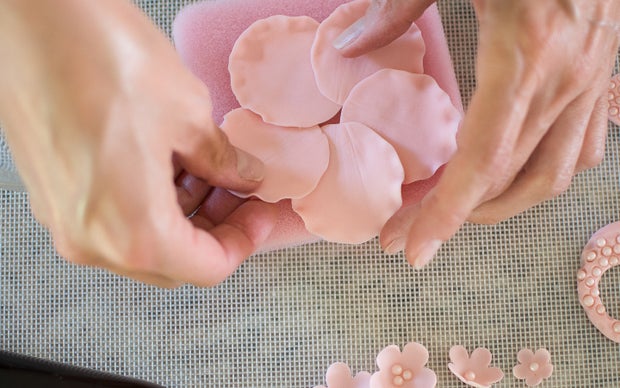
4. Place one circle on the petal foam and gently thin the edges with the ball head sculpting tool by pressing gently in a back and forth motion. Optionally you can use a toothpick to create some realistic lines in the petals.


5. Place the petal in a small shallow bowl pressing it gently to the side so it cups slightly.

6. Repeat four times and allow all petals to set.
7. Meanwhile roll a gumball sized amount of fondant into a ball.

8. Pour sugar pearls into their cap and press the fondant firmly into the sugar pearls so they stick to the fondant.


9. Remove the fondant and cut a small circle using a small, 1/2 inch, round cutter or your knife. This will be the center of our flower. Set aside.

10. Lay one petal out and start overlapping petals in a circular pattern. Secure each petal together with a small dab of clear vanilla extract or vodka. If you don't have either of these items in your kitchen you can use water, but only as a last resort. If you do need to use water please use the least amount possible because it can make your fondant gummy.


11. Adhere the center of the flower in the middle of the petals with extract or vodka.

12. Place the flower in a shallow bowl and allow to harden completely.

Step 3: Small Fondant Flower

Small flowers are a cinch! For this step you will need all of the tools in the last step (minus the circle cutters) along with a small flower cutter and a shaping mold (optional). I got these two items in a Wilton Gum Paste Flower Cutter Set, however, the plunger noted in the tools list in the beginning of the class will work perfectly for this. You can often find small flower cutters in the cake decorating section at the craft store also.
You can use the exact same technique as we did for the large flower for the small flower. You would just need to use a very small circular cutter. A drinking straw or a round piping tip would be good options.
MAKING THE FLOWER
1. Roll out a small amount of brown fondant.

2. Cut a flower and thin the edges with the ball head tool.

3. Press the flower into the shaping mold.

4. Turn the flower out onto the petal foam and press the ball head sculpting tool in the middle of the flower to round and lift the petals.

5. Remove from the foam and press a sugar pearl in the center.

6. Repeat as many times as flowers you would like for your cake!
Step 4: Confections

In order to decorate our drip cake we will need some tasty confections. Search your local candy aisle for chocolates, caramels, nuts, and candies! Fresh fruit is also a beautiful option. If you have fruit in the filling just make sure what you put on top compliments the inside!
I used the following items for my cake but be creative. I want to see what you come up with!!
- dark chocolate bars - your favorite flavor (I used two different cocoa percentages)
- strawberry whoppers
- sugar pearls
- fresh raspberries
- white chocolate chips and bar
- dark chocolate truffles (recipe follows)

Dark chocolate truffles are extremely easy to make. You've already done the hard work of making ganache so this will be a breeze!
DARK CHOCOLATE TRUFFLE RECIPE
1. Remove your ganache from the fridge.

2. Using a melon baller, small cookie scoop or a spoon. Make a ball of ganache.

3. Drop it into a small bowl of cocoa powder and roll to coat all sides.

4. Repeat for as many truffles as you would like to have on your cake! That's it — delicious truffles are done! Told you it was easy!
Step 5: Assembly

Here's the best part! Assemble all confections and fondant flowers any way you wish. Here's how I assembled mine:
1. Determine which side should be the front and place the large fondant flower on the edge of the left side of the cake.

2. Cut white and dark chocolate into slivers.

3. Cover the bottom edge of the cake (with white chocolate shavings) to cover up the visible cake board.

4. Break off two tall pieces of chocolate and stick them behind the flower.

5. Mound more chocolate pieces, whoppers, berries, sugar pearls and small fondant flowers in a neat pile! Add an accent at the base of the cake with a fondant flower, a berry, and some dark chocolate shavings for interest.
6. If you used vanilla buttercream and raspberries for you layers, this is what your cake will look like when you slice into it!! To slice a drip cake successfully, use a sharp chef knife and press straight through it pulling the knife out at the bottom. Don't try to saw back and forth or you will have a big mess!
Before you slice your cake, take a quick photo and upload it in the 'class project' section below. I can't wait to see how you decorated your cake! Eat and enjoy!


