

Introduction: Designing Wooden Puzzles


I been collecting mechanical "logic" puzzles since I was a child. I've got boxes full of them. The prettiest ones are wooden puzzles but I've got plenty of plastic or wire-and-string ones too. Of course, collecting puzzles is easy. Creating your own is much harder. This Instructable is a description of some of the ones I designed many, many years ago when I was a student.
With any puzzle, you start by making simple version so you can test the idea. Is it a worthy puzzle? The ideal is a puzzle that is simple yet challenging. It's very hard to achieve a design like that. It shouldn't be obvious what the answer is. But you don't want the player to have to blindly search a huge "solution space" - there should be logical shortcuts you can discover. You probably want the puzzle to take under an hour to solve.
What's satisfying is to find a set of pieces which follow a rule. For instance the Soma cube is "all possible combinations of three or four unit cubes, joined at their faces, such that at least one inside corner is formed.
The 12 pentomino pieces are "all the different shapes of 5 unit squares connected edge-to-edge".
Once you've found such a set of pieces then will it fit into a simple shape? The Soma pieces fit into a 3x3x3 cube in 240 ways (excluding rotations and reflections) and the pentomino pieces will fit into a 6x10 rectangle in 2339 ways. Soma and pentominos are such popular puzzles because it's not trivially easy to find a solution but it doesn't take you hours or days.
When you're sure you have a good idea, you can make a nice version that other people can play with. To me "nice" means wood and maybe brass. I used to have access to a machine shop: a big milling machine makes lovely accurate wooden puzzles. I preferred to use teak or beech. But you can make your own with a hacksaw, files, sandpaper and patience. No doubt you could use a 3D printer too but, personally, I really like wood.
Step 1: "4x4 Weaving" Puzzle


Cut eight strips of cardboard from the pattern shown. A convenient size is for each square to be 20mm across. Or you could make a small version to go in Christmas crackers.
The challenge is to weave the strips to make a four-by-four mat. The are 4 strips running horizontally and 4 strips running vertically. There must be a dot in each of the squares that is visible on the top surface.
The eight strips form the set of all the such different strips with the exception of the "all dots" and "all empty" strips.
It will probably take 15 minutes to find a solution the first time you do the puzzle. With practice, you should be able to find a new solution in a couple of minutes.
There are 8 different solutions not counting rotations and reflections. Perhaps you would like to write a computer program to find them all.
If you want to make a nice version to give to friends, search for "square wooden bar" or "square wooden strip" on eBay or visit your local timber merchant or DIY store. Fine grain wood will be nicer than cheap pine. Let's say the bar is 18mm square: in the diagram above, N = 6mm. Cut eight lengths of 22*N = 132mm. Cut 18mm square notches in the positions of the dots. The notches go 1/3 way through the wood. Use a hacksaw to cut on either side of the notch and use a chisel to remove the excess wood. The notches will probably have to be 0.5mm wider than the bar so they don't jam.
When you've solved the wooden version it looks rather like a trivet - a teapot stand.
Step 2: "5x5 Weaving" Puzzle


Cut ten strips of cardboard from the pattern shown. In each square there should be a dot on one side of the card and the other side is empty.
Once again, the challenge is to weave the strips to make a five-by-five mat with 5 strips running horizontally and 5 strips running vertically. There must be a dot in each of the squares that is visible on both sides of the mat.
The ten strips are all the different ways such strips that can be made. I find it rather satisfying that they can be woven together.
It will probably take a couple of hours to find a solution. I don't find it gets any easier with practice so when you do find a solution, write it down.
I think there are 372 different solutions not counting rotations and reflections. You could modify your computer program to find them.
The wooden version is again made from "square bar" or "square strip". The notches are on both sides and go half way through the bar. Even when you've found a solution, it can be quite hard to work out how to "weave" the bars together. It's best to cut the notches so the fit is quite loose.
Step 3: "Edges of a Cube" Puzzle


These 12 pieces form the edges of a cube.
Each corner of the cube is made from 2x2x2 smaller cubes. Each corner has one 2x2x1 tongue and two 1x1x2 tongues. The pieces fall into two groups. In Group A there's a 2x2x1 tongue at one end of the piece and a 2x1x1 tongue at the other end. There are two of each different kind of piece in Group A. In Group B there's a 2x1x1 tongue at both ends. There is one of each different kind of piece in Group B.
So the Group A pieces are "all the ways you can make a edge piece with a 2x2x1 tongue and a 2x1x1 tongue". The Group B pieces are "all the ways you can make a edge piece with two 2x1x1 tongues". It's annoying that there have to be two copies of Group A in order to complete the puzzle.
It would be hard to make a cardboard version of this puzzle. Modelling materials like Plasticene, Fimo or Sculpey might work. To make a wooden version, you can use "square bar" or "square strip" again. Or you could buy a bag of 10mm wooden cubes and glue them together (search eBay or your local craft shop; cubic wooden beads would work as well).
I don't know how many solutions there are. Perhaps you can tell me.
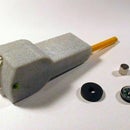
Step 4: "Holey Cube" Puzzle


The wooden cube has two holes drilled through it in each of the x-, y- and z-directions. The holes intersect so that each hole cuts out a notch in the other holes. The notches are half of the diameter of the hole. A rod passes through each hole and the rods have notches where they would intersect with other rods. There are six rods, all different.
You not only have to work out which rod goes where but in what order to insert them.
It would be nice if the rods formed a set of "all the different rods with 0..3 notches" but they don't. How about "all the different rods with 0..1 and all the different rods with 2..3 notches where the notches intersect" but again they don't. They do form that set if you say there must be only one of each chiral rod but then it's arbitrary whether you choose the left-handed rod or the right-handed rod. Maybe you can find a more satisfactory set of rods.
I don't know how many solutions there are.
Step 5: "Eight Cubes" Puzzle


The are eight cubes. On each cube, three of the adjoining faces have stripes painted on them. Each stripe covers half the face. The other three faces are plain.
Put the cubes together to form a 2x2x2 bigger cube. None of the stripes can show on the outside and no stripe must touch another stripe.
There is only one solution which is fairly easy to find.
The cubes are either right-handed or left-handed (the stripes go clockwise or counterclockwise). The pieces form the set of all such cubes. Maybe you could find a different set of cubes which don't have such an obvious handedness - there are 24 such cubes in total. Maybe you could put stripes on more than three sides - that would give you a huge number of cubes. Maybe you could also have un-striped faces and select a sub-set that will make a 3x3x3 or 4x4x4 cube with the outside plain.
You can see my original prototype has black tape for the stripes. In the final version, each stripe is a protuberance. The pieces will only fit in the box if you've solved the puzzle. (The box used to have a lid but a pet parrot chewed it up!)
Step 6: More Puzzles


There are lots more puzzles I've designed but none of them are all that great. They didn't get beyond the cardboard stage.
The first puzzle shown above is made from dominos - i.e. two squares joined together. Each square can have "exits" on its edges. The exits join together to form a line. You can see in the photo that the prototype is made from punched-cards - that gives you an idea of when I designed it!
There are different sets of dominos:
- all dominoes have 1 exit (pink)
- all dominoes have 2 exits (yellow)
- one square has 1 exit and one has 2 exits (green)
- all dominoes have 3 exits (green+orange)
- all squares have 2 exits (magenta)
- all dominoes have 4 exits (magenta+cyan)
- all dominoes have 5 exits (6pcs not shown)
- all dominoes have 6 exits (3pcs not shown)
- all dominoes have 0 exits (1pc not shown)
- dominoes where lines can cross (lots, not shown)
Having chosen a set or combination of sets, put them together into an NxM rectangle so each exit touches an exit. There can be additional rules like
- no exits on the outside of the rectangle (a "plain rectangle")
- the outside of the rectangle must be all exits
- only one continuous line
Is it a good puzzle? I find it rather dull. It feels like you are blindly trying every combination. There are some tests you can make to speed up the search. For instance, if it's a "plain rectangle" then you can count how many plain edges you have left. The pink+yellow pieces cannot form a "plain rectangle" because there is an odd number of exits.
The second puzzle shown above there has 15-squares. Each edge is either plain or has a notch and bump. Each notch/bump is either in the clockwise direction or the counter-clockwise direction. If you turn the piece over then a clockwise notch/bump becomes a counter-clockwise notch/bump. When you put the pieces together, each clockwise notch/bump must fit against a counter-clockwise notch/bump.
There are 15 different such pieces you can make which is rather disappointing. It would be nicer if there were 16 so you could fit them into a 4x4 grid. You can make an extra 16th piece which is either a joker that can go anywhere or a duplicate of one of the pieces.
It would be nice if the edges of the rectangle they fit in were all plain but that doesn't work. That's rather disappointing once again. So I made the frame with all clockwise bumps. I don't know how many solutions there are.
You can cut out the pieces from card. I also made an acrylic version where the bumps were replaced by an overhang or underhang. When you turn the piece over, an overhang becomes an underhang. Overall, I'm unsatisfied with the puzzle.
Those two puzzles use a square tessellation (i.e. a grid). What about a triangular tessellation or a hexagonal tessellation? You can find published puzzles like that - people have extended the pentominos idea to triangular and hexagonal tessellations.
The 3D puzzles in this Instructable use a cubic lattice or tessellation. The cube is the only regular platonic solid that tessellates. There a hundreds of puzzles based on a cubic lattice. But there are other solids. A mixture of tetrahedra and octahedra tessellate and the rhombic dodecahedron tessellates. You can find a few puzzles based on those but there is lots of scope to design new puzzles. To make non-cubic puzzles you probably need a 3D printer. How about a rhombic dodecahedron version of the Soma cube?

Participated in the
Puzzles Challenge


