

Introduction: Donkey Kong Bartop Arcade Powered by RPi


This New Year's Eve we were in the basement of my friend's house. My 15 year old son and I had brought the 16 inch tall Donkey Kong Bartop Arcade machine we made together to share it. While the kids played the classics for the first time from decades ago, over the familiar sounds of Galaga, Pac-Man, Donkey-Kong and others, the adults shared stories about the local arcade at the mall where we all used go.
Questions popped in. "You made that?" "Would you make me one?" Sorry, we won't do that, but we will show you what we did to design and build ours so you can design and build your own.
Step 1: Prepare Yourself to Go Back to the 80's

Close your eyes and imagine you are a less-than-computer literate version of Matthew Broderick sitting in front of a 1980s computer trying to figure out the command line and password you need to type after the blinking cursor to get WOPR to play a game. That's the feeling we got when I first turned on our new Raspberry Pi, the pocket-sized computer that will drive the arcade, and, at the beginning, drive you crazy.
So ironically, to even get to the point of being able to play 1980's arcade games, we were going to have to learn and be comfortable with learning some command lines, just like I did in the 80's. And along the way, my son and I got to reenact moments from a few of my favorite 80's movies.
Step 2: Materials and Tools

PERSONAL GEAR
To get you in the appropriate mood, dress like your high school stereotype from "The Breakfast Club."
DESIGN
Home computer
Autodesk Inventor
Photoshop
Assorted Rulers and Square Head Protractor
ELECTRONICS USED
Raspberry Pi Model B - from The Pi Hut
16 Gig SD card, installed with PiMAME
Micro USB Power Supply (for Pi)
7" TFT LCD Display (includes its own board) - eBay
12 Volt 2A Power Supply (for LCD)
Computer Speakers (powered and with controls)
LED USB Book Light (powered by USB)
USB Hub (not needed if you use Raspberry Pi B+)
Nano USB Adapter (for WiFi connection)
2 USB Panel Mount Cables - from Adafruit
Arcade Joystick - from Groovy Game Gear
Arcade Buttons (1 blue, 1 orange, 2 black, Player One, Lighted Coin Button) - from Groovy Game Gear.
Power Strip with Surge Protector
WIRING
GPIO Pin Wires (use individual wires in a variety of colors to make connections easy)
Speaker Wire
Electrical Connectors (Quick Disconnects, etc)
Heat Shrink
POWER TOOLS
CNC Router (or a jigsaw would work)
Table Saw
Drill, Drill Press and Bits
Router, Router Table and Bits
Rotary Tool and Bits
Biscuit Joiner
Soldering Iron
Electric Palm Sander
HAND TOOLS
Small Hobby Saw and Mitre Box
Wire Crimper/Cutters
Sanding Block
Screwdrivers
Knife, Scissors, Etc.
CABINET MATERIALS
3/4" MDF coated in Black Melamine
1/4" Pressboard
Spray primer, paint and clear coat (the best quality we could find)
T-Moulding - from T-moulding.com
Glass (SS, cut and smoothed edges)
Scrap Clear Plastic
Framing Matte
ARCADE ARTWORK
Color Laser Printer
Full Sheet Label Paper (side artwork and bezel only)
Plastic Laminate (for control panel only)
Step 3: Get to Know Raspberry Pi


We started in the summer. The first thing we did was buy a Raspberry Pi Model B (the new and improved B+ had not been released yet). We also bought some bare essentials to get it up and running: a 16 Gig SD card with PiMAME pre-installed on it (it is now called PiPlay), a micro USB power supply cord for the Pi and a nano USB adapter for WiFi. Although not necessary, we bought a case.
When our Raspberry Pi arrived, we connected her to an old monitor, keyboard and mouse.
Then, just like Lloyd Dobler in the 1989 movie "Say Anything," I spent my free time over the summer learning everything about her and trying to gain her affection. Here are some highlights from our summer together (These are the 7 steps you should also go through if you want a portrait arcade similar to ours):
1. She has no on or off button, but there are a few different ways to add one. In the beginning, to power it on, just plug it into a power strip and use the button on the power strip as your switch. To reboot type "sudo reboot" and to power off, type "sudo halt" and wait until it is finished before powering off (at least that's the safest way).
2. The default screen orientation is "landscape." We switched ours to "portrait" so we could better emulate the games we wanted to play most. We followed these instructions.
3. After about a month with the old monitor, we bought a 7 inch TFT LCD monitor from eBay. It comes with its own board but without the required power supply or HDMI cable. For instructions on how to connect it, we watched a silent movie on YouTube.
4. With the Nano USB adapter, she has WiFi. For instructions on how to get her to give you her IP address (so you can talk to her from another computer), try this.
5. Of the game emulators that came with PiMAME, the one we liked best is called "MAME4All." After she gave us her her IP address, to install games (ROMs) onto the SD card of the Pi, we did not have to remove the SD card. Instead, we connected with Pi from our desktop computer using her IP address and uploaded games from there. Here are more specific directions.
6. We tested all of the games we uploaded on the Pi. We kept only those that worked, required no more than two buttons to play and looked appropriate for a portrait screen orientation. We deleted all of the rest. We didn't want the arcade set up to play anything beyond what it looked fantastic doing. At this point, we were playing the games with the keyboard. The arrow buttons are your joystick controls, left control is the A button, left alt is the B button, 5 is the coin/credit button and 1 is the player one button. Esc will exit the game and Enter will select a game.
7. Finally, we were ready to purchase all of the arcade controls and buttons. We deliberately chose to use to full-sized arcade controls to try to keep the arcade as familiar as possible to the classics. We purchased everything we needed from Groovy Game Gear. To connect the controls, we installed Retrogame on the Pi and followed the instructions here. Note that in those instructions you can go with the defaults or customize the controls. By default, it only has directional controls, the A button and the B button. We customized the pin/key table in the retrogame.c file to add "Esc" "Select" "Coin" and "Player 1" to the default list. By doing this, we eliminated the need to use a keyboard entirely for any needed function. The 4th photo shows how we customized that configuration file in Retrogame. If you like it, when you get to that step in the instructions, just edit the text in your retrogame.c file to match ours and save. So you don't have to read my handwriting, we prepared our own clean diagram in the 5th photo which shows how we connected our controls to the GPIO pins (it is important that you follow this if you plan to modify the retrogame.c file in the same manner we did: in other words, they are a matched set).
So my advice would be to use a project board and add things to it as you go. Maybe you do not need to play Peter Gabriel songs for her like I did, but you should get to know Raspberry Pi well enough to make sure everything works exactly like you want before you take it to the next step.
Step 4: Measure Critical Components and Angles

Before we made a 3D design of our cabinet, we needed to measure the components. Also, to make the arcade comfortable, we experimented with angles and heights for the control panel where the joystick and buttons would be installed.
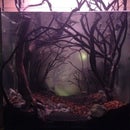
One of the aspects that would make our design unique from most others (and add to the Donkey Kong theme) was to set the monitor back inside a dark box and behind glass. This 3D design choice, especially on a small arcade, presented the surprisingly difficult challenge of creating the best line of sight to the screen for people of all ages. We took a number of measurements to reach a decision on the optimal angle for the LCD screen, the size of the box, and the angle and position of the glass. I drew these angles out on a piece of paper and took it to my son's room for the next step.
Step 5: Design the Cabinet


We designed the arcade using Autodesk Inventor. Posted are screenshots of the 3D rendering we did as part of the original plans, not the final ones (see Step 7 for our modifications).
Some of our design goals:
This arcade was never meant to be a prop from "Honey I Shrunk the Kids." With full sized controls and buttons, we weren't interested in keeping things to scale. With full-size controls, the design seemed to look better as we exaggerated its curves and angles.
Consistent with this, we decided to keep materials bulky and heavy looking, using 3/4" thick MDF for many of the outer materials, and 1/4" pressboard for internal panels. The physical weight also would keep the arcade rock solid and in place during play. We were not at all interested in it being light weight.
We also wanted to keep the number of buttons on the front to a bare minimum. Unlike most MAME arcades we've seen, we designed the cabinet so that the select and exit buttons would be on the back. This encourages people to play the game displayed rather than switch every 30 seconds. Arcades of the 80's were about getting the high score, and nobody is ever going to try to beat the high score if the game gets switched all the time.
The power switch and volume controls were also located on the back for aesthetic reasons. Other relatively unique features we added included a headphone jack (for silent game play) and two USB ports (for a keyboard and mouse should a need arise to reconfigure the Pi).
Since it would be sitting on a bartop, we also wanted it to look good from the back. So instead of putting a door there, we decided to make it accessible from the bottom only. From the bottom, every component to the arcade can be accessed, repaired or replaced should a problem arise. Even the monitor/bezel and the front glass can be removed.
Step 6: Build a Model

With our plans and vision in mind, it was time to make like Richard Dryfuss in "Close Encounters of the Third Kind" and build a model of our mini arcade. Our mashed potato version didn't hold up so well. So the next time we used foam board.
Step 7: Tweak the Design

Our arcade model accomplished exactly what we wanted. Seeing it in front of us to scale (instead of visualizing it with our 3D model on the computer) convinced us that the whole thing needed to be 3/4" wider to give a little more room for our hands. So all of the rectangular pieces (i.e the back panel, the bottom, the top, the bezel, etc.) went from being 7" originally to 7 3/4". In addition, we reduced the angle of the control panel to make it more comfortable and to further tweak the line of sight to the screen.
Pictured is the a screenshot for the revised profile view of the arcade.
I have attached the side plans in two formats. You can open the "Side Plans.dwg" in AutoCAD or Autodesk Inventor. It gives you the measurements you will need to cut the materials. Alternatively, you can print the "Side Plans.pdf" file (it is several pages long), line the pages up, and use it as a pattern. I have not included drawings for the rectangular pieces, as they are all exactly the same width 7 3/4".
Finally, note that although the plans call for you to cut a 1/4" piece of hardboard where the LCD screen will go, that board will not be used in the final arcade (we made it just to help line things up). Instead, it will be completely replaced with an identically sized "LCD & matte sandwich" (the monitor and bezel assembly) described in Step 18.
Attachments


Step 8: Cut the Side Panels

Designing the arcade in Autodesk Inventor simplified the next step. My son programmed and used a CNC router at his high school shop to cut the side panels out of 3/4" MDF coated with black melamine. If you don't have a CNC available, you could use a jigsaw with a fine toothed blade.
Step 9: Slot the Side Panels and Paint


Back home, I used a 1/16" slot cutting router bit along the edges of the panels. We sanded, spray primed and spray painted one side of each panel blue, leaving the inside of each panel black.
After that, we ordered a pizza and charged it to the Underhills.
Step 10: Add T-Moulding


We kept the T-Moulding centered in the slot, using the force, sort of like Luke Skywalker did just before he blew up The Death Star. No lightsabers were used, but we did find a small red flashlight was helpful.
Step 11: Make a Box for Speaker Controls and USB Ports


The odds of you using the same set of speakers we did are slim to none, but I thought I'd tell you about this step anyway. When we removed the plastic case off of the speakers, we found the electronic board had absolutely no flat edges, no mounting holes and no places to grip. What's going to hold that thing in place?
Problem solved, "MacGyver" style. We made a plate to match the speaker controls and headphone jack out of a scrap. We formed two rectangular holes using a rotary tool, sandpaper and an emory board. We searched the house looking for a box to house and hold everything in place. With a little trimming, the bottom of a shoe polish container was a perfect match. Using a rubber-insulated metal strip found at a scrap store, the pieces clamp tightly together on either side of the arcade.
If you purchased two USB Panel Mount cables like we did, now is also a good time to cut the rectangular openings and drill the holes needed to mount them on the plate.
As we MacGyvered our way out of this mess, we started to grow matching mullets.
Step 12: Cut Rectangular Panels

Just as it was time to cut the square side panels, my dad gave me his old table saw. I cleaned up the saw, changed the blade to a finishing blade to avoid chipping the melamine coating, and got it cutting the nice, clean, square cuts required for these side pieces. As mentioned in the previous step, the 1/4" hardboard pieced pictured in the lower left-hand corner is not used in the final arcade, instead, it is just used temporarily in the assembly process in place of the LCD & matte.
Step 13: Drill and Route for Buttons


We masked off the panels that required holes and marked their location. We drilled 1 1/8" inch holes for the standard buttons, and 1" holes for the coin button and power switch. We used a router to recess the coin button and to cut out the holes for the speaker controls and the main power switch.
Step 14: Speaker Board


Sure, Marty McFly would not been impressed with the size of our speakers, but we still wanted them to look good. I learned a new technique with the router (new to me, anyway) in order to cut slots for the panel. We taped two edges off with electrical tape to keep out any stray light from the adjacent light box.
Step 15: Lighted Marquee


For the lighted marquee, we kept it simple. We used an inexpensive USB powered LED book light and held it in place with a hole and zip tie. The top of the glass panel stays in place in a slot under the T-Moulding, the bottom holds in place using a piece of plastic window channelling (found at a home improvement store) and a small piece of wood (found in a hobby store). The marquee can be accessed after the arcade is fully assembled.
Step 16: Control Panel Artwork


My son is great with Photoshop. He found the elements we needed and made this custom, Donkey-Kong themed control panel decal to match the exact layout of our controls.
I printed the decal on a full sheet of label paper, then laminated it to protect it from wear. After the extra laminate is trimmed, the back side still peels off to reveal the sticky side of the label.
Step 17: Assemble Cabinet


With all of the prep, it was finally time to start assembling the cabinet. With the help of some scrap pressboard and clamps, I lined up all of the parts and marked the location where we would use a biscuit joiner. We glued and clamped the pieces in place. While the glue was drying, we made like Ferris Bueller and took the day off.
Step 18: Monitor Bezel


Even though the bezel around the monitor is in a dark box, you are looking right at it. We wanted a cost effective way to make it look clean and flawless.
So we took our dimensions and the LCD monitor to the cute little old lady at our local framing shop. She cut us pieces of black matte and board that fit together in three layers, with the LCD in the middle. Then we took it home, cut it to length and made a slot for the ribbon that connects the LCD to its board. We glued our "matte and LCD sandwich" together with thin layers of wood glue. "Hold the mayo, please."
As shown in the plans, the top and bottom edges of monitor bezel slide tightly behind other parts to the arcade when installed. In the photos, you are seeing that extra length to the bezel which is hidden from view later.
Now you can toss aside the temporary 1/4" hardboard you made to help line up the LCD.
Step 19: Marquee and Side Artwork


With the help of Photoshop, my son adjusted and sized the rest of the artwork. We printed the arcade window frame and side art on full-sheet label paper.
After that, we stood on one leg with our arms stretched to the side and practiced our crane technique.
Step 20: Wire the Cabinet


This was a good opportunity to teach my son that there are safety concerns whenever you are working with electricity, not just for for yourself but also for others (You certainly do not want something you build to potentially start a fire).
Here, we cut the plug off of a surge-protector/power strip and wired it to connect to a three pin power socket outlet (which has its own own switch and fuse) on the back of the arcade. To avoid shock from the 1.21 gigawatts of electricity required to power our time-machine, we disconnected the power strip from the outlet and distanced ourselves from bolts of lightening. We used a voltmeter to check the continuity of every connection and made sure every wire was firmly secured. We tested it, then unplugged it again, before starting the rest of our wiring.
Wiring everything else up was a snap. It is not as difficult as it might appear from the photo. Since we had everything tested and running on a project board and we had color coded all of our wires, it was just a matter of moving things from the project board into the arcade. Along the way, we shortened some of the wires to more manageable lengths, offsetting our splices along pairs of wires to further reduce any possibility of a "Short Circuit" (I know, groan....). Each connection was also wrapped in heat shrink.
Step 21: Removable Bottom Panel


We added a wood backstop for our removable panel, again using the tiny wood strips we found at the hobby store. We had some leftover cabinet magnets to hold the panel in place. We added two recessed cabinet pulls, the only subtle clue that the arcade can be opened.
Step 22: Need Any Adjustments?

This bartop arcade does not need a keyboard and mouse to do any of the things we are going to be doing regularly. We can power it on, power it off, navigate through the list of games, select the game we want, exit any game we want to quit, adjust or turn off the volume, and, of course, play any of the nearly 100 games we have loaded on it (how many you have is up to you)... all without a joystick or mouse. Want to add more games? Again, forget about even connecting the keyboard and mouse; we just go to a desktop or laptop and use WiFi to upload new games to the Pi.
But, just in case we need to make an adjustment to the Raspberry Pi, it has two USB ports in the back to plug in a mouse and keyboard if we need it.
Step 23: Play


Finally, similar to Gary and Wyatt on "Weird Science," sitting side by side, we turned the power on and stared at the screen with anticipation of what would happen next.... "She's Alive!"
So now you know how over this last year we planned, designed, customized, prototyped, redesigned and built our Donkey Kong themed mini-bartop arcade. If you love it, build one - the experience was great! And if you are so inclined, we really would appreciate your votes, favorites and comments.

First Prize in the
Let's Party! Challenge

Participated in the
Wood Contest

Participated in the
3D Design Contest


