

Introduction: Drill Small, Precise Holes.


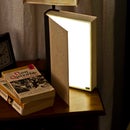

This Instructable well help you drill a line or grid of holes with 1/400th of an inch (0.06mm) tolerances. Or so. The holes in this photo are 1/32" (0.8mm) across and 3/64" (1.2mm) apart, but the same technique can be used to drill even smaller or closer holes. And you can go bigger too, the same method will use to drill a grid of holes of just about any size.
It's not super difficult, but it does take the right equipment, attention to detail, and practice. I probably drilled 30-40 holes before I got the technique down well enough to get even spacing most of the time.
It's worth noting that this works best on soft material like plastic and wood. Harder materials like steel are a bit tricky since I don't center punch the holes which can cause the drill bit will to wander a bit.
Thanks to my brother Nick for giving me the nudge in the right direction to figure this one out.
Step 1: Tools

- Small drill press. The one shown is an adapter for a Dremel rotary tool (Dremel #212), plus a small keyless drill chuck for the same. (You can possibly use a full sized drill press, but I'm not sure you'll get as much accuracy, and getting a #71 bit to fit in a full sized drill chuck is a pain.
- Small drill bit. Or several of them, since they're so easy to break. If you're drilling soft materials don't spend a lot of money on them. This is the cheapo set I used.*
- Right angle jig. If you don't have one I'll explain how to make a quickie out of old scrap wood (like this one) in step 2.
- Business cards or notecards. Anything is fine as long as they're uniform thickness. This is what we will use to determine the space between the holes.
- Rubber bands I use a number of them to hold stuff in place. If you have some small clamps or vice grips or whatnot, those would be useful as well.
- Safety glasses (not pictured because they were on my face when I took the photo).
- Practice Material. Scrap wood or plastic or whatever so you can practice before going at your final project. Trust me, you won't want to drill your final project the first time out. You'll probably also want something disposable to put under your material as you drill through it.
* Often drill bits smaller than 1/16" are called "wire gauge" bits. This term can be helpful when shopping for them online.
Step 2: The Jig


We need something to hold our drilling target and our spacers securely in two directions. It's not hard to build with some scrap wood and a couple of bolts. You could even use an old picture frame.
To build a quick and dirty jig:
Supplies:
- Scrap wood
- Wood glue
- 2 carriage bolts, washers and wing nuts. Get the appropriate size to fit though the holes of your drill press base. In my case 3/8" by 2" long.
- Saw
- Miter box, or protractor or some other way of determining 45o.
- Drill.
- Clamps.
Second flip one of the pieces over and put them together. This should make a 90o angle. If it does, glue and clamp them securely. If not, try again.
Finally after the glue is dry, drill appropriately sized holes through the jig so the bolts will be able to fasten it securely to the drill press table. (3/8" holes in my case.)
Got all that? Good, lets go!
Step 3: Prepare the Drill Press


First make sure everything is clean. Yes, that's far from easy in most workshops, but at least make sure there's no dust, sawdust, grit or other stray particles around the immediate vicinity. Getting a piece of sawdust in the works is really all it takes to throw off the alignment.
This goes for the drill chuck too. I needed to blow a bunch of air through it to get it clean. The first time I tried to use it there was a bit of grit inside that kept the drill bit from centering correctly.
Attach the jig. This should be pretty self explanatory. Make sure it's secure.
Check the Stability of the drill. Or Dremel in this case. Give it a little push left and right, backward and forward. Ideally it shouldn't wiggle or move at all. But it probably will. You might have adjustment screws that can be turned to reduce the wiggle somewhat, so try that first. In my case I still had a about 1/2mm of wiggle remaining, so I secured it by wrapping a rubber band around the body and putting both ends around the top of the depth stop. This got rid of the small wiggle, and since both the drill and the depth stop move at the same time it doesn't get in the way of any of the mechanics of the drill press.
Insert the drill bit. With very very fine drill bits it can be a bit tricky to get them perfectly centered. First close the chuck all the way. This makes sure the gripping jaws are centered and clear of debris. Open the bit very slowly while trying to insert the bit. When the bit slips in stop, adjust the location of the bit so the shaft is deeply in the chuck but the bit groves are all visible, and tighten. This will help clamp the bit securely and directly in the center rather than off to one side.
To make sure it's centered, put on your safety glasses and give the bit a good look while while turning the drill on. The bit should appear exactly the same width when spinning as still. If it looks wider at the bottom or really blurry in general it's off center, which will give you inaccurate holes and will break bits. (See illustration below.) Take it out and start over.
Step 4: Drill the First Hole


1) Adjust the location of your fence and drill for the first hole. All subsequent holes will be closer to the fence (see illustration) so plan accordingly.
2) Fasten the drilling material securely. If you are drilling through the material be sure to have something under it that's safe to drill into. I couldn't figure out how to get any of my clamps where I needed them for this project, so I used a bunch more rubber bands to both keep the box securely against the jig, but also to keep it from lifting during drilling.
3) Once you've got everything ready, drill your first hole.
Easy! Next comes the tricky part...
Step 5: Drilling a Line or Grid


This is where we really get down to business and find out if all of our careful planning and dust avoidance has payed off. Speaking of dust avoidance...
1) Remove any dust or drill shavings from the area.
2) Figure out how many cards you need to space your holes (center to center). For my example 3 of my business cards gives me 3/64" (1.2mm) distance.
3) Count out that many cards and put them between the jig and the drilling subject.
4) Drill your next hole.
5) Clean up your drill shavings.
6) Repeat steps 3,4 and 5 by adding layers of cards and drilling until you have as many in your row as you need. Be sure not to miscount the cards. (I did this more than once during practice and it will throw off your spacing and can cause spontaneous face palm.)
If you're just doing a line, then you're done!
If you want a grid, you need to make another line, offset from the first. Repeat the steps above, but also put cards at right angles to the first set. This will offset your material in two directions.
For advanced users you can draw a pattern using different numbers of cards and drill bit sizes. Like this amazing project, only smaller.
To do this at a larger scale size everything up and use sheets of plywood or square doweling as spacers. It makes the whole thing easier since you don't have to worry about sawdust or your drill press moving fractions of a millimeter.
Anything unclear? Ask in the comments and I'll try to help.


