

Introduction: Driving Motor With Android Using Arduino and Bluetooth


Hey friends!! This is my first instructable ever and today I'm going to show you how to drive 2 motors with android using arduino and a cheap Bluetooth module. This project can be very helpful to you to build robots which can be controlled by android. This also requires programming skills for arduino as well as for MIT app inventor. The MIT app inventor is a very useful software which help you to make apps for android. If you are a beginner in app inventor follow the video.
Motors are very essential for movements in robots so a motor cannot be drove by arduino as it doesn't supply sufficient voltage to it so here we will use a simple motor driver IC called 'L293D'. This is the cheapest motor driver as it is only an IC. It can drive only 2 motors at a time and it supply external voltage to motors upto 36 volts and if supplied more than that the IC will overheat and destroyed obviously while the internal voltage is 5v from arduino. Robots controlled with a wire can be messy so here we will use a Bluetooth module(I've used HC-05 but u can use HC-06). It has 4 active pins VCC, GND, RX and TX.So this RX is a receiver pin which is connected to TX pin of Arduino and the TX is a transceiver pin which is connected to RX pin of arduino and remember to only supply 3.3v of arduino to the Bluetooth.
Step 1: Requirements

Now you must have the following things : -
1. Arduino UNO R3
2. Bluetooth Module (HC-05 or HC-06)
3. Motor driver (IC L293D)
4. 2 DC motor (take out from toys)
5. Android Phone (any)
6. Breadboard
7. Jumper Wires
8. 9V Battery
Step 2: Circuit Connection (UPDATED)
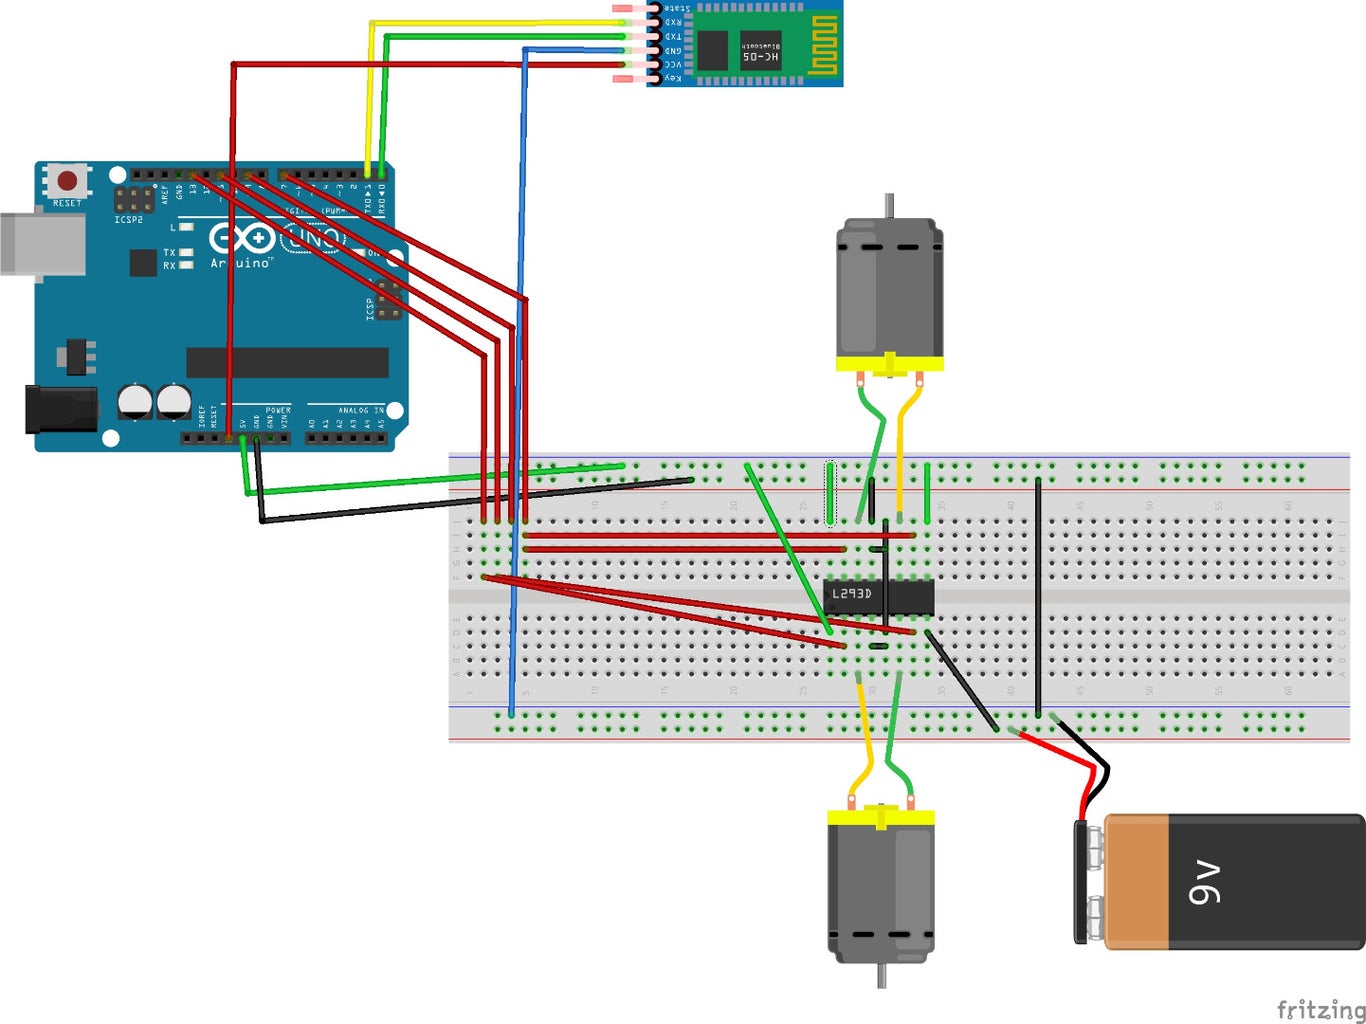
Now here is the hardware setup
Just follow the Schematic above and remember that the RX of bluetooth module will be connected with the TX of Arduino and the TX of bluetooth module will be connected with the RX of Arduino.This is the common mistake made by most of people and they blame us.
THE CONNECTION IS FIXED.
Step 3: Arduino Programming (UPDATED)

Download the following file and upload it to Arduino.
https://www.dropbox.com/s/eup60v05mnd40ll/Bluetoot...
PROGRAM IS ALSO FIXED.
Step 4: Android App Programming (UPDATED)
Now you have to make an app so that you can send command to your Arduino so here we will use MIT app inventor. If you don't have the AI companion download it in your android by going in this link.
https://play.google.com/store/apps/details?id=edu....
go to the following link, sign in with your gmail account and follow the video.
http://ai2.appinventor.mit.edu/
after you finished programming go to connect and select 'AI companion'.
Then type the code generated and type it into the AI companion in your Android or simply scan the QR code.
If you are finding difficult or very complicated to make the app the download my app from the following link.
https://www.dropbox.com/s/vhlim7ea0mty584/bluetooth.apk?dl=0
Step 5: Precautions

Ok since you have done with your connections and with your app. You must take some precautions revised.
1. do not connect the RX and TX before uploading the program to the arduino or else you will get an error
2. make sure that you have connected TX and the RX of the bluetooth module with RX and the TX of the Arduino i.e RX=TX &TX=RX.
3. give 3.3v to bluetooth module and 5v to motor driver and 9v-36v(battery) to motor driver as shown in schmatic.
4. check that the commands in the program of arduino and in the program of app are same i.e. Left = Left, Left ╪ left or else the arduino will not recognize the command its looking for and it will do nothing of course.
5. And simply check that the connections are into there correct pins
6. Before starting the app please make sure that your bluetooth module is paired with your device and your bluetooth is on.
7. If you found any problem with the project then just comment below and i will fix it.
You are good to go and have fun with robotics !!!!
If you want more tutorials and projects from me request below !!!!!!

Participated in the
Soldering Challenge

Participated in the
Metal Contest


