

Introduction: ESP8266 Network LED


I have always been fascinated by colorful lights. I have Philips Hue at home but that is expensive and I took it on self to build my own colorful lights controlled via Phone or computer.
I had been able to make on Bluetooth controlled LED strip to begin with but Bluetooth has its limitations so WiFi would be the way to go. ESP8266 made it pretty easy to build or so it seems while looking at the various posts or videos on the internet. This Instructable is a step forward to making it.
Step 1: Components.

We are going to use our ESP8266-01 board that we hooked up with an adapter some days back. The details of that are available here.
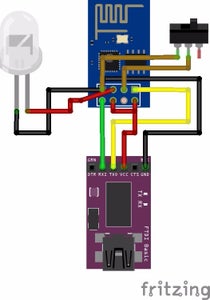
Apart from that you will need USB to serial converter, some jumper wires, a breadboard if you may or you can use male - female jumper wires to connect directly to LED and USB serial (FTDI) converter.
And an LED of course. I like the Blue ones.
Step 2: How To?

Open up Arduino IDE. I have version 1.6.7. I had to add custom board for ESP. This can be managed easily by going through the preferences menu option in File menu.
Custom board URL for ESP http://arduino.esp8266.com/package_esp8266com_inde...
Wire up the LED as shown in the diagram.
One point to note over here is how to get ESP8266 in to programmable mode. (We struggled a lot for this one.)
To get ESP board into programmable mode we need to connect the GPIO ) pin to ground and then remove power and reconnect power. At times it worked without switching the power off and on but we were not sure when it worked so we always made sure to toggle the power when ever we connected / disconnected GPIO 0 to ground.
Once you get the board in programmable mode the blue indicator LED flashes momentarily.
Load the Example from Arduino IDE > File > Examples > ESP8266webserver > HelloServer
We edited the following code lines to switch on the led and switch it off on basis of the URL. We would also need to change the SSID and Password for our WiFi.
server.on("/inline", [](){
server.send(200, "text/plain", "this works as well"); });
server.on("/on", [](){
digitalWrite(2, HIGH); server.send(200, "text/plain", "this works as well"); });
server.on("/on", [](){
digitalWrite(2, LOW); server.send(200, "text/plain", "this works as well"); });
So instead of /inline when we call the ESP IP/on it lights up the LED and /off switches it off.
The demo can be seen in the Video. All this has been just a step forward to have LED strips controlled over WiFi. More on that soon.


