

Introduction: ET: the Extra Terrestrial


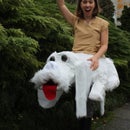


Throwback your costume to the 80s with E.T. The Extra Terrestrial! This costume was actually a fairly easy build and turned out solid!
Supplies:
-White Basket
-Chicken Wire
-1 lb. Super Sculpey Living Doll in Brown (had to buy it on Ebay, seems to be discontinued in Brown!)
-2 oz. Sculpey III in White
-Acrylic Paint in blue, black, and yellow (I bought the $1 kind at Joanne's fabric)
-Epoxy Glue
-White blanket
-Bike handle bars
-Duct tape
-Wire cutters
-Electric Drill and small bit (or an awl)
-Bike light
-Two belts and suspenders
And complete the costume with a red hoodie and jeans!
Step 1: Build E.T.'s Face


1. I started by drawing a rough sketch of what I wanted E.T.'s face to look like on some paper. This helped me as I started to layer the Sculpey Living Doll clay.
2. The Sculpey can take a couple minutes to warm up in your hand but then it is pretty pliable. It's pretty easy to start molding it and smoothing it on to the other pieces.
3. Use aluminum foil behind the face to add depth to the face. I put some under the eyebrows and the nose and mouth area. You can bake the Sculpey with the aluminum foil still in the clay.
4.When I had the flat shape basically done, I laid the face onto a (oven-safe) bowl to build the chin, side of face, and the top of the forehead down.
5. Build up the eye brows and eye-sockets with clay. Use a toothpick, or whatever you have around, to create the wrinkles around the eyes, eyebrows, and mouth.
6. Follow the instructions on the package and bake the face.
7. I made the nose separately and baked it, then glued it onto the face when I was done. I used epoxy glue to make the bond.
Step 2: Create E.T.'s Eyes


1. Use the white Sculpey to form E.T.'s eyes. Press them into E.T.'s eye sockets from the back. Sculpey is pretty great and won't shrink when you bake it so you can get a tight fit in the sockets.
2. Once you have a shape that you like, bake them and let cool. Be careful not to bake too long. I burnt the eyes a little!
3. Once they are cool, draw the iris and pupils with pencil.
4. I just used cheap acrylic paint. Paint a light yellow ring around the pupil. Paint the iris blue. I found it made for a more realistic eye using a couple shades of blue. Finally paint the pupils black.
5. Once the eyes have dried, stick them in the eye sockets. You can glue them in with epoxy or just use a little duct tape (I went the easy route and just taped them in!)
Step 3: Create E.T.'s Body


1. Create E.T.'s body with chicken wire. I recommend wire with wider spaces between the wires instead of the chicken wire that is more like mesh. Use wire cutters to shape the wire into the E.T.'s body shape. Thankfully, E.T.'s body is pretty simple. Just make it a little narrower at the neck.
2. Use a fairly small drill bit and drill several holes in the top of E.T.'s head. The drill bit should be just a little wider than the wire used to create his body. I drilled holes on the side of the head and on the chin but didn't end up using them but they might help you!
3. Situate E.T.'s head on the body. You may need to cut some of the wires and bend them so that you can stick them through the holes you've made in E.T.'s head.
4. Once I got the head situated how I wanted, I used some duct tape to secure the face on the wire.
Step 4: Finishing Touches!


The hard part is over! Now it's time to add the finishing touches!
1. Take some old bike handlebars (try ebay or amazon) and duct tape them to the back of the basket.
2. Wrap E.T. in a white blanket. I found a nice blanket at Goodwill in the baby section. I supplemented the blanket with some really cheap white fabric from JoAnne Fabrics just to make sure you can't see any the wire underneath.
3. Add E.T.'s beating heart! I had grand plans to create my own LED beating heart but I ran out of time! So, I just used a bike light and it worked great! Just find one that pulses at a heart like rate or just let it stay on a constant light. It's not necessary to have the heart but it makes a nice touch!
4. Thankfully the prop is very light so it's pretty easy to rig up a harness so E.T. can just hang out with you all night. I used two belts, one I threaded through my jeans and the back of the basket. The other I threaded through the basket and then around my waist. I also connected suspenders from the bottom of the basket to the back of my jeans.
5. Last step, zip up a red hoodie over the belts and suspenders and there you have it! Elliot and E.T.!
Hope you enjoy!

Participated in the
Halloween Costume Contest 2015

Participated in the
Make It Glow! Contest


