

Introduction: Every Thing You Need to Know for Building a DRONE With FPV


So... building a drone can be both easy and hard, bothe very expensive or legitimate, it is a journey you enter and evolve on the way...
I'm going to teach you what will you need, I'm not going to cover everything there is on the market but only those things I know about or used my self.
Mainly, there are two ways of flying a drone (there are more but I'm going to cover those two) :
- Flying Line of sight
- Flying FPV (First Person View)
choosing which way is going to affect the parts you choose and need and also the costs.
* A drone built for FPV can also be flown Line of Sight but not the other way around.
When buying a drone there are these categories :
-RTF - Ready to Fly - means that there are no additional parts needed, everything is included and ready to be flown
-BNF - Bind and Fly - means that there is no RC transmitter in the package and you should have one and once you have it you should bind the two together and only then will be ready to fly.
-ARF- Almost Ready to Fly - means the drone comes in its DIY version, usually, it does not include an RC Transmitter and everything else comes disassembled and ready for you to build, solder, screw on, assemble bind and fly...
Supplies
-Frame
-Flight Controller
-ESCs
-Motors
-RC Transmitter
-Receiver
-VTX (Video Transmitter)
-Camera
-Goggles
-Antena
-Props (Propellors)
-LiPo Bat
Step 1: FPV or Not ?


In my opinion, definitely FPV, but that doesn't mean you should skip on line of sight since it is a well needed and good practice which will also help you FPVing...
But wait, which is what ?
FPV means that there is a small camera and a video transmitter (VTX) installed on the drone and you fly it through goggles seeing a bird view or more exact first person view of the drone.
Line of Sight flying means that you look at the drone and control from sight, in my opinion, it is harder to fly like that, but it is important to learn how.
besides, flying in FPV is a different experience, you forget you are on the ground and becomes the drone.
sometimes you fly by yourself and fills somewhat of an out of body experience...
However, flying in FPV is more expensive, there are more parts and accessories to buy...
Step 2: FRAME


Frames come in lots of shapes, sizes and materials.
Tequnechly you cand build your own frame out of almost everything and it will fly, the internet is filled with drones built out of wood, cardboard, plastic, spoons, rulers, lego and lots of other stuff...
My first self built drone was made of wood, the problem with that is that it is very fragile, and it takes time and practice to learn how to control the drone. at first, you are probably going to crush a lot, especially if you are going to try and take those drone to their limits, since those self built drones can do lots of acrobatics and can reach high speed...
So after you have broken that wooden drone you might want to switch to something more rigid.
Then comes the plastic (like the F330 frame) drone, it is more rigid than the wooden but probably the same price of a chip carbon frame which takes it to another level...
The Carbone frames are divided by the length of the props, 2'', 3'', 5'' etc.
The most used ones are the 5'' and lately the 3'' and 2.5'', this is somewhat a thing of fashion but also driven by changes in the technology.
I ended up mostly using the QAV250 frame (5'') which is chip and can be easily found on EBay and Banggood however, recently i have decided on moving to a stronger carbon frame after braking the QAV250 to easily
Step 3: RC Transmitter


There are many things to know about the transmitter, there is a big difference between the chipper ones and the expensive ones... there are modules you can add for improved range, there are some that can talk back to you and warn you about stuff related to the drone, signal lost, for example, there is a different feel to the gimbles and their accuracy...
Now, I have only flown with the chipper ones, at first I have flown with an unknown transmitter - Then I bought a second hand RadioLink and now I mostly use the FlySky which is the most capable chip transmitter, however, im having a range issue with it and recently ordered the Jumper T16.
What you should know is that
- You must have at list 6 channels.
- There are different kinds of transmitters - Mode 1, Mode 2 etc., What the mode means is where the Throttle stick is on the transmitter, left or right, now you probably think you should have it on your dominant hand, well...maybe... but you should know that most of the drone pilots use mode 2 and if you chose something else might be discovered later as a difficulty, and unlearning something you got used to might be lot harder.
- Currently, the most used transmitter is the FrSky Taranis X9D but lately, it becoming a smarter choice to get the Jumper T16.
Also, there is a fight between those companies (FrSky and Jumper)
* Mode 2 has the throttle on the left stick along with yaw and pitch and roll on the right stick.
** Pay attention to which mode you are buying, changing a mode of the transmitter is difficult to impossible
Step 4: Receiver


The receiver is the part communicating with the transmitter and passing it to the flight controller.
A receiver will have at list 3 pins / connections, GND, Vcc, Signal.
In the past each channel would have been passed to the FC (flight controller) through its own line (parallel) but these days, with faster electronics and smarter protocol usually they are passed with one line (serial).
The receiver usually comes with the transmitter while buying new, not always while buying second hand.
Not all receivers can communicate with all transmitter, each company has developed its own communication protocol, sometimes more then one, so buying a receiver, you should check it matches the transmitter you have.
Note that the only transmitter I know of that can communicate with most (if not all) receivers is the Jumper T16 and the Jumper T8SG wich support multi-protocol.
Most receiver, nowadays, communicate with the FC (flight controller) through S-BUS protocol, there are many more such I-Bus and other, you should make sure the receiver you are buying is capable communicating with the FC (flight controller)
* Connecting the receiver (and every board you are going to connect), pay attention to the voltage rating it gets,
supplying it with too low voltage my cause working issues or not working at all, supplying it with too high voltage would fry it and ruin the board.
** Most receivers work with 5v
Step 5: FC - Flight Controller


A Flight Controller (FC) is the brain of the drone, it compact with sensors such as accelerometer and gyroscope.
It takes all the data from the sensor and the input it gets from the drone pilot through the transmitter and receiver and outputs the needed speed from each motor to the each ESC which turns the motor in the required speed.
Generally, the FC divided into generations, currently, we are at the 7th generation but still, most drones use 3rd and 4th.
Also, there is a difference in how many RX/TX (input/output) a flight controller has.
Why would you need that? well for connecting peripherals such as GPS, Receiver, VTX Smart audio, telemetry, etc.
Another difference is the way the FC process the data and filters out noise.
Most FCs today works with open-source software called BetaFlight however there are more such the Kiss and Ardupilot.
Here a list of the FCs I got to use, first the ones I don't recommend and then the ones I do:
Do not recommend :
Naze32 - A 1st generation FC, used to be a good FC and held up for many years but now is very limiting and does not let you evolve in the hobby.
OMNIBUS F4 - The omnibus is considered good FC but I had a bad experience with it having USB connection too easily snaping out.
HGLRC Flame - I had a bad experience with it, having pads snap out during flight.
RECOMMEND :
FlyWoo F405 - I am still using this one on numbers of my quads (drones), fly well and smooth.
DYS F4 ver2 - DYS considered a good brand in the hobby, I am using this FC still and enjoy it.
JHEMCU F7 AIO - The cheapest 7th generation, dual gyro, fly well.
Step 6: PDB - Power Distribution Board

The drone uses few levels of power, it uses the RAW battery voltage for the ESCs and Motors, it uses 5v for the Flight Controller (FC), some times it uses 3.3v for the camera...
Today most FC are combined with the Power Distribution Board (PDB) but not always, In this case you need a PDB to handle all the levels of power.
I only got to use the Matek PDB, but generally, you should have at list 4 high power connection for the ESCs, Few 5v connections for FC, Receiver, VTX (Video Transmitter), etc.
If your camera is 3.3v you will need a 3.3v connection for it tough sometimes it 5v and sometimes even more.
The PDB will also handle the connection to the battery, the standard today is XT60 connection.
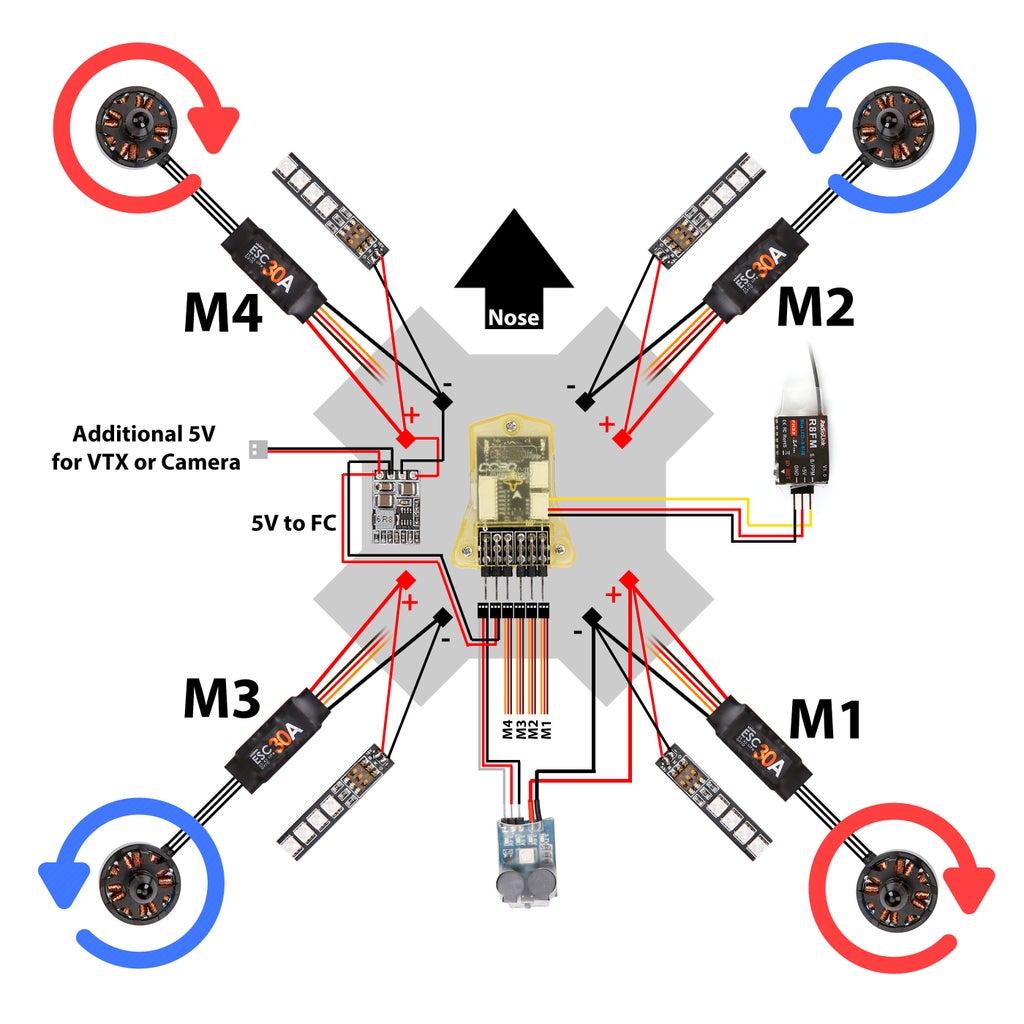
Step 7: ESCs - Electronic Speed Controller


As Brushless motors became better and smaller the drone industry has shifted toward it, but you can't just connect plus and minus and control it through the voltage as you can with a brushed motor, you need an ESC, electric speed controller to control its speed.
Tecnequly you need an ESC for each motor you have, usually 4.
Each ESC comes with 3 leads that connect to the motor, and VCC and GND that goes to RAW battery voltage eather on the PDB or on the FC and a data connection that goes on the corresponding motor connection on the FC (sometimes there is additional GND, you can add it to the main ground lead and solder them together.
You can also use get a 4 in one ESC board that can save you space (in a small drone for example) and hassle of many connections and wires, however, sometimes ESCs fail and need to be swap, in that case, you'd be needing to swap all four instead of one.
The ESCs a rated as such:
- Amps rating for how much ampers the ESC can handle.
Knowing how much you need is depending on the motors, quad size, and the battery you are using.
Usually, 30A is enough for a 5'' quad.
- Protocol - There are few ways an ESC can "talk" with the Flight Controller (FC), PWM, One-Shot, Multi-Shot, D-Shot
Most drones today use at list D-Shot600 (600 is the speed it uses) but both Flight Controller (FC) and the ESC should be capable of using the protocol you are choosing to use.
You should notice that the ESC come as BLHelli or BLHelli_s (the software flashed on it).
I am using the HAKRC 35A BLhelli32 and BLhelli_s 30A but there are many to choose from.
Step 8: Motors


The motors are marked with 4 digits number and a KV number.
KV is the how much turns the motor does per volt without load, so a higher KV will spin faster but have less torque and a lower KV will spin slower but will have more torque.
The other 4 digit number state the motor diameter and height of the winding inside.
Selecting the correct motor for your setup is sometimes trial and error, but generally a 5'' quad will use an 2300KV motor.
I didn't get to experiment much with motors, I am mainly using the Race Star 2205 2300KV
Step 9: Li Po Battery

Why Li-Po ?
Li-Po can extract high current to current hungry motors, however, Li-Pos can be dangerous and should be handled with care and retired with the first sign of malfunction or physical damage.
They should never be totally drained and should not be overcharged, they should never be left alone to charge or charge overnight.
You should never short the leads of a Li-Po Battery
In the scope of drones, we are using 1s / 2s / 3s / 4s / 5s or 6s batteries.
the number stands for how many li-po cells are in the battery, this effect the battery voltage and amperage capability.
You should notice your motors and ESCs cell stands rating and never supply more then it can stand because you will burn it.
Second is the Amps per Hour it can supply, most drone use 1300 or 1500 mah, take notice that going bigger is more weight.
Most drones today use 4s battery, however, there is a shift lately towards 6s batteries.
Step 10: Props - Propellers

The props are divided by the number of blades and the material they are made of.
There are many designs of props and it is more up to you to find the ones that are good for you.
I would suggest you start with a 3 or 4 bladed props since they are more stable and find your way from there.
Also, make sure the size is correct, each frame is built around a prop size so a 5'' quad frame will use a 5'' prop.
The number on the props state the size and pitch of the prop, 5043, for example, is 5'' with a pitch of 4 and 3 blades
Step 11: VTX - Video Transmitter


Here it might get complicated because there are all sort of features that can be added on the VTX (video transmitter), such as Smart Audio, that is out of the scope of this Instructable.
The VTX is connected to VCC (according to the V rating on it - usually 5V) and GND and to the VO (Video Out) on the Flight Controller (FC).
It takes the video generated from the camera, added the OSD (On Screen Display) from the FC and transmit it through the air to the goggles through which you see (Make sure the VTX and the goggles are on the same channel)
Starting with a good enough VTX is very important since you can manage with other stuff not begin the best but not seeing where you are flying is frustrating and problematic.
I tried lots of cheap no good VTX that got me to crush and stuck on trees...
Eventually, I got the Eachine 805 VTX wich turned out to be quite good and not too expansive.
You should take notice of the Antenna connector eather SMA or RP-SMA, The antenna you'd need is either one or the other.
Most use RP-SMA
Step 12: Camera


As the VTX the camera should be a decent one too since you want to see where you are flying.
There are all sort of cams, the micros, and splits not to mention the DJI HD system which is changing the whole hobby (however i'd wait a little more for a few more things to get solved before buying it).
Im mainly using the RunCam Eagle 2 Pro and having great time with it and also the Caddx Turbo Eos2 1200TVL
The Camera is connected to the VCC on FC or the PDB, but make sure it is connected to the right V rating, eather 5v or 3.3v or more, Ground is connected to GND.
Video is connected to the FC VI (Video IN).
Step 13: Lastly - Goggles


Up until recently, the goggles world was dominated by FatShark, however lately out some good competitors and of curse the DJI HD system.
The Goggles world is divided to :
-Box Goggles which is one screen in a big box.
-But most pilots prefer the two smaller screen, one for each eye.
As I said the world was dominated by FatShark HDOs, but lately the SkyZone 03O is better also the Aomway are good...
You should make sure the goggles have :
- DVR - it is important to record your flight at the goggles in case of a crush so you can find your drone.
- Diversity - is a two receivers method of using two kinds of antennas and selecting the better reception automatically.
*** The DJI HD system is changing the hobby big, but in my mind though very appealing is not yet complete, i'd wait a little bit more hanging on the analog systems and changing when it will be compatible with th hobby.

Participated in the
Make it Move


