

Introduction: Kids Gaming Table


kids gaming table australia
Step 1: Tools Needed

table saw
hand saw
square
level
marking gauge
ruler
tons of sand paper 60-280
pencil
router + 3 bits
jig saw
paint
paint brush
tounge oil
string
glue
dowel
screws for creg jig
Step 2: Cut List
1 x 19 x 2300 x 1200 mdf sheet cut to an oval
4 x 90 x 45 x 700 pine boards
4 x 8 x 8 x 700 red gum strips for inserts in pine board edging
2 x 32 x 19 x 1000 aussie hard wood cross supports
1 x 25 x 20 dowel center pin for cross supports
4 x 90 x 90 x 1000 red gum legs
Step 3: Legs


RED GUM SLAB X 2
clean 2 slabs of 380mm x 100mm x1600mm
from one slab cut 3 x 100mm x 100mm keeping the waist for inlays.
from the second slab cut 1 x 100 x 100
producing 4 roughly square 100mm x 100mm red gum legs
square all four legs using a hand plane or planer and jointer
sand your legs smooth taking extra care around each crack and missing timber.
mark top and bottom for each leg as well as in and out, out being the most aesthetically pleasing.
clean out all the black garbage from within the cracks,using a small chisel, screwdriver or anything you can get in to clear out all the muck. be care full not to chip away the edges of the good wood or leave tool marks on the edges while levering the muck out.
make a mortice for our pine side supports.
From the very top of the leg, 30mm wide 80mm long & 50mm deep on two sides of each leg.
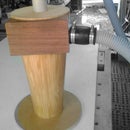
Step 4: Pine, Tennon Top Support With Redgum Inlay


I started with hard wood sides and changed to pine for esthetics, in hine site, hardwood would have been the better choice for over all looks. its all practice.
clearly mark all 4 boards: up and down and in and out
Tenons required at each end of pine boards @ 30mm wide x 80mm deep @ 50mm long
30 wide 80 deep @ 50 long
RED GUM INLAY
on the, OUT & DOWN edge of all four pine boards, using a router, remove 10mm deep and 10mm wide .
Take small passes with the router, large passes will chip at the soft pine.
RE-MADE 2 supports, was just a little too eager with my depth cutting.
RED GUM STRIPS
On the table saw cut, four strips of red gum at 15mm x 15mm x 700mm. if they have any knots or defects cut extra, they will snap during the cleaning stage.
take time to ensure two edges are perfectly straight.
glue into channel leaving it clamped tight over night.
take very fine passes with a plane and sand flat on both bottom and front edges.
correct any small defects with the correct color putty or a mixture of glue and fine sawdust.
NOTE:
sounds easy, take your time and you will not have to remake parts.
lessons learnt!
Step 5: Leg X Support Mortises

BOTTOM OF THE LEGS!
From the bottom, measure up and make a mortises on the corner of each leg.
Measure and mark 150mm up from the base of all four legs.
Measure and mark 169mm up from the base of all four legs.
Size of the hard wood cross supports are 32mm x 19mm
Using a square mark two sides of each leg at the above measurment, both will be facing in towards the center of the table.
Mortise size for the hard wood cross supports are 32mm wide x 19mm thick @ 50 mm deep
with a tennon saw, carefully cut between your two lines. with a small chisel chip out carefully until the mortise is the exact depth.
Watch the width carefully, the width required is from one side of the mortise to the other, NOT from the corner out!
NOTE
Ensure, before you mark and cut out these mortises, the best looking sides of the legs are facing out.
mark them clearly as in and out. don't want to cut a slot on the wrong side.
Step 6: Leg Cross Supports


A few lessons to learn here.
firstly, don't over complicate the job.
2nd, measure across the leg not in from the corner.
the first joint I tried was a V to match the corner of the leg with a small tennon in the center.
looked really impressive.
After a good night sleep, I wondered how much strength is really in that small tennon.
I cut the joint off. why cut material away from a joint when the entire width can be used to strengthen it.
A simple cross leg support keeping the base of the legs ridged, going to a footy club house and will take some horrid punishment.
cut 2 lengths of 32mm x 19mm hard wood @ 800mm
place one on top of each other, using a pair of squares one opposite the other make your cross.
with a sharp pencil outline the position of both boards for a cross halving joint
find the center width of the board. (9 1/2 mm)
remove 1/2 the thickness of each board at the intersection of the x.
when complete both boards will sit flush with each other.
(find the center of the joint)
place an X across the intersection of your cross halving joint & drill a 25 mm, 1" hole.
cut dowel to fit.
Note
DO NOT GLUE AT THIS STAGE.
glue when supports are inserted into mortises.
Step 7: Table Top

OVAL SHAPED TOP
find the center of the board, place a heavy dot or tap a small nail with a hammer.
draw a line across the width of the table, dividing it in two.
from the center of the board, measure 200mm towards the length in both directions and place a thumb tack in the table.
tie a length of sting to the tack, make the largest ark possible then shrink the ark by 20mm and attach a pencil.
KEEPING TENSION ON THE STRING, draw your ark.
repeat on the opposite end of the table.
From the widest point of your ark near the width of the table draw a straight line to the outer edge of the center board line, it will need to be sanded so the semi circle continues seamlessly to the outer edge of the center of the table.
carefully remove all waist with a jig saw, leaving the tiniest gap between the saw blade and the line.
clean up with a belt sander making everything smooth. using 150 sand paper, smooth all edges.
using a router with a round over bit
follow the table edge around twice, just to be sure you made no mistakes, I had several bumps I missed.
Step 8: Table Top Painting

Using sand paper no less than 180, go over the entire surfaces (top and bottom) of your top.
fill in any dints, dings or imperfections with putty. sand smooth.
Being MDF, an undercoat in vital.
Two thin coats of water based undercoat lightly sanding between coats.
Using rubber based textured paint is a little different to normal paint, it needs to be applied really thick.
Literally pour it on to the table form the pot. roll until it goes sticky, then keep going until its hard to remove the roller from the top watching as it pulls the paint up into pointy hills as you do.
One coat is enough if done correctly.
Step 9: Finishing Oil


Tung Oil was used to finish this job due to it's simplicity and ease of application
dip a lint free cloth in Tung oil and wipe on.
repeat until timber will not absorb any more oil.
follow manufactures instruction for coat applying.
Step 10: Secure Top to Base


FINALLY,
To attach the top to the base I used 5 creg screws each side
20 screws in total.
A creg jig is a tool that pre dirlls a hole into the side of timber with a slight angle leaving a nice buffer for the head of the screw to help pull the two timbers together
NO GLUE WAS USED ON THE TOP AS IT MUST BE DETACHED TO FIT THROUGHT ANY DOOR.
Over doing it, YES, that's just me.
Enjoy the build
Thanks for reading
Have a fantastic day
Step 11: CONVERSION TABLE Millimeters to Inches
Millimeters to inches
1.5 mm 1/16"
2 mm 1/12"
2.5 mm 3/32"
3 mm 1/8"
4 mm 1/6"
5 mm 3/16"
6 mm 1/4"
7 mm 9/32"
8 mm 5/16"
9 mm 3/8"
10 mm 3/8"
11 mm 7/16"
12 mm 1/2"
14 mm 9/16"
15 mm 3/5"
16 mm 5/8"
18 mm 3/4"
19 mm 3/4"
20 mm 3/4"
25 mm 1"
28 mm 1 1/8"
30 mm 1 1/6"
32 mm 1 1/4"
35 mm 1 3/8"
36 mm 1 3/8"
38 mm 1 1/2"
40 mm 1 3/5"
45 mm 1 3/4"
50 mm 2"
55 mm 2 1/8"
60 mm 2 3/8"
65 mm 2 1/2"
68 mm 2 2/3"
70 mm 2 3/4"
80 mm 3 1/6"
85 mm 3 1/3"
90 mm 3 1/2"
95 mm 3 3/4"
100 mm 4"
120 mm 4 3/4"
150 mm 6"
175 mm 6 7/8"
180 mm 7"
200 mm 7 7/8"
240 mm 9 1/2"
350 mm 13 3/4"
400 mm 15 3/4"
50 cm 19 2/3"
80 cm 31"
150 cm 59"
200 cm 79"
250 cm 98"
300 cm 118"
350 cm 138"
400 cm 157"

Participated in the
Woodworking Contest

Participated in the
Spring's Coming Contest


