

Introduction: Flexible GoPro Clamp Mount


Spring clamp mounts are very useful tools for capturing unique perspectives, all while keeping the camera steady. Their popularity has skyrocketed with the proliferation of action cameras such as GoPro, but officially licensed models are expensive and knockoff versions can be poor quality. Making your own clamp mount is easy, inexpensive and can be customized to meet your needs.
There are a lot of DIY camera clamp mounts on Instructables already, but none that addressed all of my needs so I made my own. I am meticulous about my designs function and looks. My feeling is that just because it's DIY doesn't mean it has to look like it! And it certainly shouldn't hinder your ability to get the proper angle or shot alignment.
This Instructable will demonstrate how to make a clamp mount that is fully adjustable on three axes, looks professional, and still costs under $10. I will also discuss the design decisions that need to be made when building a clamp mount.
If you like this Instructable, please consider voting for it in the Photography Contest!
Step 1: Define Requirements


Before you make any trips to the hardware store, you'll need to determine exactly what you need out of a clamp mount. Here's what my requirements looked like.
1. Clamp opening of at least 1.5"
This requirement allows it to be able to clamp to 2x lumber (i.e. 2x4, 2x8, etc) since the actual width of the two inch dimension is 1.5". I'll be clamping this mount to the ceiling joists in my basement workshop or various 2x4s for outside projects.
2. Clamp opening that is able to securely clamp around a cylinder
Cylindrical pipes are another common object I'll be clamping this mount to. The tricky thing about clamping to cylinders/pipes is that the clamp mount could inadvertently rotate if the clamping force isn't strong enough. So to meet the "securely" portion of this requirement, the clamping force has to be strong.
3. Sturdy 3 axis rotation of the camera mounting point
Since I'll be clamping this mount in odd locations such as ceiling joists or piping, I need to be able to rotate the orientation of the camera around 3 axes. Not only does it have to rotate about 3 axes, it has to be sturdy enough so when it's set in a position, it doesn't inadvertently move.
4. Standard camera mount (1/4" x 20)
The clamp has to hold a camera! This mounting system is the industry standard.
5. Appearance consideration
While not a critical requirement for performance, there were several design decisions that I made requiring more work on my part in an effort to make the clamp look refined. In other words, I wanted to make the clamp mount look like I bought it instead of built it.
Step 2: Choosing a Clamp

Depending on your local hardware store, there are probably three viable types of clamps to choose from and numerous options within each type. Essentially, you'll have to choose between:
- Molded plastic spring clamp
- Metal spring clamp
- Bar clamp
Each option had strengths and weaknesses. I traced each clamp's characteristics to my design requirements and ended up eliminating the metal spring and bar clamp options leaving me with the molded plastic clamp.
1. Clamp opening of at least 1.5"
All clamps met this requirement.
2. Clamp opening that is able to securely clamp around a cylinder
Molded plastic spring clamp appeared to be the only clamp that could reliably meet this requirement. The metal spring clamp had a smooth metal interface when clamped on a cylinder and while the rubber-like sleeves help, they can still slip and tear. The bar clamps I found didn't have a dedicated cylinder clamping surface which would hinder its ability to meet the requirement.
3. Sturdy 3 axis rotation of the camera mounting point
No clamp met this requirement, see Step 3
4. Standard camera mount (1/4"-20)
Again, no clamp met this requirement, see Step 5
5. Appearance consideration
I knew I'd be bolting an apparatus to the clamping jaws to meet requirement #3 and #4 and liked how the molded plastic clamp would be able to hide a nut that fastened the apparatus to the clamp for requirement #3. The metal spring clamp would have left the nut visible and even would have inhibited the size of the clamping mouth. The bar clamp didn't offer any clean way to bolt attachments to it.
The molded plastic spring clamp emerged as the best choice for my setup.
Step 3: Gooseneck

While researching how to best meet requirement #3 (sturdy 3 axis rotation of the camera mounting point) I came across the gooseneck system often found in desk lamps. This turned out to be the best option by far because it can be moved in any of the three axes, is sturdy and looks really clean. Another positive is that you can readily get a lamp gooseneck from a second-hand store for just a few bucks.
I found a small, black lamp with a gooseneck at a second-hand store and bought it. As an added bonus, it was black which matched my clamp.
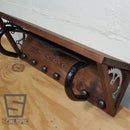
Step 4: Clamp Assembly


The spring clamp I used was injection molded with plastic and had several rib supports that prevented the nut from reaching the threads on the gooseneck so I had to take the clamp apart to be able to cut out the ribs. Once the rib was cut out, the nut fit perfectly inside the clamp and threaded onto the gooseneck. I had to precisely cut out the hole in the clamp for the gooseneck to fit inside because there wasn't much of a shoulder on the gooseneck to rest on the top of the clamp with the threads in the hole.
After the gooseneck was firmly attached to the clamp via the nut inside, I mixed up some epoxy and generously applied it to the outside of the nut. I took care not to get any epoxy inside the threads of the nut and gooseneck in case I wanted to remove it in the future.
The hardest part of the assembly was putting the clamp back together which involved pre-loading the spring and lining up the two holes for the axle bolt to slide through.
Step 5: Top Assembly


The top of the gooseneck presented a challenge to somehow turn 1/2"-20 threads down to 1/4"-20. I wasn't able to find any direct adapters that would screw onto the gooseneck and have a 1/4"-20 bolt on the other end so I had to get creative. The top of the gooseneck was hollow (to allow the lamp power cord to travel through) so I came up with the idea of permanently affixing the head of a 1/4"-20 bolt inside of the gooseneck with epoxy.
First, I friction fit a flat piece of cardboard inside the gooseneck opening and created a base layer of epoxy. Without this, the epoxy would have dripped all the way down the hallow gooseneck and reduced the flexibility.
Next, I ground down the head of the 1/4"-20 bolt, inserted it into the gooseneck and filled the rest of the cavity with epoxy. I did my best to line up the axis of the bolt to be parallel with the axis of the gooseneck threads. Then it was a waiting game until the epoxy cured.
The nut that came on the gooseneck was really thin and didn't cover all of the threads on the gooseneck so I replaced it with a longer nut that covered the threads. Originally this was just for ascetics, but then I realized I could use the face of the nut to friction fit a GoPro mount on to the 1/4"-20 bolt. To assist in creating a friction fit, I super glued a rubber washer to the face of the nut. The result enabled me to point the GoPro mount in any direction and then "lock" it in place with friction applied by the gooseneck nut.
Step 6: Completion


The last step was to mount a camera to it and take some pictures. Now I have a solid and versatile clamp mount and you can hardly tell it's DIY!
Tell me what you think and share your own clamp mount in the comments below.

Runner Up in the
Photography Contest 2017


