

Introduction: Fly Fishing Rod Organizer Made With CNC Router


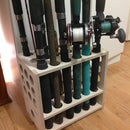

Here is another quick CNC project made from just a small piece of 1/2 plywood and a 1/2 inch dowel. This rack is used to organize fly rods that are stored in tubes or socks. The divider size can be adjusted with removable dowel inserts. The dowel insert is thick and strong enough to use as a handle, so the rack can be easily moved into/out of a closet.
Step 1: Materials and Equipment
Materials:
1/2 inch plywood (About 25x36 inches) - I used 12mm Baltic Birch
1/2 inch dowel (about 36 inches)
wood glue
Varnish or other finish (I didn't bother)
Equipment
CNC Router
1/4inch router bits (1 upcut, 1 downcut)
3/4 inch router bit(s) (optional, to speed up cutting out the larger holes)
sander
saw for cutting dowel inserts (I used a chop saw)
Laser cutter (optional - for cutting the stop rings for the dowels)
Step 2: Design

This design was optimized for the most common fly rod design- 9 foot, four piece. I also designed a slightly longer version for rods that break down into larger segments, such as spey rods. Since fly rods are relative fragile, it is a good idea for the rack not to be too much shorter than the rods.
The divider size needed to be adjustable to accommodate both rod tubes and sock, and to allow the organizing of the rods by user preference.
The rack had to be light and have some sort of handle to make it easily liftable, so that it would be practical to tuck multiple racks in a closet. I decided to make the divider/ insert function as a handle.
I drew the design directly up in the CAM program (Vcarve 6).
I have included a PDF for the design, but it will need to be adjusted to accommodate the exact thickness of the plywood selected. Since my shop has a laser printer, I cut the divider insert (dowel) rings out of MDF on the laser, but these could be added to the cut file for the CNC instead. If you want to go for something more fancy, you can cut caps instead of rings.
Attachments

Step 3: Cut and Assemble


Cut the large holes first with a larger bit if you have one. Then switch to the 1/4 downcut bit and make the rest of the cuts, leaving a small layer to finish with the upcut bit.
Sand the parts, and dry fit.
Now glue the rack together and clamp. I also used some brad nails to facilitate clamping.
Measure assembled rack for dowel insert length (don't forget to account for the cap/ring)
Cut dowels. For each section: round the edge on one side and glue the cap/ring on the other.
If desired, fill any tear-outs and brad holes and - apply finish to rack (I didn't bother) sand dowel holes as needed to get a snug fit.
Step 4: Test Drive
Rack turned out quite light and stable. It turns out that the side holes were large enough to accommodate aluminum rod tubes, so the rack could be mounted on a wall to store socks and tubes horizontally.


