

Introduction: Fortnite Drift Costume


This Halloween my 8 year old wanted to be Drift from the all too popular game Fortnite. I know you can buy the costume because I saw a few around town trick-or-treating, but I didn't know that/ couldn't find it when he asked for it back in July and I started making it. Most of the costume is bought and slightly altered but the mask is 100% hand made.
Step 1: Starting the Mask


The very first thing you should start on is making the base of the mask. The mask takes many steps with dry time in between so start it first. I followed the instructions in the video shared here that I found on Youtube. Make sure to use Vaseline liberally and cover the hair.
When you remove the mask from the person, sit it aside and allow it to dry for a day or two. It may help drying time if you try to wipe away some of the Vaseline that will be lining the inside of the mask, but wait to do so until the mask has had at least an hour to set.
Step 2: Flesh It Out


I apologize for the extreme lack of photos for this step. It is a messy process and time got away from me as I worked so I will do my best to explain it.
You are starting with a mask that is a perfect fit for the wearer. You now need it to look like Drift's mask.
1. Get some papermache pulp, I used the stuff pictured here from Hobby Lobby.
2. Follow the instructions for the mache to mix up a batch.
3. Using a photo from reference. Use the mache paste to add material to the mask to fill in and build up areas so they start to look more like Drift's. You will have to build up the nose and flatten it, build up the forehead a little, add a squared jutting chin, and try to get those blasted cheek bones right. **be very careful to NOT fill in the nostrils, you need to breathe! I rolled up some paper and shoved it in the nostrils where it stuck out enough to be able to remove it later. That kept the nostrils open**
4. Let it start to dry.
The Ears
1. Use some tin foil to shape the basic triangular form of the ears. Try to make both as close in size and shape as possible.
2. Cover the tin foil base in the mache paste and shape to get the form of the ears.
Stick 2 tooth picks in the bottom of the ear (where it will meet the head), one tooth pick near each edge. Leave the tooth picks with half in and half sticking out.
3. Let the ears dry so the tooth picks have a good hold.
ATTACH
1. Take the ears and align them on the head. Press the tooth picks into the mask until the ears sit flush or as close to as it can.
2. Use more mache paste to cover the crack where the ear meets the head and build up around it to make a smooth transition.
3. Let the entire mask fully dry.
CLEAN IT UP
1. Carefully cut out the eye holes. Use a sharp blade. Clean up any messy edges by adding a little mache paste.
2. Use sandpaper and/or a rotary/dremel tool to smooth out the surface of the mask. Add some mache paste as needed to fill in divots and small holes.
3. You may also want to put a thin layer of mache paste on the inside of the mask. Mine was a little rough and stringy from the plaster strips and Kaiden said was uncomfortable to wear.
4. When it completely dry, paint the mask with a Gesso to prime it. I painted 2 layers.
5. When dry, spray paint the mask white.
DRAW the DESIGN
1. Using a photo for reference, sketch on the mask with pencil the lines for the design elements and the eyes.
*tip: I drew the design on one half of the face making sure to use a good amount of lead from the pencil (use a normal pencil, not mechanical). Then lay a piece of paper over it and rub slightly to transfer the lead or trace the lines on the paper. Then use the paper to duplicated the design on the other half of the face. You can cut out the design and use it as a stencil to draw the the rest. This helps make it more even and mirror image.
Step 3: Paint and Add a Strap


Now the fun part, paint it. Again use a reference photo and paint in the pink, gold, and black.
STRAPS
I followed the video posted here that I found on Youtube. I just didn't add the 3rd strap that goes vertical.
Basically make the strap with duck tape and cotton, then add some velcro to be able to adhere the straps together. *I used hot glue to put on the velcro because the glue on the self adhering velcro wasn't strong enough.
To attach it to the mask, I hot glued the strap first and then used duck tape over it to make sure it stayed.
Step 4: The Clothes


I bought the hooded vest from Wish here: https://www.wish.com/product/5694cd8528bad20ea82fa...
and the pants here: https://www.amazon.com/gp/product/B07B416D96/ref=o...
and the shirt here: https://www.amazon.com/gp/product/B01MRR4E0W/ref=o...
and gloves here: https://www.amazon.com/gp/product/B01B17IJT4/ref=o...
and the shoes at Walmart in store
Unfortunately, when I bought the long sleeved shirt, it came in white and charcoal grey, not black. SO I had to paint the shirt black in places.... maybe that was for the best since I'm not sure how well the colors would have shown up on a black shirt.
To paint the shirt:
1. Put cardboard inside the shirt to separate the front from the back so the paint doesn't seep through.
2. Use masking or painters tape to cover the areas of the shirt that are not black.
3. Buy some black fabric spray paint and paint the areas that should be black. *Be careful of over spray, use scrap card board to cover the areas you don't want to paint that isn't covered by tape. You can see in the photos that I learned that the hard way*
4. Remove the tape when the paint has dried.
5. Tape the shirt again to cover all areas that aren't gold.
6. Use gold fabric spray paint to paint the gold areas.
7. Remove tape when it has dried.
8. I used a brush and a bottle of red fabric paint to paint the red strips on the arms and the triangle. You can use spray paint as before, but that stuff is ridiculously expensive.
9. I did the same for the gray on the neck and used silver to paint on a zipper.
10. Since I wasn't careful enough with over spray, I had gold and black in the white areas so I had to but white fabric spray paint and repeat the method to try to fix that.
**note, I did not paint the back of the shirt since it would be covered by the vest but I wish I had because the shoulders show and it would have looked better black.
GLOVES and SHOES
The gloves and the shoes both had a strap that I used the left over gold paint to paint gold to try to look at least a little like Drift's gloves and shoes.
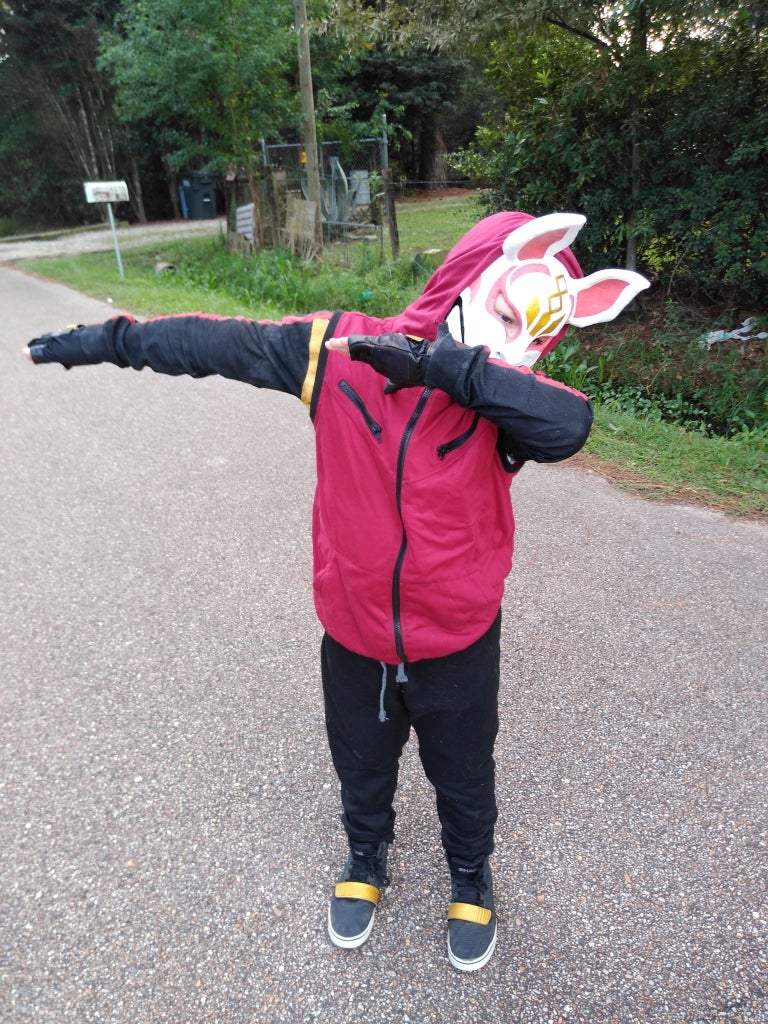
Step 5: That's a Wrap


Put it all together and go be awesome. Just don't expect people to be able to understand what you are saying very easily.

Participated in the
Halloween Contest 2018


