

Introduction: How to Program AVR Microcontrollers, Cheap and Easy


This instructable will guide you step by step how to run a simple program in an ATMEGA microcontroller (uC). If you don´t know any about how your code is stored in microcontrollers, there are basically 3 steps that you might take and which we are using to explain how code is stored:
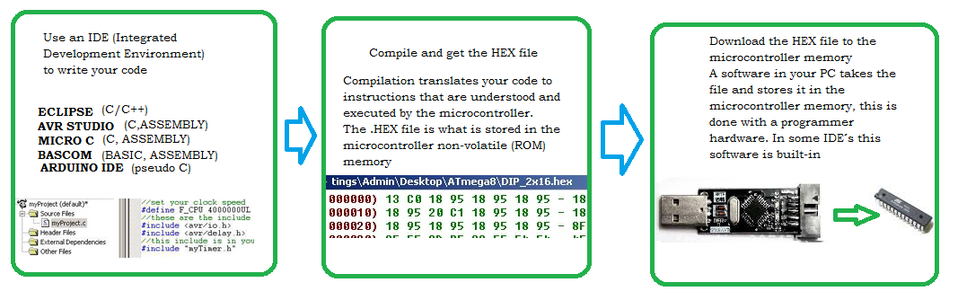
-Using and IDE (the environment in which you write the code)
-Compaling and creating a .HEX file: Compiling translates your code to instructions that are understood by the microcontroller. This instructions are in the .hex file which and this file is going to be stored in the ROM memory of the microcontroller
-Downloading the HEX file to the microcontroller: a software takes the HEX file, comunicates to the microcontroller via a module (that now-on we are calling "programmer")and stores the file.
Next steps will explain further the things above mentioned.
Step 1: Get the Hardware

Several configurations can be done to download the program to your microcontroller, there are even bootloaders which allow you to communicate with the target microcontroller without any programmer, but that will not be discussed right now. We are taking the approach in which you receive a blank microcontroller, and then you have to program it the fastest and cheapest way.
The programmer
We choose the the Usbasp developed by Thomas Fischl, the reasons are:
-Cheap programmer, it can be found under $3 (http://www.ebay.com/itm/USBasp-USBISP-3-3V-5V-AVR-Programmer-USB-ATMEGA8-L-/140763404046?hash=item20c627170e)
-It is widely used by the community
-Supports all the ATmega and ATtiny (and some more) families
-It is Open hardware so you can even make your own if you have an extra Atmega8 and follow the schematics http://www.fischl.de/usbasp/
(The only problem is to download the first firmware to the Atmega8, which can be done with another programmer which you may borrow for the task, or using Ponyprog if you have a SERIAL port, more info in the “Setting up the hardware” section)
The microcontroller
There are a lot of Atmega devices out there, generally the nomenclature goes like this:
ATMEGA[number]
Where number is the size of the Flash memory (where you store the program) given in kilobytes, for example Atmega8 would have 8KB of memory; nevertheless there are some devices with a more complex nomenclature such as ATmega168PA, ATmega88, etc., these are variations of the ATmega16 and ATmega8 respectively.
You can buy the microcontroller alone but there are some fancy (and expensive) boards out there like Arduino (Arduino UNO, DUE, MEGA, NANO and others have an Atmega as their core), or cheaper ones (like the one in the picturo of this step) that have the ISP header so you can plug the programmer easily
(If you have an Arduino, I won´t recommend you to extract the microcontroller from the board, if you do, make shure to save and reload the Arduino´s firmware to make the board useful again)
In this set-up we are going to use an Atmega8 as it is one of the most common uC, and also a cheap one.
Step 2: Setting Up the Hardware


- Plug your Usbasp programmer, Windows may not recognize the driver, if so, download the file usbasp.2011-05-28.tar.gz from http://www.fischl.de/usbasp/.
- Open the folder usbasp.2011-05-28\bin\win-driver\libusb_1.2.4.0 and run the 32 or 64bit installer according to your system
- Go to the device manager and chose Update manually, select the usbasp.2011-05-28 folder and check for the include subfolders option
Once done, you will need a software that can communicate with the Usbasp, there are many I will list the following based in my experience:
o AVRdude: use this if you absolutely love the command line interface, this soft may be called by some advanced IDE´s like Eclipse or etc.
o PonyProg: is a Serial device programmer, use this if you still have a Serial port and are willing to build some additional hardware, the advantage of this setup is that you won´t need the Usbasp hardware!
o Khazama: it do the task, but constantly prompts error windows, and you are almost blind of the state of the tasks you order, the user interface is very awkward, can´t read fuse bits
o eXtreme Burner: not only has a nice user interface, and do the tasks, it quickly display the state of the tasks!, the bad side is that in order to download you have to share it in your Facebook, or other social network. (It wasn´t like this before, but for me this is enough of a deterrent) also I found that due to some bug it only downloaded up to 10KB of code to an Atmega128.
o ProgISP: it is a Chinese software which usually comes with the USBISP like the one showed before, it supports almost any AVR microcontroller and has a good user interface, it allows you to write and READ the ROM memory, fuse bits, and EEPROM, it informs you about errors, etc. you can download it here http://www.electrodragon.com/w/ProgISP
(The only problem with ProgISP is that some fuse bits definitions may seem corrupted, to solve this you have to search for the XML files and erase some fields, however I will upload soon a repository with the fixed XML files.)
At this approach we are installing ProgISP, and check if the Usbasp is recognized, this can be done quickly by opening ProgISP, selecting the appropriate chip, and clicking Read Signature bits, an error window should prompt (see the image above)
- If it says Programmer can´t be found, then you should reinstall the driver or maybe your programmer is dead
- If it says Chip enable error, then your programmer is succesfuly recognized and you are ready for the next step (Chip enable error prompts because there is no microcontroller connected)
All Atmega microcontrollers can be programmed via ISP interface which consists of 6 lines tMOSI,MISO,SCK,RESET,VCC,GND. Connect this lines from your microcontorller to your programmer. (Take a look to the third image in this step the LED connected to PD5 is not necessary, but we will use it to test our code)
If you connected it correctly click read signature bytes again and you should get a message like this in the console of ProISP:
Read ID succesfully (01/09/2015 13:28:03)
Step 3: Installing the IDE
In order to write your code there are several IDE´s, I recommend you to write in C, as most microcontrollers are designed to work efficiently with compiled C code, they are intended to be programmed in C, however there are various languages that some IDE´s offer like C, Basic, Assembly which are the conventional ones, I also read that there are more exotic ones like Java, or even Matlab. Again I will list some options based on my experience:
- AVR Studio 6: It may be obvious, the best IDE to work with AVR is AVR Studio 6, it is free and distributed by ATMEL (the Atmega manufacturer), however there is a downside associated: It is heavy in memory size and takes several hours to install; it also takes fairly long time to start-up every time, at least that seems to be the case in most computers I have installed it.
- The AVR Eclipse Plugin: this one works fine and, you have to set-up quite a lot of things like the toolchain, etc. If you are already familiar with Eclipse then you should definitively try this one. Additionally there are some great projects and tutorials made by Katja Socher, check them out: http://www.tuxgraphics.org/electronics/200904/avr...
- BASCOM-AVR: this is a IDE developed exclusively to work with the AVR, chose this if you like to program in Basic, it outputs .obj files which are very useful for simulation and debugging, the downside it´s free version is limited to 4KB code, and also it is quite awful if you want to use some math, because it only supports one mathematic operation on each line of code!.
- MikroC: I´m starting to use this IDE and I found it is very friendly for entry level users (begginers), it takes C code and various libraries and examples are already available with a few clicks. If you are already familiarized with Arduino or with Mikroe software (which are aimed for PIC, STM and others), this will be an easy option to migrate to. Downside: it´s free version is limited to 4KB code, nevertheless I will stick with this one for this tutorial. http://www.mikroe.com/mikroc/avr/
Step 4: Downloading Code to the Microcontroller·
- Install and run MikroC
- Make a new project for Atmega8 at 1MHZ (follow this guide http://www.mikroe.com/downloads/get/301/1st_proje...
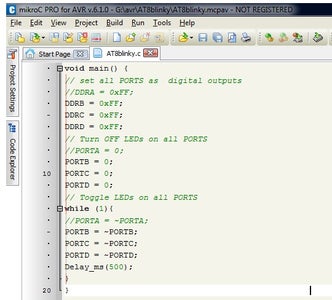
- Write the code you want (for example this code will make all pins in all ports toggle every 0,5 seconds)
void main() {
// set all PORTS as  digital outputs
//DDRA = 0xFF;
DDRB = 0xFF;
DDRC = 0xFF;
DDRD = 0xFF;
// Turn OFF LEDs on all PORTS
//PORTA = 0;
PORTB = 0;
PORTC = 0;
PORTD = 0;
// Toggle LEDs on all PORTS
while (1){
//PORTA = ~PORTA;
PORTB = ~PORTB;
PORTC = ~PORTC;
PORTD = ~PORTD;
Delay_ms(500);
}
}- Click build (this will create the HEX file)
- Locate your HEX file, it will be in the same directory of your project
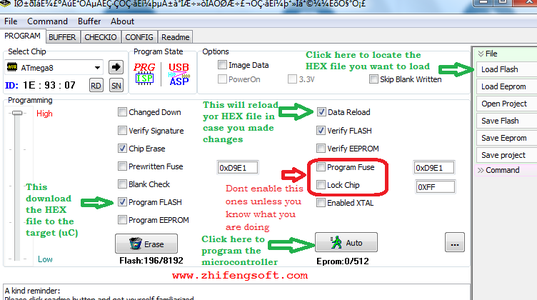
- Open ProgISP, click the Load flash button and select the Hex file you´ve created
- Make sure you select the correct chip (Atmega8), and all the checkboxes are configured as the one on the image
- Click the “Auto” button, it starts downloading the code, as the size is very small, the progress bar will indicate 100% in less than a second.
- After this the microcontroller resets itself automatically, so the program should be running, and the led blinking.
- We are done, congratulations!, now you can try writing more complex codes, you can use built-in libraries, or may want to write your own ones, i found that the built-in librararies lack of a lot of options. If you want to just migrate from Arduino or you want to make some easy projects, built-in libraries may be enough, if you want to customize some advanced optoins of the microcontroller, then you can write your own libraries.


