

Introduction: Giant Fidget Spinner! (3D Printed)


Have you ever wonder big guys with a fidget spinner? Really big guys like Hellboy or Hulk!! I do! Making a huge Spinner allow we to throw in more intricate details for creative expression and Craftsmanship, which is i am all about! Our spinner is roughly 19” wide comparing to the standard 3” palm size. A 600% diameter and 25400% volume! I hope it is record breaking!!
As a recent owner of a big 3d printer, the CR-10, i would like to test out iys performance with large prints and learn its limits. Some people would wait 24 hours for a terminator head, spiral vase or marble machine, but there is no bigger satisfaction from printing models you actually designed!! Instead of common superhero and sci-fi theme, we have a more Creative inspiration! can you guess what it is? Also we started the serious modeling and printing 6 days before the Fidget spinner contest ends. It’s a demanding challenge on the machine and the man! feel free to Vote for us if you like our project! Even if you are not interest in make this exact spinner, i documented my on-the-spot decision making in response to debugging the fail print and my project management mindset. I think my journey can provide insightful notes to beginners learning how to manage their own project.
I would like to thank my creative lovely girlfriend @marikosusie for creating this project with me!! i couldnt have done it without her!! besure to check out her instructables as well!
Step 1: Software and Tools


Software:
- Blender
- Cura
Tools:
- CR-10 Printer with white PLA
- Acrylic paint
- epoxy putty / superglue with cornstarch
- Plier
- Flat-head Screw driver
Safety Equipment:
- Gloves
- Dust Mask
- Goggles (if you don't wear glasses)
Step 2: Choosing Ball Bearing


Apparently i can’t use off the shelf metallic ball bearing at the scale i am after. I started my search on thingiverse. I tried 3 different ball bearings from thingiverse, I scaled them up/down to my desired diameter of 9.5 cm. As i expected the tolerance (gaps between fitting parts) got messed up, the bearings are either too loose or too tight (so tight they fused)
So I choose the most promising one and modify it to my need. i scale down all the balls a bit. i removed 1 ball for more space between balls and get rid of the custom support that came with the file, i used the cura generated support instead.
Attachments

Step 3: 3D Modeling


The design stems from big guys right? but Hulk is too obvious and mainstream, haha! How about Maoi from Moana? he wields the ridiculously big hook right? plus ancient civilization incorporate basics geometric shapes as intricate details into their carving and architecture! This really fit out project!
We used geometric shape as basis as you would see from New Zealand or South American indigenous tribes. little circles and alternation triangles. we apply the carving on a spiral-like shape similar to that of the New Zealand plant Koru. (https://en.wikipedia.org/wiki/Koru). In Maori culture, koru means loops. it is a symbol of growth, new life, infinity and the return to ones’ origin/heritage. Likewise Fidget Spinner goes in perpetual loops that represent infinity!
We did a sharpie sketch and nail down overall dimension with the size of ball bearings at 95 mm diameters.
Since we want the three knob of the spinner to be consistent, we only need to model ⅓ of the spinner, printing it 3 times and join them together like tiles.
The modeling process is as following;
- Block out the placement of the ball bearing in real life scale
- Add a Bezier curve mimicking the Koru shape
- Model half of your symmetric design
- Add Mirror Modifier
- Add Array modifier
- Add curve deform modifier to the array using curve obtained from step 2
- Add additional deformers for a rounded profile
- Model the rest of the 1/3 portion however your like
- Boolean the piece at angle 120° for tiling
(I have attached my blend file for your reference!! feel free to contact me should you have any question about it!!)
It's fair for you to say I used blender because i am best at it than in tinkercad or Fusion 360. While it's true that the fastest tool is the one you know best, i do wanna point out some feature in blender i really enjoy, and hope for inclusion in tinkercad and Fusion 360.
Pivot points: Polygonal modeling package like Blender, Pivot points are incredibly handy to use and easy to find in the UI. Using median point of meshes, active selection, individual origin and pre-define 3d location with 3d cursor/empties. this allows a much faster and flexible editing on the go!
Modifiers Stack: Unique to Blender and 3dsmax (as far as i know) allows highly versatile non-destructive mesh editing in real time
System requirement: Fusion 360 runs okay in my laptop with i7 and geforce 840m, but there are these random lags here and there switching in and out of tools. Whereas Blender feels seamless in normal operation. of course blender loads when it’s doing heavy duty stuff, but other wise i seldom have lags that prohibit me from editing the mesh in real time, even on laptops with i5 and cheap intel GPU.
Attachments

Step 4: 3D Printing


I am printing with maker Wise white PLA 302hk. I bought it from a Hong Kong local company whom i also bought the printer from.
let me acknowledge that i am experimenting with the CR-10, using settings that push its limits 10 light years out of its comfort zone. Also i am not targeting for a high-quality off-the-printer-ready print, i only need a correct formfactor of my model physicalized, so i can proceed with my post-processing. the fail print is not a representation of CR-10 ‘s impressive performance in its normal settings. (in fact, if you wish to see how nice the print quality normally is, feel free to check out my other instructable about that, Occido Lumen comin soon)
Print settings: layer height, print speed, print orientation
I printed the first part in ideal setting, 0.2mm layer height, 100% speed, with the model standing up the build plate so the details can be sliced nicer in spite of needing more support. Cura estimation at 16 hours, ended up taking 22.5 hours. A lot of filament was wasted as supports. So i know we need to resort to more conservative settings.
I dialed back and printed the second part with 0.4mm layer height and 140% to 170% speed, with the model standing up the build plate again. Cura said it would take 8 hours, That still took me 11 hours and the result is not as good as i hoped, so i thought the 0.4 mm is no go.
The third piece i went back to 0.2mm but speed it up a little and i reprint some portion due to failed print(see next step for more), with total print time of 20 hours. These 20 hours i realise the spinner would look way nicer with both top and bottom sides! its spins nicer, the way it feels holding in my hand. So i made a daring decision to mirror the model and print 3 more copies! you only need un-check uniform scaling, then scale the model in x/y axis in -100%.
Since we only had 6 days for the project, and we are 3.5 days in, it is impossible to print 3 more copy with any of the previous settings. So i lay the model flat on the build plate hoping it would cut down the print time with almost no supports. i was reluctant to slice the model this way since the details would be poorly aligned with the horizontal plane causing a lot of stepping/staircasing effect. But the macro top and bottom effect is so much more important as a whole to the project than the micro staircasing. at 0.4 mm, it took 7.5 hours to print!
Attachments

Step 5: Fail Prints


I think i have ran into every possible failure situations! please see them listed below in combination to how i work around them.
- Power Shortage &
Layer shift
: since there is no resume print in case of power failure in CR-10, i measure the height of the already printed portion with a caliper. Then, in Cura, i moved the model down the same amount and print the unprinted parts as separate model. later glued with epoxy putty. - Skipped layers: because the filament reel tipped over the holder, leading to poor extrusion, there are roughly 1 layer not printed. Luckily the print carries on. i just need to glue them later.
- Spaghetti and bed adhesion: this is the only situation i don’t like pasta. the large base has trouble adhering to the print bed, after all i was printing in >150% speed. the print just needs to cool down properly. i applied UHU gluestick on the bed and set print speed to 50% for the base layers, and speed it back up after it started printing layers with infill.
Step 6: Post Processing


For removing supports, i used plier and flatheaded screw drivers. Scissors can also help with trimming off large piece of support.
For Weak Layer bonding, I patched up the surface by:
- Sifting Small amout of Super glue for small gaps; or
- Cover gaps with cornstarch then soak them with Super glue as surface filler
For Seperated pieces, I reconnected them with Epoxy Putty as following:
- Wear gloves (safety first)
- Mix similar amount of the 2 part epoxy.
- Apply the epoxy to the interface between both prints Squeeze them tight for complete contact between epoxy and PLA
- Rubberband the piece for stable pressure when the epoxy cures
- leave it alone for an hour or 2
I didn’t have time to sand everything to perfection.
the epoxy putty doesn't smell strong comparing to other model making filler. the epoxy is also easy to sand after it cures.
Step 7: What Can You Do With It?


The shear size and weight of it is phenomenal. I just laugh so much feeling it spins in my hand, the experience is almost therapeutic! i can almost feel the gyroscopic effect due to its large momentum!! In case you are still not convince this is awesome, here are a few things you can also do with it!!
- Spin it!! It is a fidget spiner after all. Put your biceps in the action and this might just be the body building machine you need!
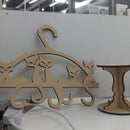
- Use it as a Carousel for kittens or puppies, or both!
- A little coffee Table or spinning cupcake tray
- Impressive wall mount, maybe?
Step 8: Possible Improvements

This project is more of a prove of concept, our crafting was significantly limited by time. Here are a few things I would improve on the next iterations. Do you have other improvements in mind? feel free to share your thoughts in the comments section below!
The first improvement is of course to print all parts with normal setting, i mean at most 0.2 mm layer height and slow down the print speed. Even if it means 160 hours of printing.
Detachable assembly for easy travel? We didn't have time to model in some registration for assembly. As we mention, the 19” size is not very travel friendly.
I am also in the process of painting this humongous Fidget Spinner! so stay tuned!! pictures should be up in a few days!!
thanks for reading thru our project!! Again we are entering the Fidget spinner contest with this one!! please vote for me if you like this!! See you next time!


