

Introduction: Halloween Candy Chest


More by the author:


About: Married with children. Enjoying art as a hobby/career, and always desiring to learn and experience more in this field.
This instructable will show how to make a nice looking chest you can use for either collecting or passing out halloween candy. This build is not expensive (depending on your supply stash) to make and takes 1-3 days to put together depending on your schedule.
Step 1:

I started with a paper made chest found at Hobby Lobby. This should be your most expensive purchase of the build. I used their weekly 40% off coupon and paid around $7 for it I believe. They had two sizes and I choose the smaller one.
Step 2:

Scrap plastic, or a material close to it, is the next component for this chest; it makes the metal frame. Yes, you will turn plastic into metal. I used vinyl fence scraps. It doesn't matter what kind of plastic material you use, any kind will work and the softer it is, the easier it will be to use. If you don't have any extra plastic laying around, you can buy a For Sale sign at the hardware store. Make sure it isn't a corrugated style sign.
Step 3:


Start the framing process by cutting your plastic into strips. I made mine half an inch wide, but you can go wider if you want your chest to look heavier. To make the arched strips, put the arched side of the chest face down on your plastic and trace the edge of the arch. Move the chest down at the distance you choose for your strip width and trace the shape again. The width doesn't have to be perfect. Once you have all of your strips cut, lay them out on the chest and mark the lengths. They do not have to butt up tightly to one another as the joints will be getting a covering. When everything is cut to size glue it into place. I used super glue from Wal-Mart. The last step before all the fun parts is to cut squares from your plastic. These go in the corners to finish the frame look and they cover the joints of the strips. Lay one in place in an actual corner of the chest and draw a line from the inside edge of one strip to the corresponding strip. Cut that line off and glue the corner in place. Do this for all of the corners of the chest.
Step 4:


This step is where one particular tool is essential. If you don't have a rotary tool, you need one. It's good for many different uses. It is a basic hobbyists tool. You can get them at very reasonable prices depending on the brand. Anyway, at this point you'll want the sanding drum and engraving tool. Use the sanding drum on all the edges - plastic and paper, to knock off the crispness and start the worn away look. When you have the look you want, change to the engraving bit. Make completely random pock marks over the strips in different depths and shapes. This whole process gets really boring, but the more you do, the better weathered look you will have.
Step 5:


The hardest part is over. Next is paint, but first you need to add rivets to the corners. I used hot glue, it's fast and easy. Just add a drop to all of the corners making sure that they are somewhat flat and imperfect looking. Now onto paint ! Mask off all the areas that are not part of the chests frame. I primed everything first. You wouldn't have to prime if you wanted to save a few dollars, but it helps. After the prime coat, I covered everything with silver hammered-on spray paint. I think it was Krylon brand. Apply several coats, a minimum of three. Remove the masking tape once the paint is dry.
Step 6:

I put all the "weathered" paint in one picture instead of stages. To get this look, the first thing I did was wipe black acrylic paint over the frame and then wipe it off with a paper towel. You want it to gather in all the pock marks. Don't do the entire frame at once, just sections at a time and make sure not to wipe too much off as this is the dirtying phase. Once the black is all dry, make a couple different shades of turquoise green acrylic paint and dry brush them in random spots. Make sure to get all the rivets, handle, and lock area. Do this process again with shades of dirty orange.
Step 7:

Plank time. I did a google image search for wood planks. When I found a set that I liked, I downloaded the image. The chest that I made was for my daughter and I wanted to give it more of a girl feel, so, I put the image of planks in photo shop and gave it a purple hue (this is not a necessary step) then printed out several copies of the image. If you can, print some mirrored copies of the planks to have variety.
Step 8:

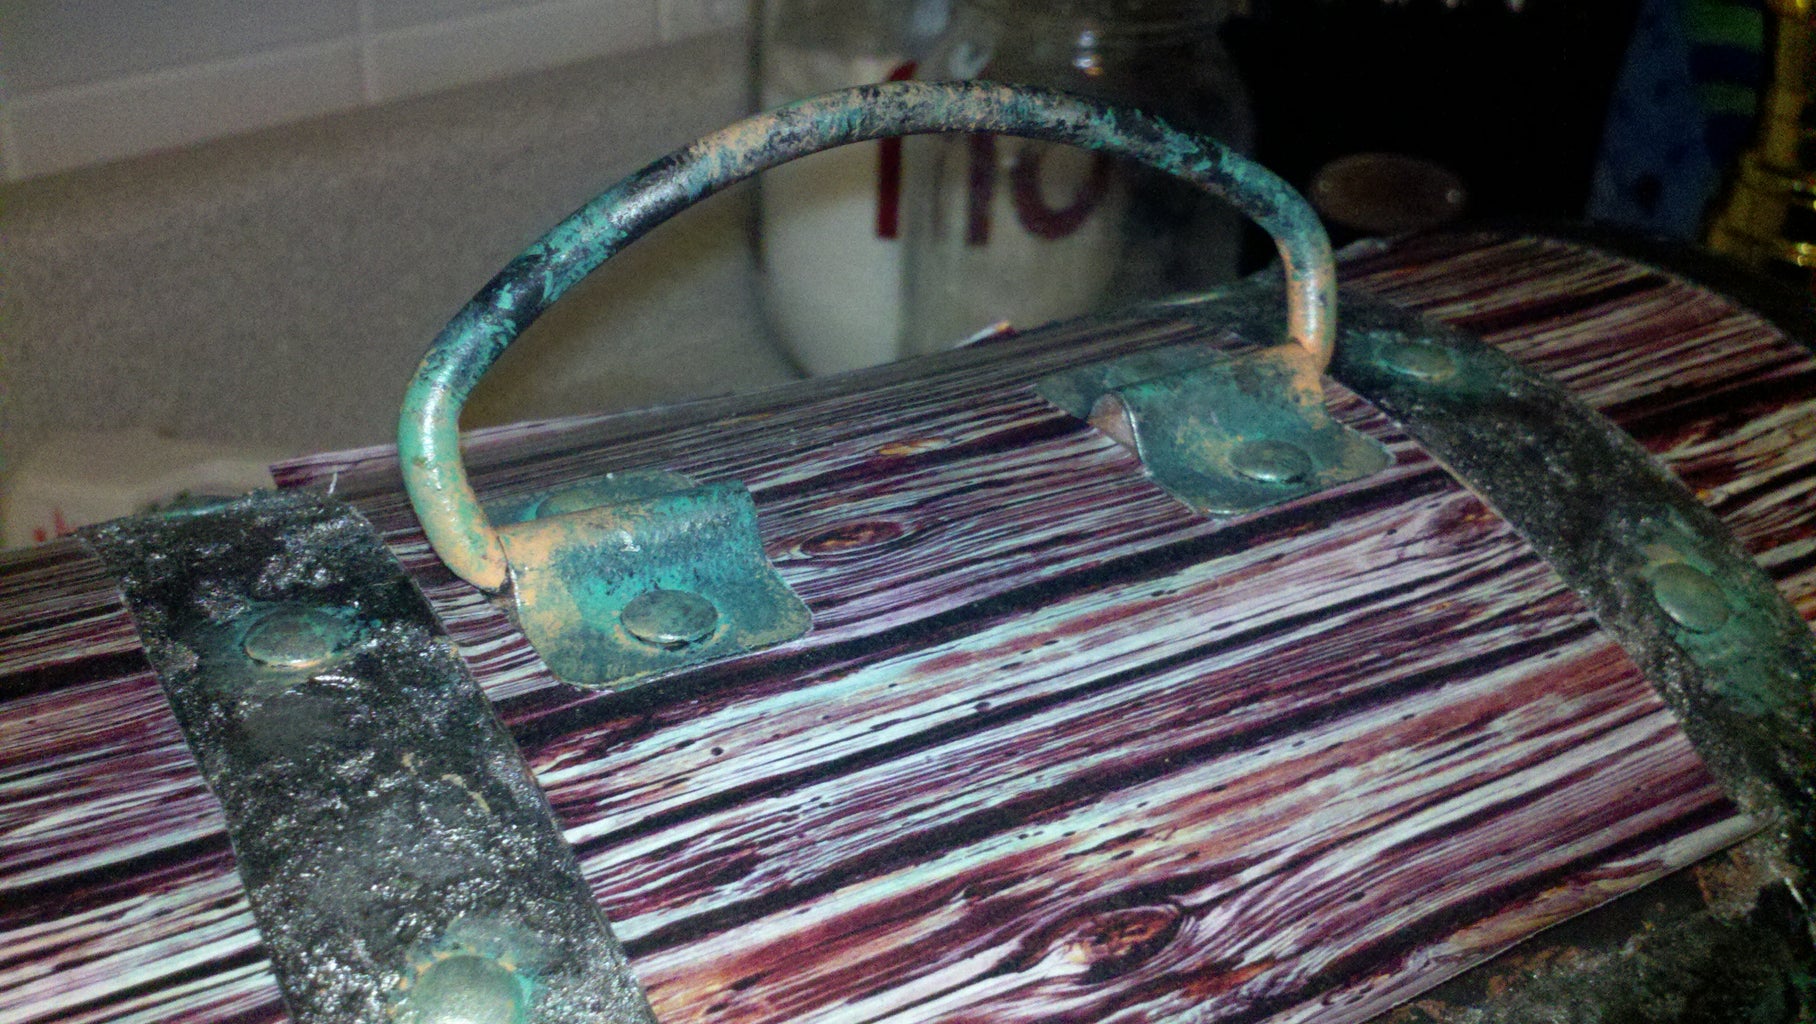

Once you've printed all your planks, cut them to size, section by section. I adhered mine with a spray adhesive. Spay the back side of the plank copies making sure the edges are well covered to prevent edge curl, and let it get tacky. Spray it once more and put it in place. After all the planks are applied, give the entire chest several coverings of clear coat. I used krylon matte. This protects all of your paint work, but more importantly, it prevents the ink of your printed planks from running and smearing if it happens to get water on it.
Step 9:


This last piece I made as a finishing touch for the inside of the chest. I did this to make a more complete looking piece for my daughter to play with. This wasn't going to be part of the instructable, so I did not document this with pictures. I thought some of you might want to add this to you chest.
First, cut a piece of cardboard to fit inside of the chest. Next, cut a piece of fabric two inches bigger than your cardboard all the way around. Glue three sides of fabric to the back of the cardboard with hot glue. Don't make it too tight, or you will not get a puffy look. Leave one of the longest sides open to stuff with cotton, once it is filled, glue the last side down.
Now, on the back side make four equally distanced marks ( I somehow got mine off), and with whatever tool you are comfortable using (scissors work fine), make a hole through these marks. Stick a toothpick straight through the holes in the cardboard and snip a hole where it is hitting the fabric. Be sure to put super glue around the fabric holes to prevent it from fraying.
The buttons are next and are made using screw bolts with nuts holding them down. I used a screw bolt because it has a round head that gives a button look. I stuck a bolt through the fabric/cardboard and tightened it down with a nut until It had a depth that I liked. To make the guides in the bolt head disappear, I filled them in with spot putty.
So the construction of the cushion is done, it's time to paint it. I used the same silver hammered-on paint, spaying light mist coats until I liked the way it looked. I then used black acrylic paint and dry brushed the buttons, valleys, and outside edges of the cushion.
You are finished and now have a candy centerpiece for Halloween, or a pirate prop for your child's costume!

Participated in the
Hurricane Lasers Contest

Participated in the
Halloween Props Contest


