

Introduction: Hammer Handle Replacement


While making my Replacement File Handles, I realized that I had a section of broken shovel handle that would be perfect to replace a hammer handle. And I happened to have a hammer that needed the handle replaced.
I have no idea where I got this hammer from, nor did I have any idea what kind of hammer it was. After some research, I learned that it's a Boiler Scaling Hammer, used for scraping the rust of the inside of boilers. I have no plans of using it to scrape the rust of the inside of boilers, but I'm sure I'll find some use it for.
It was in pretty bad shape - the head was rusty and the handle looked like a dog spent some time chewing on it, so this seemed like a good Pandemic Workshop project, and a good use of a piece of broken shovel handle scrap.
I replaced the handle on my Boiler Scaling hammer, but you could use the same process to replace the handle on pretty much any hammer with a metal head and a wooden handle.
So here is how I refurbished the hammer head and replaced the handle.
Supplies
Section of broken shovel handle
Hammer head
Tools:
Hammer
Step 1: Replacement Handle


About a year ago, I broke a shovel handle while working in my backyard. I saved the parts, with plans to replace the handle someday. After making my Replacement File Handles, I still had a perfect section of hickory to replace the handle for my Boiler Scaling Hammer.
Step 2: Restoring the Head


First I secured the hammer in my bench vise, and I took my grinder with a zirconia flap disc attached to it, and stripped down the top and sides of the head.
Step 3: Remove Old Handle


After I polished three faces of the hammer head, I cut the handle, and then banged out what remained in the head with a hammer and punch.
[After I finished this project, I realized that this old hammer handle still had enough meat left on the bones to make a few file handles, which is just what I did!
See the final "Bonus Handles" step in my Instructable, Replacement File Handles].
Step 4: Finish Polishing


I flipped the head over and put it in a machinist vise to polish the underside and any little spots I missed.
It's amazing how quickly a flap disc can get down to the surface of a rusty old hammer head, and make it shine like new!
Step 5: Shaping Handle


I took my piece of broken shovel handle over to the belt sander, and sanded off the old finish, and shaped it a bit.
Step 6: Cut Notch for the Head


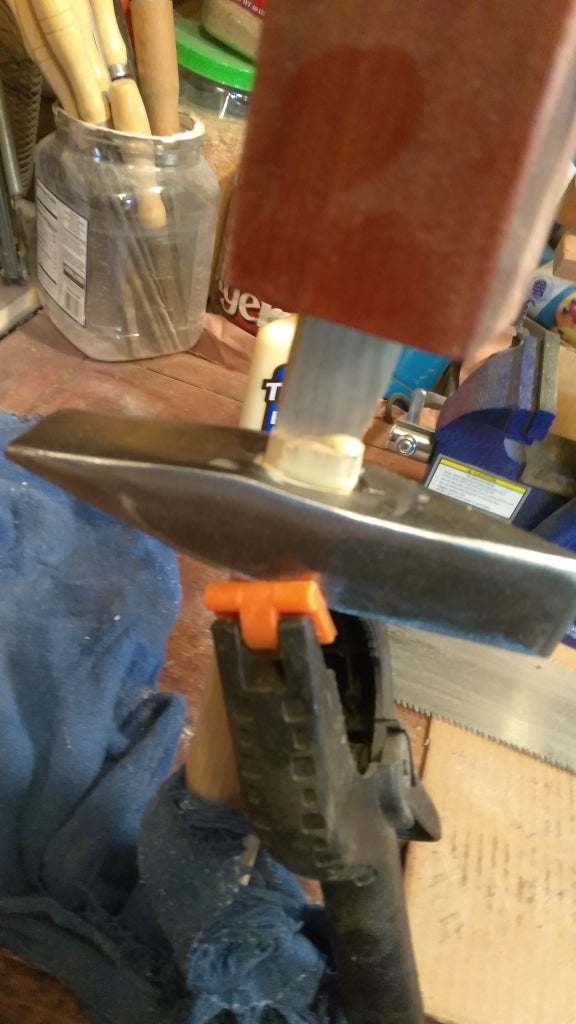
I put the head on the new handle, and marked the dimensions of the eye of the head, and then cut down with a pull saw.
I saved the sections I cut off the sides to make wedges to insert later.
Step 7: Dry Fit, Drill and Slice


Checked the head for fit, and then drilled a guide hole in the handle to cut a slice for the wedge.
Step 8: Wedging It


I sanded down a scrap I cut off to make room for the hammer head, added some wood glue, and then pounded in the wedge with my Brazilian Redwood/Purpleheart mallet.
After the glue dried, I cut the excess wood from the top, and pounded in a metal wedge.
Step 9: Stain and Seal

I gave it a light coat of stain, let dry, and then a light coat of spar urethane.
Step 10: Finished!

I don't see this hammer ever getting back inside a boiler, but I hope I can find something useful to do with it.
If not, it's still a damn good looking hammer!;-}
Step 11: Extra Step


After I finished restoring this Boiler Scaling Hammer, I decided to was just too damn pretty to throw in my hammer drawer. So I decided to drill a hole in the handle, insert a few grommets and a lanyard (a shoelace scrap) and hang it on my pegboard (which I also inherited from my uncle) next to a few of my other Pandemic Workshop projects; my Brazilian Redwood/Purpleheart mallet, and my upgraded Marking Gauge.
Now if I don't use it for scraping boilers, at least I can admire it;-)
Note: As an Amazon Associate I earn a small commission from qualifying purchases. Your price is the same, but I get a small commission to help me build more cool stuff!;-)

Participated in the
Scraps Speed Challenge


