

Introduction: Hand-Forging a Skeleton Bottle Opener - a Comprehensive Tutorial (Blacksmithing)


Bottle openers are classic blacksmithing projects that teach a variety of extremely useful forging skills. This Instructable is a comprehensive tutorial detailing every step needed to forge my original design of a stylized skeleton bottle opener. Anyone attempting this is more than welcome to make different artistic choices as well! These can be also used as merely guidelines.
This Instructable will be very detailed and thorough! At any point, feel free to skip explanations if you don't need them. The idea is just to be as comprehensive as possible.
I will show all the necessary tools and explain important geometry. If there is interest, I may make a dedicated Instructable or Instructables on forging various punches, chisels, fullers, or any of the tools.
It's worth noting that there is a non-trivial number of tools involved in this project, but do not fear! Once you have an anvil, forge, and hammer, everything in this is relatively simple to make or buy. This Instrucable also assumes a little bit of familiarity with swinging a hammer, heating metal, etc., but should hopefully be pretty accessible to most beginners.
If you don't have an anvil with a horn and hardy hole, there will be a bonus bottle opener at the end using only the face of the anvil, a hammer, forge, and one fuller.
I've illustrated some graphics throughout that I hope will be useful. Feel free to save them if you'd like! You should be able to download them below.
About me:
Hello! My name is Tristan Antonsen, and I'm a student in Mechanical Engineering at the University of Illinois. I've had had a lifelong love of making things, which led me to blacksmithing a couple years ago. Since then, I've been blacksmithing along with school and am building up my workshop and business, Antonsen Forge. If this instructable interests you, you might like my other Instructables, particularly one where I documented my very first hand-forged Damascus steel knife.
Attachments

Step 1: You Will Need. . .


Tools:
• Hammer (>2 lbs) I generally switch between a 2.5 lb and a 4.5 pound hammer
• Some sort of anvil (with a horn and hardy hole, or similar)
• Some sort of forge or a way to heat the steel (coal/gas/induction forge, whatever you have!)
• 5/8" slot punch
• 5/16" ball fuller
• 3/8" fuller
• 1/8" fuller
• Guillotine with rounded and flat dies or spring fuller(s)
• 1/4" hot chisel (and a larger one if you have it)
• Wire brush (butcher block brushes are best)
• Files or a belt grinder/bench grinder
Materials:
• 1/4" x 3/4" mild steel bar
• Any consumables needed for your fuel, etc.
• A beverage with a bottle cap
About the tooling:
I won't go through all the details of making the necessary punches and other tools in this Instructable, but they are all more than possible to make inexpensively. If there is interest, let me know and I'll make a dedicated Instructable!
Step 2: Terminology
There may be some confusing lingo in here, so here's a brief overview of some of the essential terms!
Anvil:
The heavy block of steel the metal is hammered on
Hardy hole:
The square hole in the anvil
Horn:
The conical part of the anvil
Face:
The flat top of the anvil
Punch:
A tool used to make a specifically-shaped hole in a piece of metal (also a verb for the process itself)
Fuller:
A tool used to make a specifically-shaped dent in metal (also the name of the dent itself)
• Ball fuller: Basically a hemisphere on a handle
• Any other fuller in this project: more of a blunted, oblong oval
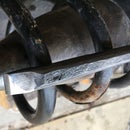
Step 3: Punch the Hole


About Punching
Punching works by making an indentation most of the way through the metal and then shearing it out from the other side. This can be done in many different shapes, and there are several different types of punch-end geometry. What I describe here is simply a tapered tool with a flat, crisp-edged oval shape about 1/8" x 5/8" wide.
Punching the hole
1. At a low red heat so you can see what you're doing, lightly tap one side of the punch into the metal about 1/4" from the end of the bar in the center, then carefully rock it back and make a mark with the other side of the punch, too. If you're not comfortable eyeballing the placement, I would suggest marking with a center punch. If you're happy with the placement, carefully line up the punch flat against the piece and strike it once to leave a shallow impression. What this does is allow you to feel when the punch is in the correct place in the next heat since it is hard to see when the piece is bright yellow.
2. At a yellow heat, start driving the punch down into the work piece. After each blow, remove the punch and make sure everything is going smoothly. If you hit twice in a row, it may shift without you realizing. Also, rotate the punch 180˚ every couple of hits to keep things even in case the punch is slightly asymmetrical. Make sure to cool off the punch every few hits, as well. The punch will "bottom out" about 90% of the way through the metal, and you will feel the anvil. This may take a couple of heats if you're new to punching.
3. At a red-low orange heat (it should be a little cooler/stiffer so the metal shears instead of stretching), hit the punch in the hole one more time to "shine up" the back, then flip the piece over and carefully line up the punch with the "bullseye", or the shiny spot left on the back of the metal. With a couple deliberate blows still on the face of the anvil, shear the plug out -- you should feel it get noticeably easier. Then, move over to the hardy hole and hit a couple more times to drive the plug all the way through. Sometimes you get lucky like I did in the pictures and it just pops out before you go to the hardy hole.
Congrats! This is the hardest part of the whole project.
Step 4: Drift the Hole


Drifts:
A drift is a tapered tool that is driven through a workpiece to make a hole larger (or change its shape). I use two drifts for this process. The first is about 3/8" diameter tapering to a flat end. This is the "opener" drift and is only to make the hole round for the larger drift. The second is a 5/8" round drift tapering down to about 1/4". Both are about 3.5" long and made from 4140 steel.
Drifting:
Take the small drift, carefully place the tip in the oblong hole over either the pritchel or hardy hole in the anvil (I hold the long bar between my legs, carefully holding the drift with tongs), and give it a couple taps to seat it. Once you're confident it won't fall out, drive it all the way through the piece over the hardy hole, moving the drift around the inside edges of the hardy hole to avoid too many marks (the backs of most drifts like these are slightly tapered to allow them to pop through the workpiece when the hole is the desired size). There will still be some bulging on the back that you'll need to forge back down.
Now take the larger drift and repeat the process. You should now have a 5/8", round hole!
Step 5: Forge the Loop Thinner, Chamfer, and Make It an Oval


Now we need to make the hole larger with an even loop. Put the tip of the anvil in the hole created in the last step and start by forging down the corners. Once the loop is an even thickness, start working your way and rotating over the whole loop to thin and expand the loop evenly. Try to always hit in the same place on the horn with the hammer and rotate the workpiece instead of trying to shift your hammer angle. This sounds a little weird in words, but is a fairly simple process. Important: Do not forge the part on the very end (the top of the loop between where the corners were) until the very end, since it is already almost the final thickness.
The piece will thicken in the opposite direction as you forge it, so make sure to periodically move it back to the face of the anvil and forge it back to 1/4" thick.
Once the loop is even and about 7/8"-1" round, rock it on the horn 45˚ along axis down the length of the bar (to the right if you're looking at it as in the third picture above) and forge all the corners down to give a nice chamfer (the chamfer should be visible in the next steps, I seem to have forgotten to take a picture at this stage).
Take one more (orange) heat and lay the piece over the edge of the anvil. Gently tap the top of the loop toward you while supporting the bar with your hand to turn the loop into an oval (see picture). You just need a slight oval shape, it won't work well if it's a perfect circle.
Step 6: Add Fullers for the Neck and Waist


Tooling:
The blacksmith's guillotine is a rather specific tool, but an extremely useful one. I made this one -- it is just vertical plates that support various hardened "dies" (the parts that do the forging) that you hit with your hammer. The reason this is useful is that it allows one to evenly forge details into both sides of the material at once, something that is very difficult by hand. For this project we will be using 1/2" rounded dies and 1/2" flat dies.
If you don't have one of these or want to make/buy one, a simple tool called a "spring fuller" can be used. It is essentially a looped piece of steel that accomplishes the same purpose (see photo). These can be made in round and square shapes, I would recommend searching YouTube, there are some good tutorials there.
Fullering:
Place the piece between the round dies of the guillotine right up against the base of the loop and forge the "waist" down until it's around 3/16" wide. Turn it 45˚ and chamfer the sides of the waist. Make sure to rotate the piece 180˚ after each blow to keep things even -- the top and bottom dies will never forge perfectly symmetrically.
Repeat this process about 1 1/4" away from the first fuller to make the "neck".
Step 7: Define the Jaw


Using the flat dies in the guillotine, align the piece to form the jaw of the skull. The jaw goes on the far side of the "neck" formed in the previous piece, which is the one away from the loop (see photos).
Using light blows, forge the jaw down so it's about 1/16" in from each side and lightly chamfer as with the other fullers. This gives a much more defined shape to the skull.
Step 8: Add the Skull Details


Now it's time for the rest of details on the skull: the chin, eyes, nose, and teeth.
Chin:
At a low orange heat, choose the side you want to have the details on and place it face down on the anvil. Align where you want the chin to start with a sharp edge of the anvil with the chin off the anvil so the neck gets forged and the chin doesn't. Then, gently hit the chin area with the hammer half-on, half-off the anvil. The photos should help with this.
Eyes:
At an orange heat, align the 5/16" ball fuller just above where the "jaw bones" end. Lightly mark where you want each eye to go and when you're happy with the placement, forge them in. The deeper you go, the bigger the eyes will be, so use your judgement. Little shifts in size and spacing make a big difference in the way the face turns out!
Nose:
Using the corner of a chisel, gently chisel the "nostrils" in, angling outwards and down as in the picture. I used a specially shaped punch for this, but it yields essentially the same result as using the corner of a chisel (sorry, only got a picture of the finished nose here).
Teeth:
At a low red heat using the hot chisel, mark the horizontal line between the teeth and then chisel it all the way across the jaw. Then, using a chisel around 1/4" wide, forge in lines perpendicular to the first to define the teeth. I usually do three, evenly spaced ones, which give a look I like.
Step 9: Add the Ribcage Details and the Tab


Ribcage:
At a red heat, using the 1/8" fuller, add the angled "collar bones" and a vertical align down the center a little bit below.
Using the 3/8" fuller at an orange heat, forge in three fullers on each side for the negative space between the "ribs". The placement and how to position the tool should be clear in the photos. I find that having the center on each side horizontal and then angling the top and bottom ones slightly upwards and downwards, respectively, gives a nice look. I also find that it helps to lightly go over each of the six fullers once and then go back over them to fully define them. Strike with hard, confident blows.
Tab for the bottle cap:
At an orange heat, place the ball fuller at the base of the loop near the skeleton. The punch should be about 2/3 on the piece. Hit with one blow at a time, checking your progress in between. It should extend around 3/16" into the loop and be pretty thin. There will be a thicker bit at the end of the tab, so place the fuller half on/off the edge and gently hit it. Then, start at the back of the tab and slowly move the fuller outwards to the end while hitting with a bunch of light blows.
Checking the geometry:
It's useful to cool it off and hold it up to a bottle at this stage to check the geometry. If it doesn't work, try to adjust the geometry accordingly -- whether that is forging the loop into more/less of an oval or thinning out the tab some more. The key parts to get right are that the tab should hook under the bottle cap while the opposite side of the loop is between 2/3 and 3/4 of the way across the bottle cap and the sides of the loop are wide enough not to make contact. This means the distance from the tab to the other side of the loop will be roughly 3/4" and the inside of the loop will be a little over an inch wide.
A good test without actually opening the bottle is to align it as if you were going to open it, and then see if the bottle will hang from the bottle opener by the cap!
Step 10: Cut It Off and Clean Up/Tweak the Shape


Using a hot chisel, cut mostly through the bar a suitable distance above the eyes (I like to give it a little extra that I then grind off to play it safe). Don't hit the anvil face with the chisel! Then bend it off with tongs. Use a wire brush to clean it up and tweak the shape as needed!
Using either a belt grinder, files, or some other type of grinder, clean up/round the top of the skull where it was cut off. I used a file, since that's what people are most likely to have. I like to chamfer it as well.
Finishing:
There are a couple ways I like to finish these: leaving it forged and brushed, wire brushing the scale off with an angle/bench grinder, and oil-blackening.
The first two should be pretty self-explanatory. To oil blacken it after wire brushing, heat it up to a dull red heat and let it cool to around 500˚, and wipe it down with oil. It should turn fairly black.
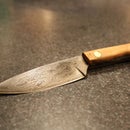
Step 11: Admire Your Work and Drink a Beer! (Or Soda)


Congratulations, you've finished an awesome bottle opener! This are much more durable than almost any other bottle opener.
(These make awesome gifts for friends and family! Or, for the easy route. . .*shameless plug* get one I've made on Etsy here)
Step 12: Thanks for Reading!
I hope you enjoyed this Instructable and that it was helpful for anyone who wants to forge their own! Please let me know if you have any feedback or questions and send pictures my way if you try your hand at this project.
(Stick around if you're interested in the minimal tooling bonus bottle opener)
If you enjoyed this, make sure to check out my Instagram, @AntonsenForge! I try to post all sorts of pictures of everything I make.
If you're feeling generous, a vote for the metalworking contest would also be appreciated! :)
Step 13: Bonus Round: Bottle Opener With Minimal Tools

Tools:
• Some sort of anvil with a flat face and radiused edges (not sharp corners)
• A hammer
• Scrolling tongs or smooth-jaw pliers (you can use normal pliers, they will just mark the material a bit)
• A 5/16" ball fuller
Materials:
• 3/8" square bar (mild steel)
Step 14: Draw a 4" Taper


Hold the bar at a slight upwards angle near the far edge of the anvil. Forge with the hammer slightly over the end of the bar, turning back and forth 90˚ each time until the end is a thin point. This will put a short taper on the end. Then, start working backwards on the bar until the taper is consistent and about 4" long (move the workpiece on the anvil, always hitting with the hammer in the same area of the anvil. Don't "chase" the piece around). This may take a few heats.
The reason for forging near the edge of the anvil is that the edge of the hammer will end up slightly below the metal, which means it would hit the anvil if it were being forged in the center.
Step 15: Square -> Octagon -> Round


With lighter blows, forge down each of the four corners on the whole taper to make an even octagon. Then, slowly rotate the piece while using lots of light blows to make a relatively consistent round taper.
Step 16: Make the Bends


At an orange heat, holding the 4" taper over the far edge of the anvil, gently start putting a sharp bend in it. It helps to alternate between hitting the part off the anvil and on the anvil, since the whole piece may bend (this may take a little practice). Don't hit directly on the corner or it will thin the material. We just want to bend the material, not forge it. See the first two pictures.
Then, either using the edge of the anvil or a pair of smooth pliers, put a small loop in the end outward, as shown in the picture.
At an orange heat, use scrolling tongs/smooth pliers to bend the taper backwards as shown in the pictures. It helps to dip the small loop in water to prevent it from distorting. This may take a couple heats and a bit of tweaking, but you want around 3/4" between the corner and the loop. You also want the corner to be as close to 90˚ as possible.
Step 17: Forge in the Tab, Add Details and Clean Up


Just as before, forge in the tab with the ball fuller slightly to the right of the corner. This can be a bit tricky, it helps to work at a high heat!
I chose to add a twist using a vise and wrench, but this is purely aesthetic.
Cut the bottle opener off the parent bar as before, then clean it up and finish it as you see fit. You're ready to open some bottles!

First Prize in the
Metalworking Contest


