

Introduction: Hand Gesture Controller for Robotic


The hand gesture controller makes it possible to control applications using hand tilt angle values. Actually, the hand gesture controller uses an accelerometer, it is possible to use it wherever tilt is provided and control projects. For example, controlling with head movements other than hand movements.
It also allows you to do this control wirelessly. Let's take a look at the video on how it works.
By the way, thanks to PCBWay for supporting many Maker and Robotics projects with free product support. Take a look at PCBWay and contribute to their support: https://www.pcbway.com
Step 1: How It Works?
The Hand Gesture Controller includes an accelerometer and it detects the motion by comparing the acceleration on any axis with set thresholds.The accelerometer can measure the static acceleration of gravity in tilt-sensing projects. The hand gesture controller acts as a transmitter, so a receiver circuit is required.
The hand gesture controller contains three main hardware:
1) nRF24L01 Transceiver Module Banggood - Amazon
- Frequency Range 2.4 GHz ISM Band
- Communication Range: 800+ m (line of sight)
2) ADXL335 Accelerometer Banggood - Amazon
- X axis Y axis Z axis
- Minimum full-scale range of ±3 g
3) Arduino Pro Mini -
Step 2: Transceiver - Accelerometer - Microcontroller

nRF24L01 Transceiver Module
- The nRF24L01 + transceiver module allows two or more Arduino boards to communicate with each other wirelessly and remotely.
- A transmitter and a receiver circuit are required to provide communication.
- An address (array of bytes) is created for two nRF24L01 modules to communicate. It communicates over this address and transfers data.
- A popular library called RF24 is used to interface with the nRF24L01 transceiver module. RF24 Arduino Library for nRF24L01+ Module - https://github.com/nRF24/RF24
- For more detail about nRF24L01 - https://lastminuteengineers.com/nrf24l01
ADXL335 Accelerometer
- At the heart of the Hand Gesture Controller is a low-power three-axis accelerometer ADXL335.
- It can measure the static acceleration due to gravity in tilt-sensing applications.
- The program works as follows,
The X, Y and Z values provided by the ADXL335 sensor are read by the program and transmitted to the Receiver via the nRF24L01 module.
The receiver compares these values with the min and max threshold values defined in the program.
If the values satisfy the condition specified in the program, the function is executed.
- For example,
When the sensor outputs 1.65 (0g) volts on the x-axis (i.e. xAxis=511), the "stop" condition is executed and the DC motors remain in the "LOW" state.
When the sensor outputs 3.3 (+3g) volts on the x-axis (i.e. xAxis=1023), the "turn to one side" condition is executed and the DC motors go into the "HIGH" state.
When the sensor outputs 0 (0g) volts on the x-axis (i.e. xAxis=0), the "turn to other side" condition is executed and the DC motors go into the "HIGH" state.
- For more detail about ADXL335 - https://www.analog.com/media/en/technical-documentation/
Arduino Pro Mini
- Arduino Pro Mini was developed for applications and installations where space is premium and projects are made as permanent set ups.
- The Pro Mini does not have a built-in USB input, so a serial converter (FTDI) is used to upload the source code. It is an easy process.
- For more detail about Arduino Pro Mini - https://www.arduino.cc/en/pmwiki
Step 3: Prototype (Printed Circuit Board)


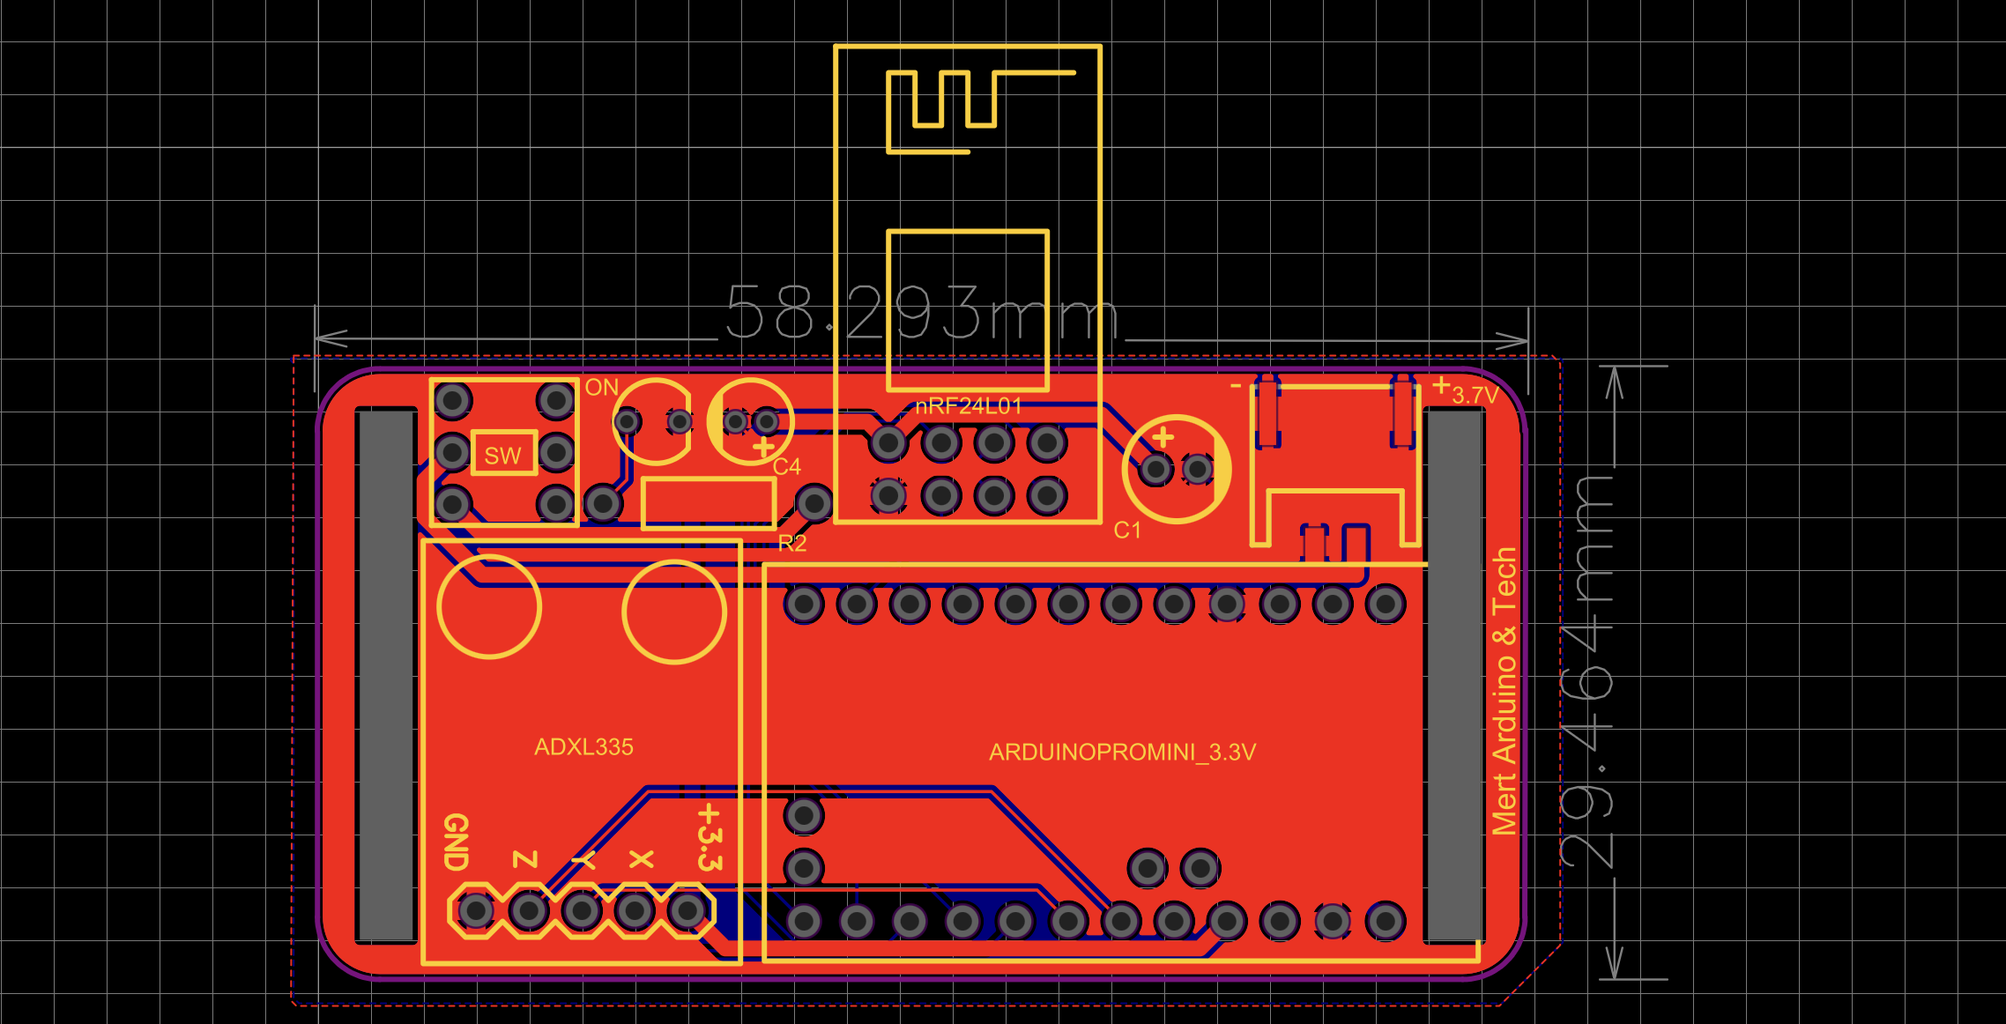
A printed circuit board was designed to turn the project into a useful prototype. Printed circuit boards are plates with conductive paths on the surface for mounting electronic circuit components.
PCB manufacturers provide service to turn your projects into professional prototypes. In this project, PCBWay was chosen for high-quality and low-cost PCB service.
To get the PCBs, simply upload the shared "Gerber file" to pcbway.com and create an order. High-quality PCBs will arrive in a few days depending on the shipping address.
Get the Gerber File -
Step 4: Required Components and Soldering


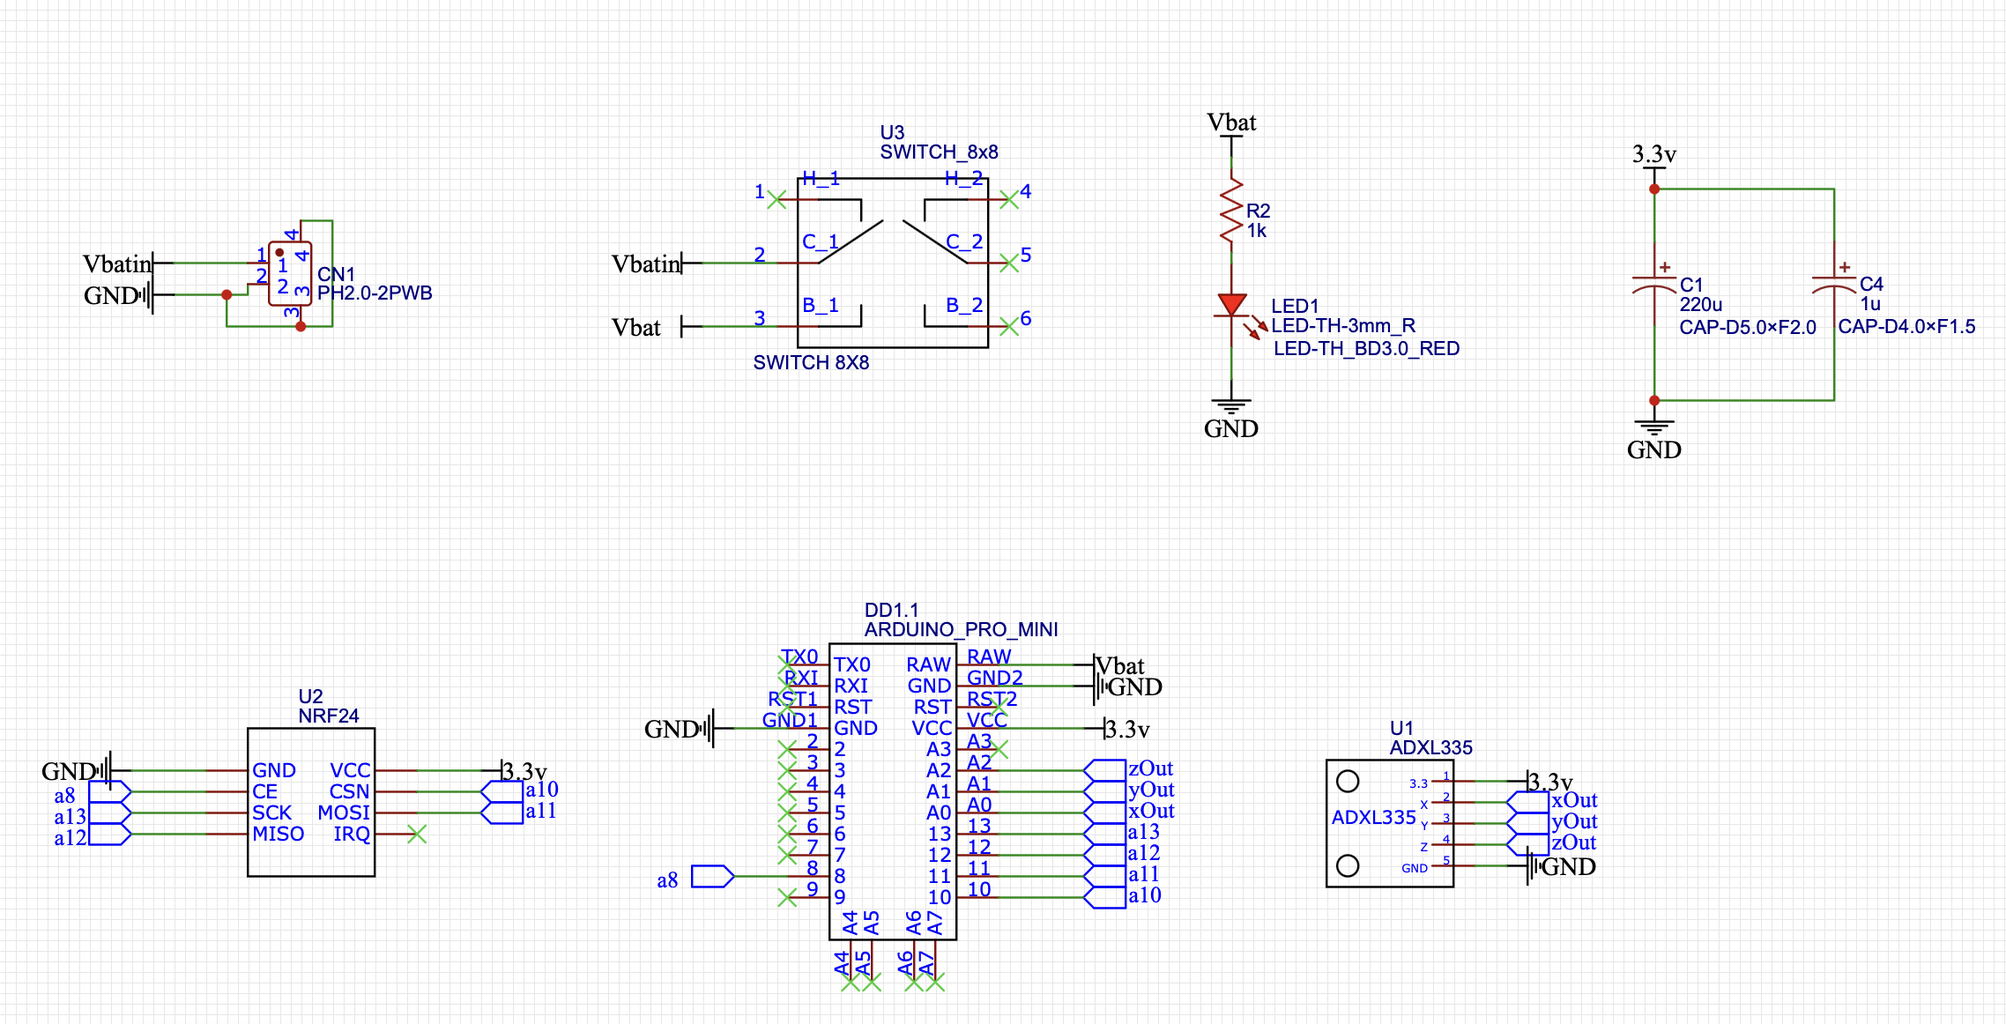
The hand gesture controller needs a few components. Easy solderable components. Place and solder components according to shared reference designator.
Step 5: Transmitter Source Code


- The Pro Mini does not have a built-in USB input, so a serial converter (FTDI) is used to upload the source code. It is an easy process.
- Arduino Pro Mini 3.3V version is used in the project, so make sure to set the power jumper on the FTDI module to 3.3V!
- Upload the shared Transmitter source code using the FTDI module. Before the source code is uploaded, the board selection should be determined according to the Arduino Pro Mini version (3.3v) used.
FTDI USB To TTL Module Banggood - Amazon
Get the Transmitter Source Code - https://github.com/MertArduino/GestureTransmitterCode.ino
Step 6: Receiver Circuit and Source Code


The hand gesture controller acts as a transmitter, so a receiver circuit is required. You can get the necessary and source code for the Receiver (DC motor and Servo motor control) from the link.
Get the Receiver Source Code - https://github.com/MertArduino/GestureReceiverCode.ino
Step 7: What About Everything Else?

If you want to know more about Gesture Tank Control in the project:
- Project Video https://youtu.be/64NS91KmK84
- Source Code https://github.com/MertArduino/GestureTankControl
- Circuit Diagram https://github.com/MertArduino/TankReceiverSchematic.png
- Tank Chassis https://amzn.to/31DriT0
If you want to know more about Robotic Hand:
- InMoov Open-Source 3D Parts and Assembly http://inmoov.fr/hand-and-forarm/

Participated in the
Arduino Contest


