

Introduction: Holding the Camera


It seems like we wouldn't have to go over this - but there are some serious benefits to understanding how the way you hold the camera affects your images. If you are struggling to get a good composition or a sharp shot, playing around with different camera angles and body postures can be vastly beneficial.
This lesson will outline some do's and don'ts for improving your images with some simple body adjustments.
Step 1: Body Posture

While I was working on my photography degree, one of our professors would regularly take us out into the field to help us with technique while observing our form. I'll never forget the day I was hunched over a bush taking a picture of bees buzzing in lavender when they came over to me, unfurled my rounded back and said to me "There are other ways to lower your camera, don't be afraid to use some muscles." They then directed me to widen my stance, bend the knees, and bring my arms in closer to the body. Paying attention to your own body's stability will make you a better photographer, and really tell you when you should be using a tripod. Engage your core muscles while shooting, become a pillar of stillness. Good shooting posture does more than improve your images, it's also kinder on your body!
When Standing

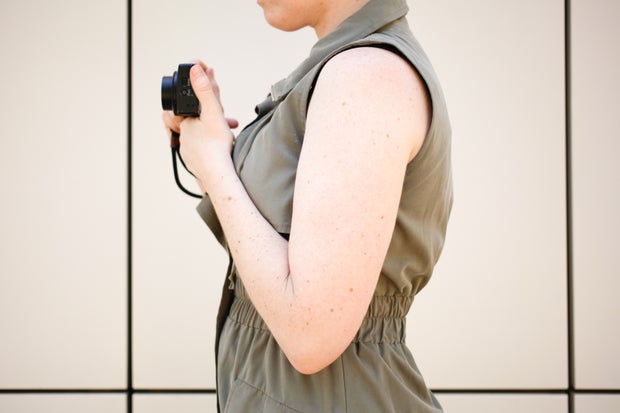
As a simple exercise, hold your arms out in front of you. Look at your hands down to your fingertips. Are they moving or swaying at all? Unless you are super buff, I am guessing your body is swaying ever so slightly. When we hold cameras far away from the body, they become less stable, and if we are shooting in low light and the camera's shutter will be open for a longer amount of time, it is imperative for the camera to remain still to avoid blurry images. By bringing the limbs closer to the body, and into the core, we are far more stable. While standing up, you can usually achieve solid contact points by resting your elbows against your sides, or even into your tummy.
When Crouching...


Sometimes you're going to have to get low to the ground to get your shot. When holding the camera while crouching, you actually don't want to rest your limbs on hard objects around you or joints. This actually creates more wobble. For example, you may be tempted to rest your elbow on your knee while you are composing your shot. When your joints are touching like this, you can shake and shiver to hold yourself in position. Instead, bring the elbow back slightly so it may rest on the squishy and shock absorbing part of your thigh. This squish stabilizes your movement and reduces camera shake.
Step 2: How Holding the Camera Affects Perspective
The following goes over how holding the camera in your hand will change the perspective or point-of-view of your photographs. These same principles apply on your smartphone just as much as they do on your DSLR.
Bird's Eye View/Top Down

When the lens is perpendicular to the plane you are photographing...

...you are actually flattening the physical space in your image. Notice how we lose the dimensional quality of the objects on the table - a bread roll looks like a circle and not a sphere, and it is hard to perceive the depths and heights of the objects in the frame. A lot of food bloggers use this perspective for on-the-table shots.
High Angle

When the lens is tilted down...

...it creates the impression that a subject is small, or potentially diminished.This perspective is not as extreme as a bird's eye view, and will be more dimensional and less formalistic. This angle is great for little kids, and pets - but also perfect for when you are high above your subject, but needs to be contextualized in its setting.
Low Angle

When the lens is tilted up...

...you can indicate that the subject matter is powerful or strong. I like to call this angle 'super-hero view'. The shapes and composition at the base of the image will appear larger than the shapes at the top of the image.
Swing Right or Left

If you hold the camera so that the right or left side of the camera is positioned more toward your subject...

...this particular phenomenon is best observed when photographing architecture or buildings, the right side of the image diminishes towards the left side of the frame because the camera was not parallel to the subject matter, so the contents of the right side appear larger. If you want a rectangular object to appear like a rectangle, and not a trapezoid, you and your lens plane will have to be completely parallel to the subject
Head-on or Eye-level

When the lens is eye level with your subject...

...the image connotes a neutral viewing perspective. This point of view is great for portraits, product shots, and landscapes that you want to dimensionally flatten.
If the images you are creating look distorted in your screen, try adjusting your angle in the wrist and hand. Move the body around to frame the shot from different perspectives. Don't be afraid to look like a dork in public contorting your body to get the shot you want, sometimes you just have to so you can get the perfect picture!
Step 3: Still Getting Camera Blur?

If you photographs are still turning out blurry, it could be a matter of correcting your shutter finger.
When you really smash your finger onto the shutter, often you end up curling your whole hand flexing so hard that you ever so slightly twist the camera. This is problematic because it can result in moving your camera away from the shot you had composed or blur in low light situations. With your shutter finger hovering over the button, roll your finger back across the button instead of hooking your finger straight down onto the shutter.

Look how the hand recoils after pushing the shutter vertically down with the point of your finger.

By rolling over the shutter with the broad pad of your finger, your grip isn't causing camera shake, and your camera moves less while the shutter is open.
If you have observed and corrected all your shakes and wobbles and you're STILL getting blurry images, maybe it's time to use a tripod.
Step 4: Class Project

Share some photos demonstrating the five perspectives that we went over in this class. Bird's Eye View, Tilted Down, Tilted Up, Side Swing, and Neutral.

![Tim's Mechanical Spider Leg [LU9685-20CU]](https://content.instructables.com/FFB/5R4I/LVKZ6G6R/FFB5R4ILVKZ6G6R.png?auto=webp&crop=1.2%3A1&frame=1&width=306)


