

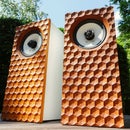
Introduction: Horn Loaded HiFi Speakers - Oak With Brass Inlay


This has, by far, been my most involved and enjoyable project to date. Typically I have purely focused on design when it comes to the speakers I make, but with this build, sound quality was a high priority. The sealed volume was paired to the main driver and with the horns based on other designs available online and similar to those used on other speakers that are commercially available. Naturally, I am not an acoustics expert and although the horns did produce an overall better sound (compared to when I tested the speakers without the horns), I have no idea if they are the correct design but add a particularly nice aesthetic to the speakers.
Overall, this project has pretty much cemented in my mind that building speakers is ultimately what I love to do. I will continue to keep designing and making them so I hope you continue to enjoy my Instructables!
For more up to date content, please follow me on instagram: https://www.instagram.com/nick.charlton/?hl=en
Supplies
Wood is the main ingredient of this project if you are attempting this as a maker. I would consider this an expensive project and so will avoid giving specifics on the costs involved. If you would like any guidance on how to build these speakers, please let me know in the comments!
Step 1: Inspiration


Inspiration is probably the hardest part of any project. Envisioning what it is that you want to make can take up as much time as the entire project itself!
I have obsessed over the Evolution speakers by RD acoustics for a long time. They are impressive in stature, but it has always been the horn around the main drive that has peaked my interest. It would be an obvious part that could be made on a lathe but I thought it could probably be made on a CNC.
Several other speaker designs use a front horn and in the case of the Evolution speakers the front horn is an option called the Oris500 and adds direction to the sound and intensifies the sound above 500hz by up to 3db. I wanted to include this idea of a horn as much as possible in the design and opted to apply a horn to both the woofer and tweeter.
The scene was therefore set; design and build a horn speaker using my Shapeoko 3.
Step 2: Design


Jumping into Fusion 360, I began modeling with a slim, tall cabinet in mind. I ideally would like to have these on stands to bring them up to chest height for the room they will be used in but I didn't want to have them be too dominating.
I knew that a black cabinet with some kind of wood on the front for the baffle was the way these were going to look as it would highlight the horns well.
Step 3: CAD/CAM


Internally, I added a divider into the cabinet to firstly stiffen the cabinet but also to get the required volume the driver being used.
Fusion 360 was used to generate toolpaths directly onto the modeled parts making the process of producing GCODE for my shapeoko quick and easy.
The small horns for the tweeters could be made out of one piece of 40mm oak whereas the the larger horns needed to be made in two halves and glued together for a total thickness of 80mm. I could not machine them as one piece due to the restrictions of the z-axis capability of the shapeoko 3.
I won't go into detail about my CAD and CAM too much as there is already a lot of information out there about using Fusion 360 but if you would like me to go into more detail in future or have any questions please let me know in the comments!
Step 4: Making the Horns


Now for the fun bit, well for me anyway! Starting with the horns for the tweeters; blanks of 40mm oak, reclaimed from kitchen surface worktops were cut to size and held onto the my CNC waste board with the superglue-tape method.
First of all the inside of the horn was roughed out with a 6mm flat end mill to remove the bulk of material but not so much that the operation would take ages.
Next, a scallop finishing pass was ran with a ball mill to give a smooth finish. Notice that the roughing operation did not go all the way through the bottom of the horn. Instead, a thin bit of wood was left and a 6mm hole was drilled with the CNC into the center. As the part is symmetrical around 360 degrees, this will be used to find the zero when the part is flipped. (most apparent in 3rd image).
The part was flipped and then the same order of operations was carried out but this time that skin of wood left for aligning was removed.
The process was nearly identical for the large horns but as previously mentioned, they were machined in two halves and then glued together.
The horns were then thoroughly sanded and scraped up to a fine surface finish and then were coated with a glossy polyurethane to highlight the nice oak grain.
Step 5: Making the Cabinet


18mm MDF was chosen for the cabinets as it is cheap and easy to work with. All the pieces were cut to lenght, as per the CAD, and then I used some off cut pieces to act as corner braces. Wood glue was used in combination with super glue to help hold the parts together while the wood glue dried.
Instead of using a round over bit on the router or something similar to get the filleted edges, a piece of quarter-round soft wood (36mm diameter) was used in the corners and held in place with masking tape while the owod glue dried.
The divider/structural piece was glued in the center of the cabinet, a specified height from the top of the cabinet to give the desired internal volume.
Step 6: Cabinet Finishing


Any gaps in the cabinet were filled with two part wood filler and then sanded down smooth.
Several coats of grey MDF primer were used to seal the end grain of the MDF and prevent the top coat of paint from soaking in too much. Then a glossy blakc coat was applied roughly to give the beginnings of the textured finish which I was after. This was left to dry overnight before a second coat was applied to cover any spots where the paint had soaked in a lot.
As I mentioned in the intro, I have been obsessed with the textured paints from Rustoleum and I decided to use the Black Granite texture for this build to give a subtle but interesting finish to the cabinet. I wanted the cabinet to be elegant but not stand out too much and distract from the front baffle and the horns.
Several light coats of the textured paint and I was happy with the finish. The key with this stuff is to do very light coats and let it fully dry between re spraying as this allows the texture to build up and be more "3D".
Step 7: Making the Baffles


My go to wood for baffles these days is still white oak. It's cheap, easily available and super nice to work with (especially on the CNC). I bought a long board which was enough for the baffles of both speakers and as the wood was PAR (planed-all-round), I did not have to cut it to width.
The two baffles were cut to length on the miter saw and then I rounded the corners with a small block plane and some hand sanding based on a pencil line made with a radius guide (3d printed). I would highly recommend having a set of these guides in the workshop as they can either be used for making pencil lines or directly used with a router and flush trim bit to quickly round corners.
Next, I loaded the boards onto the CNC to cut the pockets for the drivers on the backside of the baffles. I used the bolt holes on my CNC wasteboard to set up a fence to align each baffle on the machine and a mark where the center of each drive would be to zero the machine.
Finally, a light chamfer was added to the front and back of the baffle with a router that I temporarily screwed down to the workbench.
Step 8: Brass Inlay for Baffles


To add a bit of personalization to these speakers I decided to add a brass inlay of my logo (minus the big 'C' around the 'N') to the front of the baffles.
I had already had it in the CAD design so produced some GCODE for the CNC to machine the logo out of 3mm brass plate. This was repeated for the inlay for the other speaker and then all the logo parts were sanded to brushed finish.
The baffles themselves were loaded into the machine and squared up to the machine. The toolpath was generated to add a clearance of 0.05mm of clearance all the way around the profile. This fit was a bit too tight so I ran the same file again as a spring pass which then made the brass parts a snug fit in the pocket.
The brass was glued in place and the brass was sanded flush to the oak and then re-sanded to the brush finish (a slight oversight on my part that I had to re sand the brass!).
Step 9: Baffles Finishing


As the horns and the baffles were of the same material I wanted to finish the baffles in such a way that the horns would stand out and be the center of focus when looking at the speakers. Furthermore, the light brass and white oak made the logo blend in a little too well. To fix this, I opted for a darker stain than I would usually ever think to use but I thought it would complement the black cabinets well and allow the light colour of the horns to be the focus of attention.
A roughly stirred mix of Jacobean dark oak and Tudor black oak stain was used to give a streaky effect which highlighted the grain of the white oak baffles nicely. A coat of glossy varnish was then used to match the glossy finish of the horns and would allow the brass to not only stand out but also be protected from tarnishing.
Step 10: Mounting Horns to Baffle


The horns were simply mounted to the baffle with small wood screws once aligned with the speaker cut-outs in the baffles.
Step 11: Attaching Baffles to Cabinets


As the baffles were not designed to be a flush fit to the cabinets, a way of both centering and then securing them to the cabinets was required.
I opted for dowels to keep the baffle from moving in the XY plane, keeping the baffle centered, with long bolts from the back of the cabinets screwed into threaded inserts in the baffles to keep baffles securely pressed against the cabinets.
Step 12: Mounting Electronics


For the woofers, I went with the Dayton Audio ND140-8 as it had a decent frequency range of 54hz to 8khz which was ideal for these speakers which will be used with a separate sub-woofer to fill in the bass. They were also small enough to fit in with the slim design I was aiming for with these speakers.
For the tweeter, I went with the Dayton Audio DC28F-8 silk dome tweeters. They had the correct frequency response to fit in with the woofers and enough power to match the woofers well.
These were used with a high and low pass filters to achieve a crossover point of 2.5khz however upon testing, I may change this to 3khz to allow the woofer to do more work.
Everything was wired up and connected to some binding posts which were screwed into the cabinet.
Finally, some soft foam was glued around the interior walls of the cabinet to reduce internal reflections but unfortunately I have no pictures of this!
Step 13: Finished + Things I Would Do Differently


Overall, this has been quite a learning experience with many new skills learnt along the way. I am extremely pleased with the resulting speakers. I think the colour scheme works really well and helps focus attention on the horns which I think turned out to look quite interesting. I would like to try a rear loaded horn speaker at some point, perhaps when I have my new, larger CNC set up!
The brass inlay is a feature I am really glad I added. It is highlighted perfectly by the dark oak finish of the baffle and adds some design intricacy alongside the horns.
Having tested these speakers extensively, I really like the punchy, clean sound they produce with the sealed cabinets as was intended but the bass is a bit lacking and they don't have the fullness of sound I had expected from them. I have re-done some calculations with https://speakerboxlite.com/subwoofer-box-calculator/tab-graphs and have come up with a way to modify the speakers to be ported. This, coupled with a change in crossover frequency, should increase bass and give the desired sound profile I am after.
Although having the baffle detachable from the cabinet as the means for gaining access to speaker working fairly well, I think I will opt for a back plate in the cabinet in future for this kind of build. It would have been a lot easier to make and makes sealing the speaker easier.

First Prize in the
Woodworking Contest


