

Introduction: How To: DHT11 / DHT22


The goal of this guide is to demonstrate how to setup & use the DHT11 or DHT22 Module with an Arduino in the most simple way possible!
Supplies
To replicate my example you will need...
- DHT11 &/or DHT22 sensor module (Even if your module does not look exactly the same this guide will likely work)
- Arduino Nano
- Breadboard
- Jumper Wires
- Arduino IDE
Step 1: What Are the DHT11 & DHT22 Sensors?

The DHT temperature sensors are a popular hobbyist option for simple projects that require thermal readings. They are simple to communicate with using 1-wire coms, cheap & quite accurate.
The DHT22 as shown in the tech spec table above is superior to the DHT11 sensor with an improved sample rate, accuracy and temperature and humidity measurement range with the compromise of a larger enclosure.
Both sensors are capable of measuring temperature & relative humidity only.
Step 2: How to Wire Up Demo
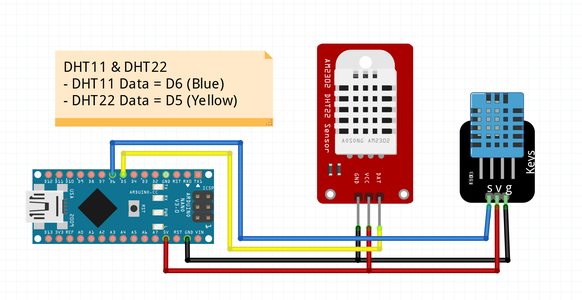

For this demo we will connect both the DHT11 & DHT22 sensor to an Arduino Nano at the same time.
The wire map is as follows,
- DHT22 VCC = 5V
- DHT22 GND = GND
- DHT22 DAT = D5
- DHT11 VCC = 5V
- DHT11 GND = GND
- DHT DAT = D6
Step 3: Code & Test


Before you can program the Arduino, you will need to get the "DHT sensor library" Library, to do so first open the Library Manager as shown below,
In the Library Manager search for "DHT sensor library" and install the latest version.
The Arduino code I used to test out the DHT11 & DHT22 modules can be found below, download the DHT11_DHT22_Demo.ino attached, and program your arduino with it via the IDE.
Once successfully programmed the Arduino will be writing to the serial communication port every 250ms with the sensor reading, in the format shown above.
Attachments

Step 4: Additional Comments

How do the DHT11 & DHT22 work?
Both sensors use the same type of components to measure temperature & humidity. A NTC thermistor is used to measure the temperature and a Humidity sensing component is used to measure relative humidity.
See the attached photo of the DHT11 & DHT22 modules opened revealing these components.
The thermistor is a standard part while the humidity sensor is a little more interesting, this is a multi-layered IC with a moisture absorbing substrate sandwiched between two electrodes. Depending on the amount of absorbed moisture the resistance between the two electrodes varies, this gives the sensor the ability to measure the humidity in the air
What is apparent Air Temperature?
"The perceived temperature in degrees Fahrenheit derived from either a combination of temperature and wind (Wind Chill) or temperature and humidity (Heat Index) for the indicated hour."
We can use the DHTxx sensors Temperature & Humidity values to calculate an "Apparent Air Temperature" with this command (T = Temperature, H = Humidity, False = degC output)
float hic = dht.computeHeatIndex(t, h, false);
Step 5: Thanks for Reading
I hope this short guide has been helpful, if you have any questions please leave a comment or direct message me!


![Tim's Mechanical Spider Leg [LU9685-20CU]](https://content.instructables.com/FFB/5R4I/LVKZ6G6R/FFB5R4ILVKZ6G6R.png?auto=webp&crop=1.2%3A1&frame=1&width=306)


