

Introduction: How to Create a Downhill Ski-Bike 2.0


A ski-bike is a magnificent contraption that uses the basic elements of a bicycle fastened to downhill skis to ride down a snowy slope.
My first attempt at creating a downhill ski-bike resulted in a fully functioning prototype and was overall, a success. It performed as I suspected it would. The ride blended attributes of skiing, snowboarding and biking to great effect. You can find a link to my first iteration here: How to Create a Downhill Ski-bike
Despite the first ski-bike's admiral performance, test riding it revealed there were opportunities for improvement so I developed several design specifications and characteristics that would improve the ski-bike's durability, performance and ease of use. This Instructable chronicles the design improvements and changes that I made to create my second downhill ski-bike. Each step focuses on a specific attribute that I improved.
To avoid creating confusion, from this point forward I will refer to the first ski-bike as Ski-bike 1.0 and the ski-bike created in this article as Ski-bike 2.0.
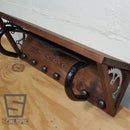
Step 1: Bike Frame


After a few of my friends rode Ski-bike 1.0, it was apparent that the size of the bicycle frame was too large for most riders. The extra large frame was heavier than the riders were used to and more difficult to maneuver. The shock on the bike frame was also designed for larger riders so smaller riders were not able to fully utilize all of the shock absorbing advantages.
For these reasons, I chose to use a small sized mountain bike frame for Ski-bike 2.0. This would allow smaller riders to be more comfortable with the points of contact, and larger riders to ride the bike with few, if any, trade-offs.
There were two features of the bike frame from Ski-bike 1.0 that I wanted to keep the same. The first was to utilize a suspension driven frame and the second was to have an aluminum frame for it's excellent strength to weight ratio.
Step 2: Mounting Brackets


My top priority for Ski-bike 2.0 was to design and build the mounting brackets out of steel to achieve maximum rigidity and durability.
For Ski-bike 1.0, I lowered the axle height from the typical 13 inches for a mountain bike to 11 inches in order to lower the center of gravity and improve handling. The modification was effective so I expanded on that strategy for Ski-bike 2.0 by designing the axle height to be 9 inches.
Building the mounting bracket was a five step process:
Cut the angle iron and tube steel to the lengths predetermined by my design.
Weld the pieces together.
Build the hub and axle assembly.
Drill holes in the angle iron to line up with the ski binding screw holes.
Drill the holes in the front of the brackets for the eyelet bolt (discussed later).
To create a basic hub and axle system, I used a standard 3/8 inch threaded rod as the axle and purchased plastic bushings (from the retailer Igus) to provide a low friction barrier between the axle and the outer steel sleeve. The internal diameter of the bushing was chosen to match the axle and the internal diameter of the outer steel sleeve was chosen to match the outer diameter of the bushing. This resulted in a free rotating axle with very little unwanted play. I also added lock nuts to the front and rear axles to control the longitudinal pressure exerted on the hub delivered by tightening the outer bolts over the dropouts.
Step 3: Ski Type

As I demonstrated with Ski-bike 1.0, a set of downhill skis cut down in size did work to build a functioning ski-bike, but there were some serious drawbacks. Since I shortened the ski length, I couldn't use the ski binding screw holes so I had to drill long wood screws up through the bottom of the ski to attach the mounting bracket. This method was not secure enough for extreme or long-term use. Another drawback was that the ski could break open or separate on the cut steel edge, ruining its performance, and becoming a safety risk.
A much better option was to use a set of twin tipped ski blades (aka ski boards or snowblades), which allow for the same control sliding backwards as forward. Ski blades are similar to modern downhill skis, but are significantly shorter, often coming in lengths between 90 and 100 cm. This length range has become the unofficial standard for ski-bikes. For Ski-bike 2.0, I obtained a set of ski blades that were about 94 cm in length.
The width of the skis was also a factor to consider. Despite being similar in width, I could immediately tell a difference in the performance of my chopped downhill skis on Ski-bike 1.0 and my slightly wider ski blades on Ski-bike 2.0. The extra width increases the amount of leaning needed to catch the ski's edge and carve through the snow. One is not necessarily better than the other; it comes down to the rider's preference.
Step 4: Fork Travel


Here are two technical bicycle terms that will help clarify the following section.
Fork Travel - The amount the suspension fork can compress. The larger the amount of suspension travel, the longer the fork is.
Head Tube Angle - The angle the center line of the head tube makes with the horizontal plane. A steeper head tube angle will steer a bike more quickly whereas a slacker head tube angle makes it easier for a bike to travel in a straight line. Head tube angles range from about 66 degrees (downhill mountain bikes) to 74 degrees (race orientated road bikes).
During its days as a regular mountain bike, the Ski-bike 2.0 frame had a fork with 100 mm of travel. When converting it to Ski-bike 2.0, I replaced the original fork for a fork with 130 mm of travel. The 130 mm fork had 30 more millimeters of travel than the 100 mm fork and was therefore longer. This increase in length raised the head tube and reduced the head tube angle which gave me more confident steering and control when pointed downhill.
The amount of fork travel paired with the height of the front and rear axles (based on the mounting bracket dimensions) determines the head tube angle. This in turn affects the steering and handling of a ski-bike. Since every bike frame comes in several sizes and has a different geometry, I can't say that there is a single, optimal amount of fork travel for all ski-bikes. It comes down to personal preference of the rider and the terrain.
Step 5: Footings


I really liked the footing setup I used for Ski-bike 1.0 because it provided the familiar feeling of using standard bicycle cranks and pedals and allowed me to change the position of my feet depending on the situation. There were a few drawbacks to this setup though. Without the resistance from the chain and rear wheel, the cranks spun freely, which as a cyclist, I wasn't used to. Another drawback was that the drive side crank arm still contained chain rings. During a crash, the teeth of the chain rings could potentially injure a rider.
For Ski-bike 2.0, I came up with the idea of using unicycle crank arms. Unicycle crank arms worked great because they still allowed the pedals to change position, had no chain rings to worry about, and were available in a variety of lengths. I decided to use really short crank arms to remedy the uneasy feeling of pedaling long crank arms with zero resistance. Having short crank arms resulted in a much smaller rotational diameter of the pedal, minimizing the effects of spinning the cranks with zero resistance. Another benefit of shorter crank arms was the increased clearance with respect to the ground.
I chose to use mountain biking platform pedals for Ski-bike 2.0 because they have a wide foot platform and large studs for extra grip.
Step 6: Ski Rotation Control


Unlike a bicycle wheel that's ready to contact the ground anywhere in its rotation, it's imperative to always keep the skis on a ski-bike with the bottom sides down. Ski-bike 1.0 had no system in place to keep the skis from over rotating in either direction. This potential problem was controlled by limiting Ski-bike 1.0's use to stable snow conditions and no large jumps.
Ski-bike 2.0 on the other hand was designed to be ready for anything. The front ski was controlled by a bungee retention system on the front of the mounting bracket. The bungee was in constant tension while the ski was on the ground, always trying to pull the front tip of the ski upwards. The bungee was threaded through the eyelet bolt on the front of the mounting bracket and lashed into a loop using sturdy stainless steel wire. The top of the bungee was lashed into a loop with more wire, looped over an "S" hook, and then the "S" hook was hooked to the bridge of the bicycle fork. I cut the length of bungee to achieve the right balance of tension. Once airborne, too much bungee tension would pull the ski tip quickly towards the handlebars and too little tension could allow the ski tip to dive into the ground.
For the rear ski, I was going to rig a bungee retention system similar to the front ski, but I came across a torsion spring that seemed to be the right size and have an adequate spring rate (i.e. strength of the spring). The spring had an internal diameter larger than the axle's lock nuts so it slid right over the top and pressed against the underside of the mounting bracket and the axle cutout of the bicycle frame's dropouts.
One key attribute of these two systems is that they both can easily be disengaged when needed, such as during transportation.
Step 7: Paint Job


This step is entirely optional, but very effective at giving the project a professional and completed look. I had the bicycle frame and mounting brackets powder coated which is very durable, but requires the parts to bake in an oven to harden the paint. Since the skis contain a lot of plastic that would have likely melted during the baking process I was not able to powder coat them so I simply spray painted them instead.
I chose a dark metallic blue color for the frame to accentuate it's shape when viewed with a white snow background. The skis and mounting brackets were painted white to blend into the white snow background to create an illusion of the bike just floating over the snow.
Step 8: Conclusion


The performance of Ski-bike 2.0 was a giant step ahead of Ski-bike 1.0. I was able to confidently ski-bike down a legitimate ski hill as fast as a typical skier or snowboarder. The front ski dug its edge into the snow when I turned the handlebars and allowed me to carve sweeping turns and stop whenever I wanted. Every improvement was noticeable.
Here is a quick summary of each improvement made to build Ski-bike 2.0 and the resulting performance increase:
- Using small sized full suspension bike frame = lighter weight and easier to handle
- Building mounting brackets out of steel = noticeable increase in rigidity and ability to fasten to ski via screw holes
- Lowering axle height via mounting bracket dimensions = lower center of gravity made turning and leaning easier and more confident
- Using twin tipped ski blades = allowed sliding backwards and the use of the screw holes for secure fastening to mounting brackets
- Increasing fork travel reduced the head tube angle = more confident steering and control when pointed downhill
- Using short unicycle crank arms = increased ground clearance, no chain rings to worry about, and minimized feeling of no resistance
- Creating a bungee and torsion spring rotation control = prevented front and rear skis from nose diving while airborne
Ski-bike 2.0 was a major success. It achieved every performance goal that I set and more importantly, it was an absolute thrill to ride. While I will ride Ski-bike 2.0 as is for a while, I can't help but contemplate ideas for Ski-bike 3.0. Be on the look out. But until then, check out the video highlights of Ski-bike 2.0 in action!

First Prize in the
Guerilla Design Contest


