

Introduction: How to Document Your Busy Bees


Many bee keepers aren't just satisfied with opening their hives to check on their bees, but want a more in-depth experience with bees. Keeping an observation hive is a great way to learn more about your bees and see what happens in the hive on a day to day basis.
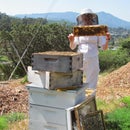
I borrowed this observation hive shown in the first two images from a friend in order to test new materials for the hive while at Residence at Autodesk. The observation hive I have shown here is typical of most, with the frames held vertically so that an entire hive can be observed and there are no places for the queen to hide. While this design is great for shows and short term, it isn't so great for the bees long-term because it's very hard for the bees to regulate temperature when the comb isn't clustered close together as in a natural hive. Plus, I wanted a way to document the building of comb and bees activity, and the acrylic has a high reflectivity and glare, making it difficult to photograph.
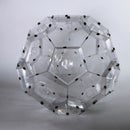
I set out to design a type of observation hive with my own needs in mind. I have a series of sculptural collaborations I'm developing, and I wanted to document how the bees react and then build onto the sculptures that I place inside the hives.
The cameras I place in the hive will take time lapse images which I will then compile into a video. A separate Instructable will document how to hack a flatbed scanner and use time lapse images to compile a video, but for this set of tutorials lets just stick with the building of an enclosure for documentation.
Step 1: Parts and Tools Needed
For the outer cover:
3/4 plywood
1/4 plywood
Gorilla glue
Strap clamps
House paint
For the acrylic inner camera hive body:
1/2 acrylic sheets
1/4 acrylic sheets
Acrylic cement
Strap clamps
Red paint
Masking tape and masking paper
Adhesive cork gasket
For the shelves:
Optically clear acrylic from Evonik
Acrylic cement
1/4 acrylic
Stainless steel dowel pegs
Tools, software and machines used:
Drill press and drill bits
Coherent Metabeam laser cutter
Epilog 120 watt laser cutter
Dell laptop running windows 7
Fusion 360 from Autodesk
Sawstop table saw
Consumables:
Paintbrush
Masking tape
Butcher paper
Latex gloves
Dust mask
Eye protection
Glass syringe and tips for acrylic cement
Sandpaper
For documenting consider using the following:
Power cord, 100 feet
USB and power outlet combo
GoPro hero 3+ or newer with standard housing and a macro lens
USB to mini for GoPro power
Flatbed scanner and modifications for time lapse
Light source, preferably red LEDs in the 640nm range, or flash
Step 2: Prep Work


The camera hive was designed to document my collaboration, so first I needed to make drawings and calculations for the dimensions and features of my enclosure. I kept in mind ventilation and airflow for the bees, how to power cameras, and lights or flash I needed, space for the cameras, and how to adjust the shelves for different purposes.
It's great to have a set of drawings and measurements when you begin to create your cad model.
Step 3: Create Your Model


I used Fusion 360 to create my models for this project.*
About the design. This camera hive has three major components: the ability to see inside without releasing bees, the ability to power devices, and a cover to keep the bees in the dark when closed.
I wanted to have an enclosure that I could open without bees escaping. Acrylic traps moisture, which is the killer of hives. I decided to use pegs to hold my shelves, and the holes for the pegs double as ventilation holes for the box.
The is a gap between the acrylic and the plywood cover. This allows me to insert my cameras and any motherboards, plugs, or other devices I might need to make documentation magic happen. Plus, it also acts again to be an airlock and help reduce extra moisture, since the gap will help insulate and keep moisture from condensing in the warmer surfaces inside the hive.
The lid of the acrylic box and the cover both have openings to accommodate electrical cords and wires without releasing any bees.
Once I had my model completed, it was time to test fittings and tolerances with the machines I used to cut the pieces and based on thickness of materials. Then I made adjustments in my models and sent the files as PDF to illustrator, the program I used to talk to the laser cutters.
*I can't say enough about how great this software is for my purposes. While you can also use Inventor for this particular type of project where you're creating a series of boxes that fit together, Fusion is a hybrid modeler that allows people to model both surfaces and solids, and many of my other projects switch between both.
I also love Fusion 360 and Inventor because unlike other software such as Sketchup, you can go back in history to make adjustments which update the parameters of the entire model. I've used Sketchup for more than a decade, but when I made the switch to Fusion 360 my brain lit up and I finally started creating dynamic models that worked beautifully and satisfied my sense of aesthetics.
Step 4: Cut and Glue the Plywood Cover


I used a metabeam laser made by Coherent to cut the 3/4 plywood. This laser cutter is a bit tricky, since it uses a proprietary software and DXF to read the files. Plus, it's very powerful, so use it with extreme caution and always watch the laser as it cuts in case of fires.
You'll notice I've put my name, the project and date, plus the part on all the sides. This saves confusion later, since I will always know what part and what version I have in front of me when assembling.
Once the parts were cut, I used gorilla glue and strap clamps to hold the entire piece in the right position and let sit overnight.
Step 5: Cut and Glue the Inner Acrylic Box


For cutting the acrylic I used a 120 watt laser cutter made by Epilog. It's a very easy laser cutter to use because it reads PDF, and I use illustrator to send the files much like you'd handle a print file. This laser is slower than the metabeam, and so I got into the habit of listening to audiobooks while I monitored the machine.
Once the acrylic was cut, I used acrylic cement and strap clamps to glue the entire piece together and let sit overnight.
You'll notice that in addition to the text for each piece, I etched the different shelf configurations possible into the sides of the acrylic box. I also used the glued box as a jig for gluing my cover.
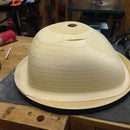
Step 6: Treatment for the Acrylic Base


The acrylic camera hive sits atop a standard Langstroth hive body. I wanted to be able to see into the hive below, so I cut the base for the acrylic box from acrylic and put slats into it so bees could get through. When I assembled it all I could see that light passes though the acrylic into the hive, so I masked and painted the edges with red paint. Bees can't see in the red spectrum, so it should do the trick to keep the bees happy and in the dark.
I wanted the acrylic inner box to be stable and not accidentally move around when I lift the cover, so I used cork gasket tape on the base to make the index and keep the box in place.
Step 7: Bevel and Glue the Shelves


Next I cut and glued the shelves. I had to make a few minor adjustments to the shelf dimensions before I cut, since my acrylic box wasn't perfectly square and I wanted a tight fit so bees can't escape.
The acrylic I used for the shelves has an anti-glare ultra clear coating, making it very expensive. To minimize the expense, I cut the shelves from standard clear acrylic and then used the special acrylic as windows, thus reducing the amount I used and having it only where it was needed.
The only tricky part about glueing two pieces of acrylic this way is that the cement doesn't want to work on sheer loads, so I roughed up the edges with sand paper were the acrylic would overlap to give it more tooth and hold better.
The laser cutters we have can only cut in 2D, so the edges of the angled shelves needed to be beveled. This is so they fit tight against the lid and keep bees from sneaking out. I did the bevels with a table saw, setting the saw blade to a miter angle and running the prices through with a jig.
Step 8: Assemble and Test


For this step I assembled and tested the camera hive and cover. So far so good!
You can see here that I'm using a GoPro with a macro lens to take images. I set it to time lapse and plugged it in using the usb mini cord. My original intent had been to use a hacked flatbed scanner, but that's not up and running yet. You'll see that I have red LED strips to light the inside of the hive. Bees can't see in the red spectrum, so to them the hive will still be dark inside. This allows the goPro to work. The flatbed scanner provides its own light, so later I won't need the LEDs. I don't know what the bees would do if they saw full spectrum light, but my guess is that they become confused and may even try to cover the light with propolis. Light passing through propolis is red from what I've seen when removing bees from inside walls.
For the details on how to document the activity inside a hive, including different cameras and lighting possibilities, I will have another Instructable coming soon.
Step 9: Paint the Outer Cover


Next I painted the outer plywood cover with a low VOC house paint. Most hive boxes in my apiary are white, so I stuck with that color. I painted the inside red, though this was probably unnecessary.
Step 10: Assemble Outside on the Hive


Last step, assemble outside. I was sure to have all my parts and assembly thoroughly examined and tested, since no one likes an open hive for very long, especially me, who is the one who really suffers. No humans were harmed in the making of this Instructable.

Participated in the
Explore Science Contest


