

Introduction: Nucleus Colony -or- How to Start a Beehive


You've gotten the bug and decided to start keeping bees. You do a little research and learn that every spring, local beekeepers sell starter colonies, what are known as Nucleus colonies of bees, also called 'Nuc' for short. Excited, you put your deposit down on a nuc and eagerly await the arrival of your first hive.
Now what? This tutorial will show you the simple and easy methods to get started, with extras in italics for those who want a little bit more to fill their heads. At the end I'll include some links for resources and a few extras for those deep learners.
Step 1: Where Do I Put My Hive?


You need to find a location for your hives. You don't need a lot of space, but you need the right conditions.
Here is my list:
Must haves:
- At least 20 feet of room for bees to fly unobstructed. The will need a "flightpath" out of the hives where people aren't walking.
- Sunshine in the morning
- A flat, level surface
- Access to this space 24/7 without needing to make arrangements. You'll thank me for this tip.
- Located at least 100 feet from sidewalks, doors, pet areas, and any other areas that see heavy people/pet activity.
- Not too windy or places where temperature swings are minimal. Rooftops are difficult places to learn beekeeping.
- A good water source nearby, either provided by you or a natural source like a creek. Bees prefer pool water or a drippy faucet on soil for some reason.
Bonus:
- Urban areas with lots of irrigated gardens around them
- Places where they cannot be seen from the road or by neighbors
- Places where you can keep more than one hive, since they can share resources when you pair them up.
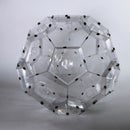
- Space between your hives so that bees know which one is their own. The hives in this photo are very close together, not ideal but makes for a pretty photo and easier to work this way.
Step 2: Preparing With Hive Set-up


What equipment do I need?
You're probably also wondering about hive equipment and trying to figure out all the different sizes and options- there are many. I bought hive kits the first year and as I learned more I was able to figure out a system that worked best for me. Best to keep it simple and increase complexity as you know more, in my opinion. The kits I recommend are all medium frames at 6 5/8" tall, so the nucs you'd be buying would be medium nucs. Here is what I recommend to start out: (All text in blue is a link)
Mann Lake is one of my favorite companies to work with, good cust. service, fast delivery, free shipping on orders over $100. Each kit will house one full-sized hive with room for honey and includes all you need to get started for the first year or two. (In the next section I will lay out what parts you will need for initial setup)
These kits are pre-assembled and painted, completely ready for bees. They only need one additional component- a top feeder.*
10 Frame 6 5/8" Growing Apiary Kit - Wood Frames - Painted
Then you will need the following tools:
You will also need a base to set the hive on, since it doesn't do well on the ground. Use mason blocks from any hardware store, a sturdy palette, buy a fancy one or build your own. Remember, it needs to be level!
Before your nuc is ready for pick-up, you need to have your new hive pre-assembled and set up in its new location.
For installing the nuc, you will not need all the equipment that came in your kit, but you will need the following:
bottom board (base)
one hive box (it can be medium or deep, depending on how much you want to lift)
four or five frames for now, (a total of ten when you add in your 5 frame nuc)
either a telescoping lid with inner cover, or a migratory cover
entrance reducer set to the smallest opening size
feeder for syrup or drivert sugar (not pictured in drawing)
To make the syrup, you mix a 1:1 ratio of hot water to table sugar, being sure to let the syrup cool to room temperature before using it.
*Drivert sugar is a dry form of feeding. Keep reading for more about drivert and feeder types.
There are many types of feeders, but I recommend top feeders for their ease in filling and their tendency to not encourage robbing by other hives.
Step 3: Picking Up and Transporting Your Nuc


Nucs typically come in a temporary box with a lid. Hive entrances must be closed while no bees are flying to avoid leaving any behind and weakening the nuc. This means that the entrances must be closed before dawn or after dark.
Ideal times to pick up nucs are the same deal- early in the morning or after dark. It's tough on any colony to be locked inside all day, especially with the temperatures are warm, so best to plan for this.
Your nucs should be kept in a warm- but not hot- place while they travel to their new home. Think of them as you would a baby. They need to be kept out of the wind, the damp, and at a temperature that you and I would find comfortable. Ideally they will be in the back of a hatchback or enclosed inside the vehicle. I'm a seasoned beekeeper, so having an occasional stray bee in the cab with me is no big deal, but there is no need to risk your driving ability for your new hive. If you have a truck or must put the nucs in your vehicle with you, bring a tarp. This will ensure strays are safe, and wind will not cool the nucs too much in the back of a truck.
Here is the most important part:
Hives should travel so that the frames are parallel to the car orientation. If you travel with frames that are perpendicular to the direction of stops and starts, they will move inside and damage bees and comb. Make sure frames are safe,
The sooner you can get your nucs to their new hive, the better your success rate. Now let's get on with it! If you've jumped in with both feet and bought many packages, then you should plan ahead and bring any tarp, boxes, and accessories you need to strap those babies down in the back of your truck all nice and cozy-like.
Step 4: Hiving Your Nuc


Your nucs must be placed in their new homes asap.There is one key step here, so don't skip this one...
Your bees will orient themselves to their new locations based on polarized vision and recognizable landmarks. Bees will orient themselves so they can find their new hives, and if they orient themselves to the wrong part of your garden, they won't be able to find home.
What you do is place your nuc box right next to where the new hive awaits. The bees will them be able to shift over a few inches to find the hive as you make the transfer. If the bees cannot be move into their new hive right away, place the nuc box in the spot your hive will be and allow the bees out to forage. When you move them into the hive keep it in that spot and they will already know where home is.
You'll fire up your smoker and give the entrance of the nuc box a puff or two of cool smoke. This will ensure the guard bees at the entrance are calm and you don't get a big reaction your first time opening the hive. Smoke interrupts the ability of bees to signal danger. There are only a few dozen bees in nucs who are programmed to signal danger, but if they get fired up, others will join in the cause. This is why smoke is the universal tool for all beekeepers worldwide, no matter if they keep bees in traditional ways or our more modern systems. Don't skip the smoke because you're concerned about the health and wellbeing of the bees- this is a foolish notion based on a failure to understand honeybees. Bees are amazing and wonderful, sentient creatures, but it is in their nature to sting, and they have just been through some trauma while on their trip to your apiary, so do not set yourself up for failure on your first day. It will be less stressful for you and your bees, because you will make fewer mistakes as a new beekeeper when you get prevent yourself from getting stung and keep a cool head.
You'll make a space in the hive box by pushing the empty frames to either side of the hive. The frames from your nuc go into their new hive in the center, with brood in the very center and resources on either side, and finally the empty new frames on either side. As your bees consume their resources they will be foraging for new resources, which they will begin putting in new combs as they expand. The old honey and pollen combs will become brood comb where eggs will be as the colony occupies more frames.
It's not a bad idea to feed nucs when they are in their new home, at least until they have filed out the first box with bees and resources. This box must be full before winter at the very least, and feeding helps the bees build wax. It takes many pounds of honey or other carbohydrate sugars to produce small amounts of wax, and without wax its hard to make new bees to gather honey and there's nowhere to put honey if there isn't any comb.
If you are adamant about being all organic all natural, then feed your bees pure honey so they can make comb. This isn't ideal, since honey can be a vector for pathogens to spread from hive to hive. It's also expensive. I prefer to feed my nucs with my own less marketable (read: Coyote brush) honey or a sugar syrup of 1:1 ratio to stimulate wax production.
Don't spend too much time moving the nuc into their new hive. They're bound to be grumpy, so you won't see them at their best, and being quick will be better for everyone. Next day or two when they are settled and the weather is nice, check out your hive. They will be happy and not stressed by then, and you can do a real evaluation of their health and happiness, and they won't get grumpy if you keep the frames out a bit longer than normal.
Remember to check and make sure the hive entrance is at its smallest opening so the small hive can defend itself from other bees who may rob them and from yellow jackets.
See the next page for inspection info.
Step 5: Inspecting Your New Hive


As I wrote in the last step, save your first inspection for a few days after you've placed your nuc in their new box so you aren't trying to do it while the bees are stressed.
Inspections this time of year will be to assess the buildup of the hive's population, how well they are building new comb and if they need more room, and how their overall health looks. A nucleus colony will have a minimal tendency to swarm if setup correctly and promptly, so don't worry too much about that for a while.
You may not see the queen, maybe even not ever, even if she's marked! She's surrounded by thousands of other bees! While the queen is the most important bee in the rest of the hive, you don't need to see her to know she is there and all is well. Just look for her eggs. When you see eggs, stop looking for the queen. I know you're dying to see her, and not seeing her can be disappointing, but you have to show some restraint. Its very important not to keep frames out too long, because they need to be kept at a stable temperature for the larvae to develop properly. It stresses the bees to have frames out too long, and sometimes foreign bees can start robbing the frames of honey. How long is too long? Depends on the temp and situation, but if you always try and make it quick, then you'll be fine.
Look at the brood next. Healthy hives have brood that is grouped in rings of the same age. Capped areas should be fairly uniform with cells mostly capped, not too many gaps. Look at the larvae and make sure the smallest ones are "wet" looking, not dry. Look for dead larvae. Take notes.
Pro tip:
Start from the outer edge of the frames and remove that one first and set aside. Then push the remaining frames into the gap you just made and inspect the center frames first. It is in those center frames you will find the queen and/or eggs.
Step 6: Xtra Curricular: Understanding Nucleus Colonies and How They Are Made


Nucleus colonies can be made in a variety of ways but the composition should remain the same. Five frames of bees, two or three have brood comb, and the rest are drawn and full of pollen and honey, called resources. Each nuc has one laying queen, and the brood comb should all be hers.
The way I make my nucleus colonies has developed over the years. I wrote an 'Ible a few years ago about making nucs and splits, and since then I've taken on some tools and methods to make the process more reliable for larger scale queen breeding. I'll describe my new methods briefly as an overview, since its not really for beginners like my more in-depth 'Ible form back then.
I use the Cloake Method for rearing queens. I basically nurture my nurse colonies to be super strong and bursting at the seams with huge populations of young, healthy bees. They are ready to swarm, the ideal conditions for making baby queens. I make them think they are queenless, and so they begin make many queens from the eggs I provide them from the queens who have the most desireable characteristics. I've set up the nurse hives so that there are many nurse bees looking for jobs, and when they sense the new queens, they rush over to feed them. Queen larvae are fed 100x more often per day than regular worker larvae, imagine that.
Once the queen larvae are beginning to develop, I reunite the queen with the rest of the hive and the bees continue to nurture the new queens. Then I watch my calendar patiently, oh so patiently. During this time I make my mating nucs ready. Mating nucs are two frame colonies, filled to overflowing with bees, all comb drawn with some resources and no eggs or larvae. When the queen cells have been capped and the larvae have almost fully developed but just before they begin sending out queen pheromone, I place each queen cell by itself in a mating nuc. Then I transfer those nucs to the mating yard, where they will mate with the drones from my other desireable colonies. The queens hatch and a week later fly out to mate over another week to ten days period.
Once the queens have mated and begin to lay eggs, I quickly move them into their 5 frame nucs. The population will continue to grow and I will begin to verify the quality of the queens. I'm looking at how well they lay and how tight the capped brood is, whether they are showing signs of hygienic behaviour, and how gentle they are during inspections. During this time I will mark queens that make the grade with the paint color for their year of birth and replace the queens that fail to meet my standards.
Once that has been completed, the nucs are ready for sale or for replacing my colonies that didn't overwinter.
Step 7: More About Feeding Bees

In addition to sugar, the bees need pollen. Bee supply stores sell pre-made patties, and you can make your own with powdered commercial pollen supplement or by mixing your own with raw ingredients. The pollen patties should be added as close to brood as possible, and in this case I'd put them right on top of your frames where they can get to them easily. Remember to place the patties to that bees can still get around them!
Feed your bees until all the frames are completely built up with wax comb. Bees gather nectar, the raw ingredient used in making honey, from plant flowers, and this nectar can consist of 16+ different types of sugars. When we feed, we usually can only provide one or two different types of sugar, but this is enough to get them started. If you want to go super granola, you can feed your bees honey, but you run the risk of infecting them with all sorts of diseases. Its a general conception that feeding bees with corn syrup can harmful, as most corn is heavily treated with pesticides. Pollen is how bees get their protein, and they need this to feed their brood and use it to keep themselves fat and happy, which extends their lives. When bees begin to lose their body fat, they begin to age, which triggers them to leave the hive in search of more food. Pollen supplement is just that, not a substitute. If you go super-granola you can buy real pollen to feed your bees, but again it's risky and very expensive. In the image of dry sugar on top of the inner cover- Drivert you can see a pollen patty sitting there too. In this case the bees ignored the patty because it was too far from the brood. Better to put it inside the hive body. I mix my own pollen patties using Ultrabee, a product sold by Mann Lake. I make it with the powdered suppliment, sugar syrup, essential oils of thyme, tea tree and eucalyptus, and a little olive oil. The olive oil keep the patties moist and adds extra to the diet of the bees. I make the consistency moist enough to dribble it on the top bars where there are brood.
I prefer to use drivert to feed bees the rest of the year, especially in winter. Its a specially formulated sugar that is in a more raw state that the bees can process from a dry form. I scoop into the tops of hives on the inner cover with a spacer between that and the outer cover. This is easy, attracts fewer ants (which can kill a weak hive) and also acts as a desiccant to help keep the hive dry in the winter.
Step 8: Resources and More Info

Beekeeping Suppliers
Mann Lake : Free shipping Nation-wide on all orders over $100, full selection
Dadant: If they offered free shipping they'd be as good as Mann Lake, Nation-wide
Kelleybees has a great online catalogue with unique tools and supplies.
Brushy Mountain: great queen castles.
Beekeepers who know more than me:
Randy Oliver has published extensively on the hows and whys of beekeeping
Michael Bush is knowledgeable, best information for going treatment free
Extras: I've written many Instructables over the years, so check them out!
Additional projects I've written: How to Make a Nucleus Honeybee Colony
Sugar-coated Bees, How to Test for Varroa Mites
How to Make a Bee Vacuum that Really Sucks
My websites: www.jennifer-berrybees.com
A better PDF than mine on getting started:
http://scientificbeekeeping.com/scibeeimages/BEGINNERS-OUTLINE-PDF.pdf


