

Introduction: How to Make Mini CNC Router Drawing by Arduino and Shield L293D


In this project we will build a small drawing machine Mini CNC using Arduino Reader's old disks for computer equipment. is machine electromechanical digital control through a computer card and ardueno simple to use.It may these circumstances the machine drawing dimensions limit 4x4 cm .
This is a video and how they work:
Step 1: But What You Will Need?


Step 2: Axe X and Y :


We are building a machine on this shape using old things from plastic or wooden cutting ... taking into account the measurements and angles.
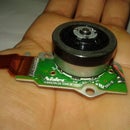
The reader can use the discs as a base tray.
We soldering engine small step in order wire.
We linking the two axes X and Y together constitute Laket 90 degrees like in the picture.
Leave a space between the cover and structure through the use of the same length pieces.
We cut off part of the cover structure dimensions of 7x8 cm to be the basis for drawing them.
Use these magnets installed on the underside of the paper axis "There is a close reading lens"
Thus get to overlie this form. You must note that measurements and angles and should be minimized to the maximum friction as possible, All stepper weak and with less friction difficult for them to move the rotation axes.
Step 3: Axe Z :


This axis is the most difficult in terms of both composition There is no specific design for him, saluting and we have to use your imagination and you install it according to what you have to cut you may find useful in its design.
But here are some pictures to illustrate the design ( All Pictures)
Saluting the pen hanging on after 6 cm from the horizontal axis Y on a piece of plastic, which in turn linked to a moving axis up and down, taking into account not to move this piece to any direction Swe down or up. The controls in this small servo motor axis (blue)
To prevent the pen from moving in any direction but the bottom or above the rods used as a platform to move the pen.
Lubrication axes to ensure the functioning of the machine series.
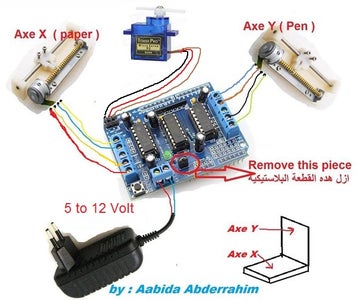
Step 4: Circuit :
Step 5: Arduino Code :

This open source code modified platters with a small CNC machine and circuit driving motor L293D
You will not need to change him nothing but that I wanted to change the rotation rate servo drive by your design.
Step 6: Convert Any Photo to Draw and Then to Gcode :
First Gcode is a sequential and sequential coordinates and received by Arduino of computer commands to be applied by the leadership to step coordonnét engines were sent in succession.
There are programs produce files Gcode such as inkscape . which worck by inkscape in this project, which specializes in graphics ... We'll Download Inkscape 0.48.5 version (it is necessary to download version 0.48.5)
Now you need to add a library to inkscape files to be able to produce Gcode files on the extension gcode (there are several extensions including svg, eps, emf, gcode .... What matters is gcode)
We unzip the file has been pressing for we copy the src folder to the following location C: \ Program Files \ Inkscape \ share \ extensions (location may be changed by inkscape on your computer, the program's inauguration venue)
Now how we will transfer the images to draw? This is indicated by them to the following video. Follow the stages well :
Do not forget to subscribe :)
Step 7: Programe Gctrl :


gctrl is a simple program which will automatically send gcode files from computer to Arduino .
In the first after we have put the code in Arduino card and rode the pieces together and connect Arduino card to a computer, we select COM relating to him Arduino card (the card should be linked to computer before running gctrl), the spectrum clicking Al symbols "p"
To determine the caller Com card Alardueno go to the Arduino IDE software and put pressure on Outils ..... as in the picture (I used an Arduino Mega)
After you determine COM clicking on the letter "g" to locate Gcode file, and then pull the OK to begin immediately to send Coordinates Arduino card.
- There are further instructions on the front of gctrl including:
- The numbers "1" and "2" and "3" to determine the accuracy of the drawing
- The letter "x" to stop drawing
- The letter "h" to return to the coordinates of the pen zero (0,0)
Step 8: Gcode Ready:
this Gcode file is ready to drawing .

Step 9: This Is Another Video for Mnin CNC With the Increase in Drawing Speed :
Step 10:
Finally Congratulations, you beautiful drawing machine. Greetings from the blog world of electronics.
Do not forget your blog post with your friends on Facebook and do not forget the world of electronics subscription channel on YouTube. Do not be stingy to leave comments on the blog, and I'm on standby to answer your questions.
Here small video drawing Mini CNC plotter:
This is a video of some of the achievements channel world of electronics:
And I say it again, do not forget to click on the subscribe button for each new learned about your channel from the world of electronics, to manufacture it simply.


