

Introduction: How to Make a Hammer Rack


Materials:
12 ft • ½” round steel rod
15 ft • 1” square steel tubing (1/8” wall thickness)
4 casters (optional)
Prerequisites:
Basic Metal Shop SBU: MTL103 at the TechShop
Tig Welding SBU: WLD101 at the TechShop
Measurements:
4 ft • Tall
2 ft • Wide
1 1/2 ft • Deep
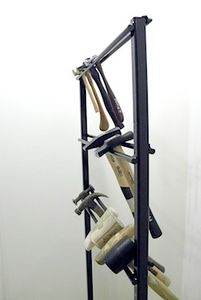
The 3 rows are spaced 10 inches apart. The front bar of the row is slightly lower than the back bar of the matching row. This causes the hammers to hang at an angle. The first is 1/2 inch lower, the second is 3/4 inch lower, and the third is 1 inch lower. The variation in this measurement allows for smaller hammers to fit on the top row, and progressively, larger hammers to fit on the bottom row.
Step 1: Cut Materials to Size
Use the cold saw and horizontal band saw to cut materials into the following lengths:
(6) • 2 ft sections of ½” round steel rod “rows or bars”
(2) • 4 ft sections of 1” square steel tube “height”
(2) • 2 ft sections of 1” square steel tube “braces”
(2) • 1 ½ ft sections of 1” square steel tube “feet”
Remember to always wear your safety glasses and follow the Tech Shops safety rules. Consult your handout from your Basic Metal Shop SBU: MTL103 class, to make sure you are using the appropriate settings.
Step 2: De-Bur All Pieces
This can quickly & easily be done with a hand files.
However, if you’re in hurry or your cuts are a little rough, you can use the pedestal grinder and/or the disc sander.
Step 3: Weld “Height” to “Feet”
Consult your Tig Welding SBU: WLD101 handout to review welding safety and settings.
Make sure to keep your tungsten sharp and use a square to keep everything square.
Center one of the “height” pieces (4 ft sections of 1” square steel tube) to one of the “feet” (1 ½ ft sections of 1” square steel tube) pieces & weld. This will make a giant T shape.
Repeat this to result with 2 giant T shapes.
Step 4: Weld “Braces”
Position T shape pieces 2 ft apart and weld on “braces” (2 ft section of 1” square steel tube), one at a time.
Step 5: Weld on Back “Rows”
Weld on the top row, back bar (2 ft section of ½” round steel rod), at the very top of the hammer rack (the bottom of the T Shape).
Weld on the middle row, back bar (2 ft section of ½” round steel rod), 10 inches lower than previous.
Weld on the bottom row, back bar (2 ft section of ½” round steel rod), 10 inches lower than previous.
Step 6: Welding on Front “Rows”
Weld on the top row, front bar (2 ft section of ½” round steel rod), ½ inch lower than the back bar.
Weld on the middle row, front bar (2 ft section of ½” round steel rod), ¾ inch lower than the back bar.
Weld on the bottom row, front bar (2 ft section of ½” round steel rod), 1 inch lower than the back bar.
(The variation in this measurement allows for the hammers to hang at an angle, and for smaller hammers to fit on the top row, and progressively, larger hammers to fit on the bottom row.)
Optional: Weld on Casters
Note: Many commercially available casters will have a plating that needs to be removed before welding.
Step 7: De-Bur
Take your time; you are almost done!
Step 8: Paint!
Finish everything up with a nice clean coating of paint or powder coat if you have taken the Sandblasting & Powder Coating SBU: FAB106 (I haven’t yet, but I’m planning on taking it next!).
Now you can arrange, admire, & easily find all of your hammers!
I made it at TechShop! For more about TechShop, check out their site: http://www.techshop.com


