

Introduction: Serial Communication Between Arduino and HTML


Working with Arduino is easy, but creating project which involves software requires more programming skills. Unlike other solutions my project is the way to create HTML offline app.
It's easy to create user interface with HTML and CSS. This solution is simple and it allows user to create App similarly to creating website with frameworks like bootstrap etc. It's also a good solution for quickly prototyping more complex project.
In this instructable I would like to show how to communicate with Arduino via HTML and Involt which is my experimental framework.
http://involt.github.io/
Before you start you need to have:
- Arduino UNO (or any other)
- Something to read data (10k Potentiometer or anything else).
- LED with 220ohm resistor
- Node-webkit
Step 1: What Is Involt and How to Install It.

With latest release involt moved from Chrome apps to node webkit. The installation changed and how framework works.
What is Involt?
Involt is ready to app template with built-in serial and Bluetooth communication, editable user interface elements and JQuery methods for advanced users. You can control your Arduino writing only a few lines of code. If the built-in UI kit doesn't fit your needs the framework includes JQuery support and can be used like other JQuery plugins.
Of course there are other ways to work with Javascript and Arduino but the key to Involt is to make is as simple as it's possible.
Install
Download Node-webkit* from http://nwjs.io/
Download Involt and unpack it into Node-webkit root folder.
Open the NW app.
Step 2: Circuit
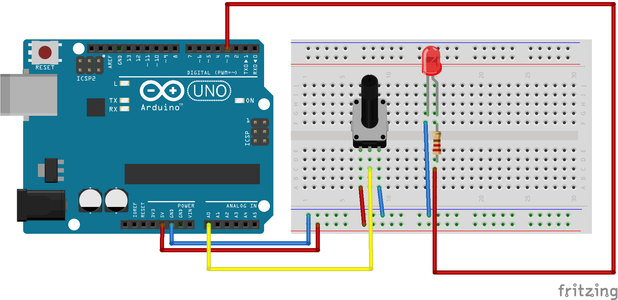
This is basic example so you need only something to read/send the data.
- Connect potentiometer to pin A0.
- Connect LED with 220-ohm resistor to pin 3
Step 3: Arduino Sketch
There are two workflows for Involt - it depends on project when to start with sketch or HTML code, for this example the first step is editing the Arduino sketch.
Involt works like bridge between software and hardware so the communication with device is managed automatically but it requires to write code from both sides. This is not disadvantage because it simplifies many things. To communicate with Arduino you need to upload Involt sketch from arduino folder. To fully understand how does it work read the getting started page.
To read value from sensor (A0) and send it to Involt you need to add this function to void loop:
void loop() {
 //receive data from your app
  involtReceive();

  involtSend(0, analogRead(A0));
}
The values received from App are stored in involtPin array. To toggle values on pin 3 add this:
...


void setup(){
  Serial.begin(57600);
  pinMode(3, OUTPUT); //required for digitalWrite to work correctly
}


void loop() {
//receive data from your app
  involtReceive();

  digitalWrite(3, involtPin[3]);
  involtSend(0, analogRead(A0));
  delay(2);
}

...
Step 4: HTML and User Interface.

User interface
As I mentioned before - creating App with Involt is smiliar to working with other HTML frameworks. The parameters of each UI element is defined with CSS classes. To customize the interface you can add or edit CSS file.
Add two lines of code to your body section in index.html. The first line is responsible for displaying pin A0 value and the second line is button that switch digital pin value between 0/1 (the 0 is the beginning value on App launch).
Involt basic syntax:
ard [function] [pin] [value] [yourclass]
To see what you can do with Involt check the reference page
<body>
	<div class="ard show A0"></div>
	<div class="ard toggle P3 value-0"></div>
</body>
More features
You can also send PWM value. Change the toggle button to two buttons with PWM values (or toggle-pwm button ). Here is example of button that sends value 255 to pin 3:
<div class="ard button P3 value-255">Click me</div>
To create custom interface or more advanced interactions you can use JQuery. For example - sending value 123 to pin 5 looks like this:
$(this).pinDefine("P5").sendValue(123);Because this is basic tutorial I used only basic features. Just keep in mind that there are many ways to do same thing.
Test
To check the results open the App, choose your device port and you should see something similar to the attached picture.
For files and more examples check other tutorials on Involt page.
Step 5: The End.

Congratulations! Now you know basics of Involt framework.
If you want to help in the development of Involt check Github page - any help will be appreciated. There are many features coming soon - read the issues and wiki on github for more details.


