

Introduction: Imperial Ramp Walker


Now if you love Star Wars or kinetic toys, you will like this. If you like both Star Wars and kinetic toys, go are going to love this. It is a ramp walker that will march down an incline. Just tapp it to get it rocking.
It has 16 laser cut pieces made from ¼" and ⅛" MDF. They are super glued together. Although the brass escutcheon pins add some strength, they are primarily used to add a steam punk vibe.
Being MDF they can easily be painted or colored with felt pens.


Step 1: Laser Cut the Pieces


For each walker you will need one piece of ¼" MDF 5⅜" by 5¾" and one piece of ⅛" MDF, 3¾" square. Use the attached SVG files to cut out the pieces.
I put a piece of 2" wide aluminum (not Mylar) tape on the back side of each piece. I did this to keep the pieces in their frame. I suppose I could have designed the piece with break out tabs, but I didn't.
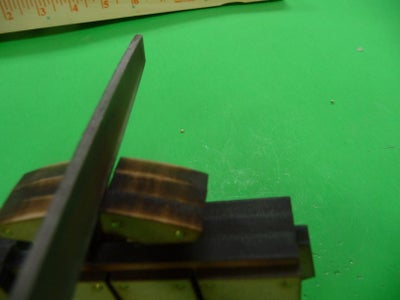
The thick piece needs to be drilled in three places. Their positions are marked and shown in the second photo. Drill two ⅛" holes where marked (blue) and one 9/64" hole where marked (red).
You will notice the fronts of the pieces have a bit of burn and the backs have a lot. You decide how much of it you want to sand away. I like the patina I get on the front and don't sand it away. I only sand the backs if they will be seen. I can see that if someone wanted the battle scarred look they might not sand at all.
Sanding is easily done on a piece of 150 grit sandpaper laid on a flat surface.
Step 2: Body and Head Piece to Main Piece


Lay down the main piece. Take the right head piece, apply cyanoacrylate (super) glue, align it to the main piece with a couple of needles in the alignment holes, and glue in place. Hammer in two pins in the holes available, remove the alignment needles, and nail it the remaining two pins. Do the same thing for the right body piece but only nail two pins in the feet. Flip over and repeat this process for the other side.
So far each side has used six pins.
You made have problems finding ⅜" brass escutcheon pins. I use this place. you will need 50 pins for each walker. (42 to use, 8 to lose)
400 of them cost my about $10,includeing postage.
These are not as cool looking but a heck of a lot cheaper/
A half pound of them (4,500) are about $20, including postage.
Step 3: Size the Back Leg and Attach Shoes


In the bottom of the main assembly there is a cavity where the back leg will be pinned. The leg needs to be sanded a bit so it easily moves with in the cavity. Place the leg in the cavity and rock the main assembly back and forth. It should easily flop around. Sand it until it does. The most common cause for this walker to not work is that the leg is too snug.
Take the shoes, align and glue them to the back leg. Each side of the foot gets two nails.
You have used 16 pins so far. (More if you lost or bent some.)
Step 4: Pin Leg in Place, Add Battle Armor and Small Cannon


An ⅛" dowel is used as an axel to hold the leg in place. When you buy an ⅛" dowel it is most likely oversized. Lightly sand the dowel until it comfortably fits in the hole in the center of one side. Cut a piece of dowel ⅝" long, align the leg hole to the two side holes, and pin in place with the dowel. There is no need for the dowel to be glued as the battle armor will hold it in place.
On each side align, glue, and pin the outer armor pieces and the small canon Each side in the step with require an additional 14 pins or 42 pins total. You have completed you Imperial Ramp Walker.
Step 5: Ramp


You are going to need a ramp. These walkers don't walk very straight and will easily fall off the edge of an incline. It helps if there are barriers to keep them on the ramp. These have to be the simplest ramps to build. On is made from a common pine 1x6 with yardsticks used as barriers. The cheaper option is to use a pine 1x3 with paint sticks as barriers. You can make them as long as you want. I go to home depot and buy their cull pine at 70% off. I give the guy in the paint department one of these walkers and I get as many paint sticks as I want.
Step 6: Trouble Shooting

This walker is a pendulum were the back leg moves freely. It is attached to the body by a peg. This is the pivot point and it is just below the center of gravity. When it rocks back the body shifts and there is a gap between the legs. When it rocks forward the gap disappears. The walker will move the distance of the gap each cycle. The angled ramp adds energy to the walker that keeps it rocking. Just slope the ramp at about 10 degrees, give the walker a bump to get it rocking, and it will march down the ramp.\
If your walker is working well, ignore the rest of this step.
If your walker doesn't work well, here are some possible problems.
- Try different slopes for the ramp.
- The leg is too snug. I tried to warn you in step 3. There isn't much you can do except move the
leg back and forth and hope the friction loosens it.
- The bottom of the feet need to be a continuous curve. Use sandpaper to smooth this out
- Use a file to adjust the boots so the front and back leg touch.
Step 7: Bag Em Up

These MDF pieces were sized so the they would fit easily into a one quart zip lock bag. Just add the brass pins and a small container of glue. Glue can be found on eBay in bulk for less than a quarter. Also included, a quarter sheet of 150 grit sandpaper and the instructions folded in fourths. The PDF of the instructions has been included.
In kit form these can be handled out as a craft project for a children's party.
These pieces are sizes to allow for up to five kits to be fit into a small flat rate USPS mailer. Since many don't get the luxury of being able to see their loved ones, you can send them these kits and build them together via Skype, Zoom or some other software tool.
Step 8: Step 8 This Should Put a Smile on Your Face
I wish to acknowledge the talent of Paul Fellay. He is a talented maker and toy designer from South America. His patterns can be seen here.
Paul introduced me to ramp walkers and did the initial design for this ATAT. I adapted the pattern to make use of the laser and add alignment holes..
When I asked Paul about making this pattern available, he said:
"It will help me a lot if you share it with others. This way people start to know more about these kinds of toys. Feel free to publish the project wherever you want and share it with others."
Thanks Paul! Safe Sailing.

Participated in the
Toys and Games Challenge


