

Introduction: IoT Garage Door Monitor/Operator (From Anywhere!)


Let's build the scene...
You get up in the morning, drive to work, and then all of the sudden your heart drops...
Did you remember to close the garage door on your way out? Are strangers rummaging around in there as the time ticks on?
That's where I come in. With a little bit of effort you can relax with the comfort of knowing that from anywhere you can connect to the web, you can view a live feed of your garage as well as control the door.. No more doubts or worries.
In this example I will walk you through how to build the hardware, setup a secure site, and build out mqtt communications all using 100% FREE services such as Heroku and Microsoft Azure
Supplies
- Garage Door Remote
- Soldering Iron
- Breadboard
- SPDT Relay (I used this one)
- NPN Transistor (2N3904)
- Raspberry Pi
- USB Webcam
Step 1: Design


Let's quickly hop into TINKERCAD to simulate what we want to do. You will notice I have drawn 3 different boxes around various components in the diagram.
The red box represents the raspberry pi (since tinkercad doesn't currently support that) which is simulated by an arduino uno with a pushbutton switch (which represents a piece of code that will trigger the garage door opener). We set the output of the pin 13 on the uno to high in the code setup so that the pushbutton will let us control the rest of the system.
The blue box includes hardware components that we will wire up on our breadboard.
The brown box is a simple LED/battery circuit that will represent the garage door button being pressed with the LED turning off and on.
When we simulate this circuit, you will notice that when the pushbutton is pressed, the LED illuminates. In the same way, we will use a raspberry pi to control a GPIO port and via software 'push' the button. When the button is pressed the transistor triggers the coil of the relay to switch and the NO/COM (normally open / common) circuit is connected, turning on the LED (which would represent the garage door being triggered).
Now that we know our system design works, let's head to the next step where we prepare the hardware.
Step 2: Preparing the Garage Door Opener


Remove the garage door opener from it's housing and take a look at what we have - you will normally have several buttons that can be programmed to open different garage doors, so identify which one will be used for your case. In my case the button labelled S3 will be used to control my garage door. Looking at the reverse side, find where two leads can be soldered onto the button so that touching the ends of the leads together will simulate the button being pressed. Be careful not to damage any components.
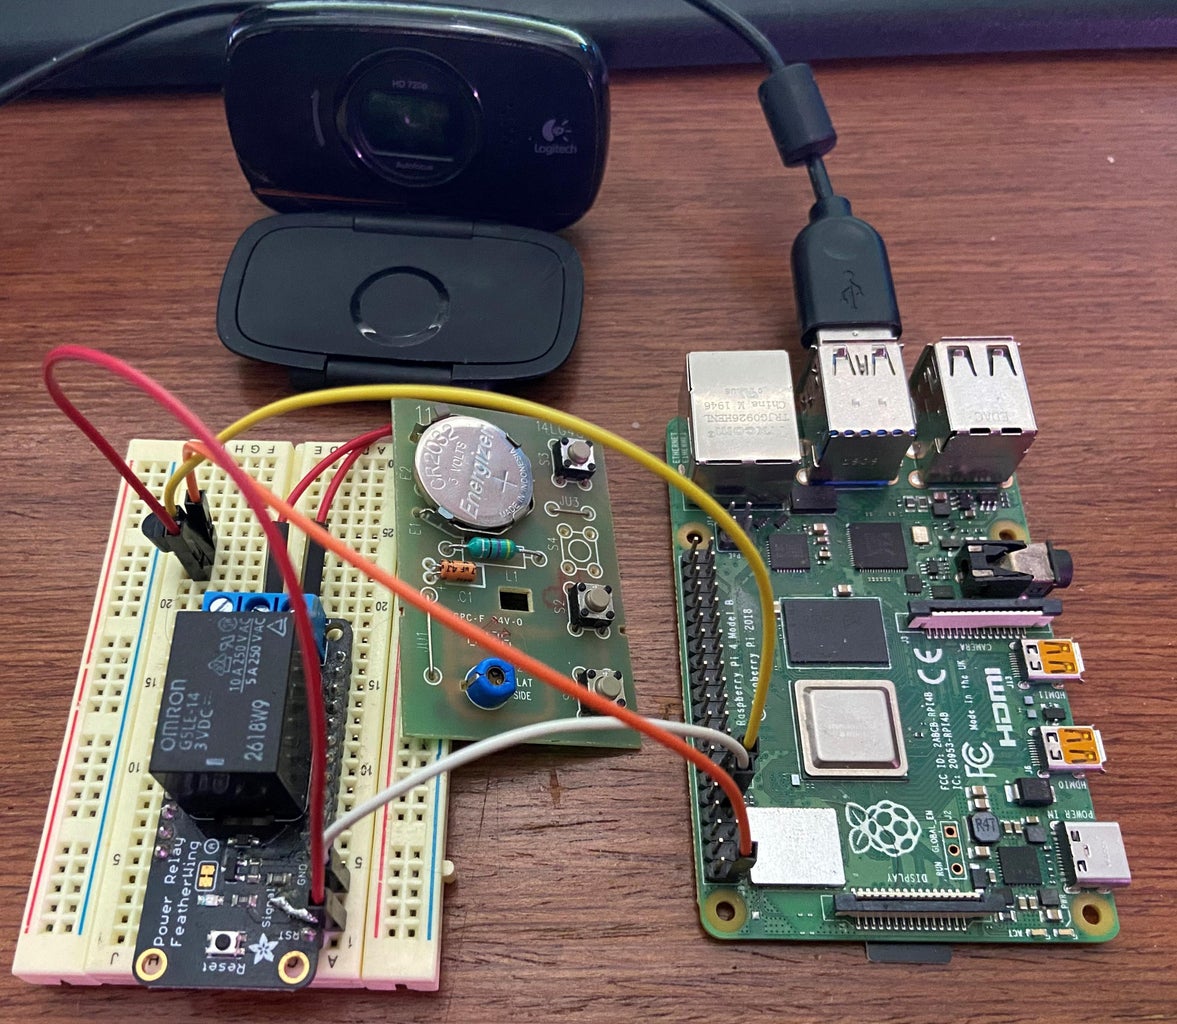
Step 3: Connecting the Hardware


If you are using the featherwing relay as I am, make sure to solder a connection between the signal and 3v pins.
Connect the two leads from the garage door opener to the common and normally open pins on the relay.
Connect the 3V lead on the relay to the collector on the transistor.
Connect the GND pin on the relay to GND on the raspberry pi.
Connect pin 11 on the raspberry pi to the base of the transistor.
Connect the 3V pin on the raspberry pi to the emitter of the transistor.
Double check everything is properly connected before proceeding. Feel free to use the images provided to check your work.
You can also connect your webcam to one of the available USB ports at this time.
Step 4: Preparing the Raspberry Pi


The first step of any project involving a raspberry pi is to set up the device. I will be using the Raspberry Pi Imager that can be found here
Plug in an empty sd card to your computer and run the imager. I suggest the following settings to make things easier in the setup process (we will be using a headless setup and connecting via ssh):
For the OS selection, choose Raspberry Pi OS (other) and select Raspberry Pi OS Lite.
Choose your sd card from the storage options.
Under Advanced Settings, Enable SSH (password authentication), set username and password as pi and raspberry, configure the wireless LAN connection for your wifi, and set the locale.
Once the sd card has flashed, safely remove it and insert into the raspberry pi.
Power on the raspberry pi and after a few minutes use a software such as PuTTY to connect via ssh (you can discover the ip address using an app such as fing to discover network devices.
Once you have successfully connected and logged in, proceed to the next step where we will set up our hub in Azure.
Step 5: Setting Up Azure IoT Hub


Head on over to Microsoft Azure and create a free account if you don't already have one.
Create a new subscription (either free tier or pay-as-you-go *dont worry we will set up all services to be free even if you are on a pay-as-you-go subscription)
Navigate to Resources and create a new IoT Hub resource. When creating the resource make sure to select the free tier which will give us free devices as well as 8000 messages per day which is more than enough for our project. I called mine pidoorgarage.
Once your hub has been created, navigate to it and in the left column go to the devices section and create a new device. Call the device pi and create it. Keep this tab open as we will need to collect connection strings in a later step.
In the next step we will set up a blob storage that will be used to hold images from the webcam and deliver to our site.
Step 6: Setting Up Blob Storage

In a similar way to how we created the IoT Hub, navigate to resources, create a new Storage Account, and give it the properties seen in the first image so as to keep it in the free tier.
Once the account has been created, navigate to the containers tab and create a new container called images with the public access level container.
This is all we need to do for now to set up the storage, however keep the tab open as we will need to collect connection strings for use in the code.
In the next step, we will navigate back to the raspberry pi via ssh and set everything up.
Step 7: Raspberry Pi Code


There will be 2 files created by us on the raspberry pi. The first is the listener python program, and the second is the setup bash script.
The python program will run in the background and be constantly listening for commands coming from the C2D system in our Azure IoT Hub (C2D stands for Cloud To Device). We will build in 2 commands:
CAPTURE will tell the device to take a picture from the webcam and upload it to our blob storage.
OPERATE will tell the device to send a signal from the GPIO port to trigger the garage door opener. At the end of the project, both of these operations will be made from our secure UI page.
The setup.sh bash script will be used to setup the environment on the rpi, install any requirements, and inject the listener script as a background process that will run whenever the rpi is turned on or rebooted.
Let's start with the listener script.
On the rpi open the editor with
sudo nano listener.py
Paste the following (right click if using PuTTY)
import RPi.GPIO as GPIO
import time, os, asyncio, logging
from azure.storage.blob import BlobServiceClient, BlobClient, ContainerClient, __version__
from systemd import journal
from azure.iot.device.aio import IoTHubDeviceClient


blob_service_client = BlobServiceClient.from_connection_string("BLOB CONNECTION STRING")
blob_client = blob_service_client.get_blob_client(container="images", blob="capture.jpg")
log = logging.getLogger('listener.service')
log.addHandler(journal.JournaldLogHandler())
log.setLevel(logging.INFO)


class style():
    BLACK = '\033[30m'
    RED = '\033[31m'
    GREEN = '\033[32m'
    YELLOW = '\033[33m'
    BLUE = '\033[34m'
    MAGENTA = '\033[35m'
    CYAN = '\033[36m'
    WHITE = '\033[37m'
    UNDERLINE = '\033[4m'
    RESET = '\033[0m'


async def main():
    log.info(style.YELLOW+"STARTING SERVICE..."+style.RESET)
    device_client = IoTHubDeviceClient.create_from_connection_string("HUB DEVICE CONNECTION STRING")
    await device_client.connect()
    log.info(style.GREEN+"SERVICE STARTED SUCCESSFULLY...WAITING FOR COMMANDS..."+style.RESET)


    def stdin_listener():
        while True:
            time.sleep(10)


    def operate():
        log.info(style.YELLOW+"OPERATION REQUESTED"+style.RESET)
        GPIO.setmode(GPIO.BOARD)
        out=11
        GPIO.setup(out, GPIO.OUT)
        GPIO.output(out, GPIO.HIGH)
        time.sleep(0.2)
        GPIO.output(out, GPIO.LOW)
        GPIO.cleanup()
        log.info(style.GREEN+"DONE"+style.RESET)


    def message_received_handler(message):
        msg=message.data.decode("utf-8").strip()
        if msg == "OPERATE":
            operate()
        if msg == "CAPTURE":
            capture()
            upload()


    def upload():
        try:
            log.info(style.YELLOW+"Uploading..."+style.RESET)
            with open("/home/pi/capture.jpg", "rb") as data:
                blob_client.upload_blob(data, overwrite=True)
            log.info(style.GREEN+"DONE"+style.RESET)
        except Exception as e:
            log.info(style.RED+e+style.RESET)


    def capture():
        log.info(style.YELLOW+"CAPTURE REQUESTED")
        os.system("fswebcam -r 1280x720 --timestamp \"%d/%m/%Y %H:%M:%S (%Z)\" /home/pi/capture.jpg")


    device_client.on_message_received = message_received_handler
    loop = asyncio.get_running_loop()
    user_finished = loop.run_in_executor(None, stdin_listener)
    await user_finished
    await device_client.shutdown()


if __name__ == "__main__":
    asyncio.run(main())
There are a few things we will need to update so hopefully you kept the Azure tabs open, if not navigate back to Azure.
On the line with
blob_service_client = BlobServiceClient.from_connection_string("BLOB CONNECTION STRING")
we will need to replace the BLOB CONNECTION STRING with the actual connection string on azure.
To do that, navigate to the Access Keys tab in your storage account and copy/paste the Connection String under key1
Next we will replace the HUB CONNECTION STRING from the line
device_client = IoTHubDeviceClient.create_from_connection_string("HUB DEVICE CONNECTION STRING")
with our device connection string from the IoT Hub.
To do this, navigate to the IoT Hub Resource, select Devices under the Device Management tab, select your device, and copy/paste the primary connection string.
Next save the file on the rpi by using CTRL+X, Y, and then ENTER
Now we will generate the setup script.
Run
sudo nano setup.sh
to open a new editor for the bash script. Paste the following
#!/bin/bash
if [ "$EUID" -ne 0 ]
        then echo -e "\e[39m\e[31mMust be root, run sudo -i before running this script.\e[39m"
        exit
fi
echo -e "\e[33m┌─────────────────────────────────────────"
echo -e "|\e[39mTesting Non-sudo command status\e[39m\e[33m"
echo -e "└─────────────────────────────────────────\e[39m"
sudo -u $SUDO_USER whoami
var="$(sudo -u $SUDO_USER whoami)"
if [ $var != "pi" ]
        then echo -e "\e[39m\e[31mNon-sudo test failed\e[39m"
        exit
fi
echo -e "\e[32mDONE\e[39m\e[36m"
echo -e "\e[33m┌─────────────────────────────────────────"
echo -e "|\e[39mUpdating repositories\e[39m\e[33m"
echo -e "└─────────────────────────────────────────\e[39m"
apt-get update -yqq
apt-get install python3-pip -y
echo -e "\e[33m┌─────────────────────────────────────────"
echo -e "|\e[39mSetting country code\e[39m\e[33m"
echo -e "└─────────────────────────────────────────\e[39m"
iw reg set US
echo -e "\e[32mDONE"
echo -e "\e[33m┌─────────────────────────────────────────"
echo -e "|\e[39mSetting up Logging\e[39m\e[33m"
echo -e "└─────────────────────────────────────────\e[39m"
apt install libsystemd-dev -y
pip install systemd-python
pip install systemd
echo -e "\e[32mDONE"
echo -e "\e[33m┌─────────────────────────────────────────"
echo -e "|\e[39mInstalling Requirements\e[39m\e[33m"
echo -e "└─────────────────────────────────────────\e[39m"
pip install azure-iot-device
pip install azure-storage-blob
apt install fswebcam
echo -e "\e[32mDONE"
echo -e "\e[33m┌─────────────────────────────────────────"
echo -e "|\e[39mBuilding Listener Service\e[39m\e[33m"
echo -e "└─────────────────────────────────────────\e[39m"
set -o noclobber
filename='/lib/systemd/system/listener.service'
if [ -f $filename ]; then
    rm $filename
fi
touch $filename
cat >| /lib/systemd/system/listener.service <<"EOL"
[Unit]
Description=Message Listener Service
After=multi-user.target
[Service]
Type=simple
ExecStart=/usr/bin/python -u /home/pi/listener.py
Restart=always
[Install]
WantedBy=multi-user.target
EOL
chmod 644 /lib/systemd/system/listener.service
chmod +x /home/pi/listener.py
systemctl daemon-reload
systemctl enable listener
echo -e "\e[32mDONE"


echo -e "\e[33m┌─────────────────────────────────────────"
echo -e "|\e[39mReboot required\e[39m\e[33m"
echo -e "└─────────────────────────────────────────\e[39m"
read -n 1 -s -r -p "Press any key to reboot"
reboot
If you set the username on the rpi to something other than 'pi', make sure to update the line
if [ $var != "pi" ]
to reflect your username
As with the listener, save and exit
Run the setup script with
sudo bash setup.sh
and once done press any key to trigger a reboot. If all went smoothly, when your rpi boots up, it should be running the listener service in the background.
We can confirm this by SSHing back into the pi and running
sudo journalctl -f -u listener --all
to see a live stream of the logs coming from the service
The last picture in this step shows what the logs should be for a successful initialization of the service.
Step 8: Communication Testing


Now that the service is running, let's do some quick tests to make sure the connections to the IoT Hub and Blob Storage were successful before we start building out the UI.
In this step, we will manually send C2D messages from our hub to the raspberry pi to trigger the CAPTURE and OPERATE commands to make sure everything is working correctly. At this point, I would recommend keeping the journalctl logs running so that you can see what's going on behind the scenes.
Back in Azure, where we navigated to the device connection string, there is a button that says Message to Device.
Click that and let's start by issuing a CAPTURE command.
In the Message Body type CAPTURE and click Send Message. In the rpi logs you should see that the device receives the command, finds the webcam, takes a picture (adding a timestamp), and uploads it.
Now if we navigate to the blob storage in azure and open the images container, you should see a file there called capture.jpg
If you click on the file there will be a tab labelled Edit that will allow you to view the image.
Next let's test the OPERATE command. In the same way, send a C2D message with the body OPERATE and have a look at the logs on the rpi. If your device is in range, your garage door should also open at this point
Now that communication functionality has been tested, let's continue on to build an interface so we can access and control our device from anywhere. (Don't forget to close your garage door!)
Step 9: UI (Part 1 - Static/templates)


For our UI, let's create a simple python flask app that will have an authentication screen before allowing a user access to the image captures and garage door controls. We are also going to use a free service called Heroku to host our site.
On your PC, create a new directory and name it garagedoor. This will hold all of our UI code. In this first step, we'll create the static images and html templates for the site.
Create 2 new directories inside of garagedoor. The first should be named static and the second should be named templates.
In the static folder, we will have 2 images. The first will be a placeholder image for the garage door capture if there are no images available, the second will be an icon for activating the garage door operation. Name the placeholder image capture.jpg and the icon gd_icon.png. I have attached my placeholder and icon images if you would like to use them.
Now for the templates.
In the templates directory we will have 4 files - base.html, index.html, login.html, and profile.html
The code is here and is fairly straightforward but you are welcome to ask any questions in the comments if any clarification is needed
base.html
<!DOCTYPE html>
<html>
<head>
    <meta charset="utf-8">
    <meta http-equiv="X-UA-Compatible" content="IE=edge">
    <meta name="viewport" content="width=device-width, initial-scale=1">
    <title>Garage Door Operator</title>
    <link rel="stylesheet" href="https://cdnjs.cloudflare.com/ajax/libs/bulma/0.7.2/css/bulma.min.css" />
</head>
<body>
    <section class="hero is-primary is-fullheight">
        <div class="hero-head">
            <nav class="navbar">
                <div class="container">
                    <div id="navbarMenuHeroA" class="navbar-menu">
                        <div class="navbar-end">
                            <a href="{{ url_for('main.index') }}" class="navbar-item">
                                Home
                            </a>
                            {% if current_user.is_authenticated %}
                            <a href="{{ url_for('main.profile') }}" class="navbar-item">
                                Profile
                            </a>
                            {% endif %}
                            {% if not current_user.is_authenticated %}
                            <a href="{{ url_for('auth.login') }}" class="navbar-item">
                                Login
                            </a>
                            {% endif %}
                            {% if current_user.is_authenticated %}
                            <a href="{{ url_for('auth.logout') }}" class="navbar-item">
                                Logout
                            </a>
                            {% endif %}
                        </div>
                    </div>
                </div>
            </nav>
        </div>
        <div class="hero-body">
            <div class="container has-text-centered">
               {% block content %}
               {% endblock %}
            </div>
        </div>
    </section>
</body>
</html>
index.html
{% extends "base.html" %}
{% block content %}
<h1 class="title">
  Welcome
</h1>
<a href="{{ url_for('auth.login') }}" class="subtitle">
    Login
</a>
{% endblock %}
login.html
{% extends "base.html" %}
{% block content %}
<div class="column is-4 is-offset-4">
    <h3 class="title">Login</h3>
    <div class="box">
        {% with messages = get_flashed_messages() %}
        {% if messages %}
            <div class="notification is-danger">
                {{ messages[0] }}
            </div>
        {% endif %}
        {% endwith %}
        <form method="POST" action="/login">
            <div class="field">
                <div class="control">
                    <input class="input is-large" type="email" name="email" placeholder="Your Email" autofocus="">
                </div>
            </div>
            <div class="field">
                <div class="control">
                    <input class="input is-large" type="password" name="password" placeholder="Your Password">
                </div>
            </div>
            <div class="field">
                <label class="checkbox">
                    <input type="checkbox" name="remember">
                    Remember me
                </label>
            </div>
            <button class="button is-block is-info is-large is-fullwidth">Login</button>
        </form>
    </div>
</div>
{% endblock %}
profile.html
{% extends "base.html" %}
{% block content %}
<head>
  <style>
      .imgbox {
          display: grid;
          height: 100%;
          margin: 0;
          padding: 0;
      }
      .center-fit-img {
          max-width: 100%;
          max-height: 100vh;
          margin: auto;
      }
      .center-fit-icn {
          max-width: 100%;
          max-height: 100vh;
          margin: auto;
          padding: 0;
      }
      .icnbox {
          display: block;
          margin-left: auto;
          margin-right: auto;
          max-width: 20%;
          height: auto;
      }
  </style>
</head>
<h1 class="title">
  Welcome, {{ name }}!
</h1>
<div class="imgbox">
  <form method="POST" action="/profile">
    <input type="image" src="static/capture.jpg" alt="Refresh Image" class="center-fit-img">
  </form>
</div>
<div class="icnbox">
  <form method="POST" action="/operate">
    <input type="image" src="static/gd_icon.png" alt="OPERATE" class="center-fit-icn">
  </form>
</div>
{% endblock %}
In the next step we will set up the flask environment and SQLAlchemy
Step 10: UI (Part 2 - Flask)

The flask app derives from 4 python files that we will cover and alter in this step. Add the following files to the main garagedoor directory:
__init__.py
from flask import Flask
from flask_sqlalchemy import SQLAlchemy
from flask_login import LoginManager


db = SQLAlchemy()


def create_app():
    app = Flask(__name__)
    app.config['SEND_FILE_MAX_AGE_DEFAULT'] = 1
    app.config['SECRET_KEY'] = 'secret-key-goes-here'
    app.config['SQLALCHEMY_DATABASE_URI'] = 'sqlite:///db.sqlite'


    db.init_app(app)


    login_manager = LoginManager()
    login_manager.login_view = 'auth.login'
    login_manager.init_app(app)


    from .models import User


    @login_manager.user_loader
    def load_user(user_id):
        return User.query.get(int(user_id))


    from .auth import auth as auth_blueprint
    app.register_blueprint(auth_blueprint)


    from .main import main as main_blueprint
    app.register_blueprint(main_blueprint)


    return app
auth.py
from flask import Blueprint, render_template, redirect, url_for, request, flash
from . import db
from werkzeug.security import generate_password_hash, check_password_hash
from .models import User
from flask_login import login_user, login_required, logout_user


auth = Blueprint('auth', __name__)


@auth.route('/login')
def login():
    return render_template('login.html')


@auth.route('/login', methods=['POST'])
def login_post():
    email = request.form.get('email')
    password = request.form.get('password')
    remember = True if request.form.get('remember') else False
    user = User.query.filter_by(email=email).first()
    if not user or not check_password_hash(user.password, password):
        flash('Please check your login details and try again.')
        return redirect(url_for('auth.login'))
    login_user(user, remember=remember)
    return redirect(url_for('main.profile'))


@auth.route('/logout')
@login_required
def logout():
    logout_user()
    return redirect(url_for('main.index'))
main.py
from flask import Blueprint, render_template, url_for
from . import db
from flask_login import login_required, current_user
from azure.storage.blob import BlockBlobService
from azure.iot.hub import IoTHubRegistryManager
from os import getcwd
import sys
from time import sleep


main = Blueprint('main', __name__, static_folder='static')


@main.route('/')
def index():
    return render_template('index.html')


@main.route('/profile')
@login_required
def profile():


    return render_template('profile.html', name=current_user.name)


@main.route('/profile', methods=['POST'])
@login_required
def profile_post():
    block_blob_service = BlockBlobService(account_name="ACCOUNT NAME", account_key="ACCOUNT KEY")
    blob_properties = block_blob_service.get_blob_properties(container_name="images", blob_name="capture.jpg")
    initial = str(blob_properties.properties.last_modified)
    registry_manager = IoTHubRegistryManager("IOTHUBOWNER CONNECTION STRING")
    data="CAPTURE"
    props={}
    registry_manager.send_c2d_message("pi", data, properties=props)
    final = str(initial)
    while(final == initial):
        blob_properties = block_blob_service.get_blob_properties(container_name="images", blob_name="capture.jpg")
        final = str(blob_properties.properties.last_modified)
        sleep(1)
    block_blob_service.get_blob_to_path(container_name="images", blob_name="capture.jpg", file_path="static/capture.jpg")
    return render_template('profile.html', name=current_user.name)


@main.route('/operate', methods=['POST'])
@login_required
def operate_post():
    registry_manager = IoTHubRegistryManager("IOTHUBOWNER CONNECTION STRING")
    data="OPERATE"
    props={}
    registry_manager.send_c2d_message("pi", data, properties=props)
    return render_template('profile.html', name=current_user.name)
models.py
from . import db
from flask_login import UserMixin


class User(UserMixin, db.Model):
    id = db.Column(db.Integer, primary_key=True)
    email = db.Column(db.String(100), unique=True)
    password = db.Column(db.String(100))
    name = db.Column(db.String(1000))
We will need to make a few edits to main.py for naming and connection strings.
On the line
block_blob_service = BlockBlobService(account_name="ACCOUNT NAME", account_key="ACCOUNT KEY")
we need to replace ACCOUNT NAME with our Storage Account name and ACCOUNT KEY with the Key found in the Access Keys tab under key1 (*Note you need to use the Key not the Connection string here)
On BOTH lines that have
registry_manager = IoTHubRegistryManager("IOTHUBOWNER CONNECTION STRING")
we need to replace IOTHUBOWNER CONNECTION STRING with the IoT Hub Connection String that has iothubowner permissions
To get this key, navigate to your IoTHub in Azure, Go to the Shared Access Policies tab under Security Settings, click the iothubowner Policy Name, and copy/paste the Primary connection string
We have built in login functionality using flask SQLAlchemy. If help is needed adding a valid user please refer to the documentation found here
In the next step, we will put the finishing touches on the UI code
Step 11: UI (Part 3 - Docker/setup)

There are still a few more things we need to do before we're ready to upload to Heroku.
If your sql user was set up correctly in the previous step, you should now have a db.sqlite file.
Next, we'll create a Dockerfile to tell Heroku how to run our code
In the main directory create a file Dockerfile (no extension)
Dockerfile
FROM python:3.8
WORKDIR /app
ADD . /app
RUN pip install --trusted-host pypi.python.org -r requirements.txt
EXPOSE 5000
CMD ["python", "__init__.py"]
You may have noticed that the Dockerfile references a file called requirements.txt. This file tells us what requirements need to be installed to run the code properly. Create a file called requirements.txt
requirements.txt
Flask==2.1.0
flask-cors==3.0.10
azure-iot-hub==2.5.0
azure-storage-blob==2.1.0
flask-sqlalchemy
flask-login
We also need a few other files to support Azure and Heroku's deployment functionality as well as local running
host.json
{
 "version": "2.0",
 "logging": {
  "applicationInsights": {
   "samplingSettings": {
    "isEnabled": true,
    "excludedTypes": "Request"
   }
  }
 },
 "extensionBundle": {
  "id": "Microsoft.Azure.Functions.ExtensionBundle",
  "version": "[2.*, 3.0.0)"
 }
}
local.settings.json
{
  "IsEncrypted": false,
  "Values": {
    "AzureWebJobsStorage": "",
    "FUNCTIONS_WORKER_RUNTIME": "python"
  }
}
Procfile
web: FLASK_APP=__init__.py python -m flask run --host=0.0.0.0 --port=$PORT
runtime.txt
python-3.8.11
Your directory should now look and contain the files/folders shown in the image for this step. Continue on to the next step to learn how to deploy our app to Heroku!
Step 12: UI (Part 4 - Deployment)


The best way to deploy our code sustainably is to upload our garagedoor folder and contents to an online code repository such as GitHub.
Heroku has some great functionality that will pull the latest code and auto-deploy straight from GitHub so that's what I'll show you how to do here. Once your repo has been created and code has been deployed, create or login to an account on Heroku and under the Personal tab Click New and select Create New Pipeline. We will also create a new app once the pipeline is created. Heroku will walk you through the process but make sure once the pipeline and app are created and linked (you will be able to link to the created pipeline when you create a new app) to configure automatic deploys in the pipeline settings. You will need to grant Heroku access to your GitHub.
Now, every time you make a change to your code and push to GitHub, the heroku pipeline will automatically pull and deploy the latest code. Once your code has been deployed, proceed to the next step.
Step 13: Congratulations!


Congrats! Everything should be working at this point. In heroku, you can navigate to your new deployed site by clicking the Open App button. If you'd like to personalize your url you can purchase a domain name however since we've managed to build this entire project without spending a dime on hosting or processing, I think I'll keep the Heroku one for now...
Login to your site and you should be greeted by your placeholder image (or the latest image grabbed from the storage account) as well as the operational icon.
Clicking the image should send a signal to your rpi to take and upload a new image. The site will refresh once the new image is downloaded.
Clicking the icon for the garage door should trigger the rpi to send a signal via GPIO to the garage door opener and the door should open/close.
You will be able to access this site from anywhere you have internet access so enjoy the worry-free days ahead of you!

Participated in the
Teach With Tinkercad Contest


