

Introduction: Kids Piano With Tinkercad & Block Code


A piano is an amazing and fun toy for kids. I have a 4 years girl who is very interested in piano because she saw that thing in cartoon. She was asking to buy one and I said let's make one by ourselves. She was very interested throughout the whole making process. As I made it with my kids I avoided any soldering-related tasks and tried to keep all steps very simple and easy.
Supplies


The following components are required for the piano:
- Arduino UNO
- Small Speaker
- Copper Tape
- Male Pin Header
- Some Wires
- 3mm 15cm X 10cm PVC board
- 9V Battery
- Battery Connector
- Old Multimeter Lead
Step 1: Simulating in Tinkercad


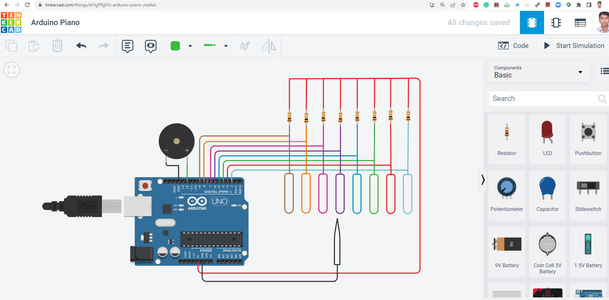
Before going to make it by hardware I made the whole circuit in Tinkercad Circuit Editor and made code using blocks to keep it kids friendly. Using Tinkercad's block editor we can easily write simple programs very easily. It is very amazing for kids.
I used a buzzer for simulating the speaker and I used tactile push buttons for generating different tones. Each pushbutton is associated with a PWM (pulse width modulation) signal in the code. When a button is pushed, that particular PWM(pulse width modulation) signal is generated through the Piezo Electric Buzzer. I used 8 pushbuttons/notes in a row for ‘c’, ‘d’, ‘e’, ‘f’, ‘g’, ‘a’, ‘b’, ‘C’ and when you press one you will hear the sound (within frequency creation) from the buzzer. For buttons I used Arduino pins 3 to 10 and for speaker I used pin 12.
After testing the circuit and the block code I downloaded the code by clicking the download button and uploaded the code to my Arduino board.
Step 2: Making Copper Pad


As I avoided soldering I did not use any PCB or push button in my hardware project. Instead, I used copper tape on a PVC board to make the pads for different notes. I cut 8 pieces of copper tape each 5 cm long. Then I placed all those pieces with a 5mm gap between the two pieces.
Step 3: Connecting Wire With Arduino Without Soldering


After making the pads, the next step is to connect the pads with the Arduino digital pins. As I am not going to solder anything I cleverly used copper tape and male pin headers to join the pads with Arduino using flexible hookup wires.
First I inserted one terminal of the wires into the female header of the Arduino. Then I placed male header pins to tightly fixed the wire inside the female header. Connection from the Arduino side is completed.
Step 4: Connecting Copper Pad With Arduino


In this stage, we will connect another terminal of the wires to the copper pad. Before doing this it is good to fix the Arduino with the PVC board. I used double-sided sponge tape for this purpose.
Then I placed the open terminal of the wires on top of the copper pad and add another piece of copper tape on top of it. That attached the terminal to the copper pad.
Step 5: Connecting Speaker

For generating sound we need a speaker. Though for simulation purposes I used buzzer the speaker shows the better output for generating fundamental notes. So, I used a small speaker for this purpose. I connected the speaker with Arduino using the same technique we used in the previous step.
Step 6: Connecting Battery


For powering the device I used a 9V battery which is very common. I added a battery connector to connect the battery wit the Arduino.
Step 7: Adding Ground Lead

The ground lead will be used to play the piano. When ground lead touches any copper pad it generates a fundamental tone. I used a copper pad and ground lead without using a push button because it gives an elegant feel and made it kids friendly. I also avoided soldering using this technique.
For the ground lead, I used an old multimeter's lead with a female header connected to another side that can be attached to the Arduino ground pin very easily from the Arduino ICSP header.
Step 8: Final Stuff


The final piano looks like the above. My kid is very happy with getting it working.


Second Prize in the
Block Code Contest


