

Introduction: LCD Screen Back Light Replacement With LEDs


This is an Instructable about how I repaired the screen on my laptop. The steps here should be fairly generic for other laptop or even LCD monitors and TVs as far as the general idea in replacing the back light CCFL tube lamp. However, this is not a simple procedure as it requires dealing with delicate equipment and high voltages in some cases. With this in mind, it is still a very satisfying and potentially inexpensive modification that can extend or revive an aging display. My laptop is an old Sager NP-888E and so the steps follow the process of changing the lamp in this model but most LCD screens have similar circuitry and thus this steps should be helpful as general directions to just about any other display.
To keep this Instructable within a reasonable amount of steps there will be some pre-requisite knowledge and skills required on the following subjects:
- Soldering
- Micro controller programming
- Writing AVR code
- Sourcing parts from an electronics supplier
- Pulse width modulation and its use in controlling LED intensity
- Opening a computer and disassembling its parts
This being said, if you are courageous enough to attempt this but have questions feel free to ask in the comments and I will do my best to answer them. If what I wrote is not clear or seems confusing also let me know. I'm familiar with what I am trying to accomplish and I might miss explaining details that appear obvious to me but not to those trying to learn or apply the steps.
I have a small room in my home that I use to play and record music. I have an old laptop that serves as my digital audio work bench. When I bought this laptop it was top of the line (in 2001) with a 16 inch screen, 2.4 Ghz Pentium 4 processor, 1 Gb DDR2 RAM, 80 Gb hard drive, TV tuner, digital sound output, dual DVD burners and memory stick reader. It is the type of laptop kindly referred to as a desktop replacement. It weighs about as much as a desktop.
I stopped using the laptop as a portable computer when the wife started requiring use of a computer and lugging around the Sager became cumbersome. So the Sager was replaced with a different laptop; and this is how the Sager ended up in my recording room. It has worked great for years as a digital audio workbench, it has enough power to record multiple midi tracks and 4 stereo audio tracks at once so there is no reason for me to throw away a working machine for something else. This is why I ended up down the path of replacing the back light when, after 14 years of service, the laptop screen suddenly went dark in the middle of a recording session...
Step 1: Diagnosing the Problem


I found the above image of the LCD assembly at http://studentstudyhub.com/liquid-crystal-display-.... I am not affiliated with them, just borrowing the image as reference.
There are many parts involved in turning bits in a computer into images on a screen. One set of parts involves the data path, where the bits from the computer travel via the video card to a display controller on the screen/monitor. This controller uses those bits to turn on and off tiny portions of the screen (LCD panel) to create the image. So if the screen is not displaying an image this is one path that must be diagnosed.
LCD panels require a consistent source of light (the backlight) that shines through the back of the screen. After shining through some polarizing filters, the backlight hits the LCD panel where it gets filtered again and turns into the image that we perceive with our eyes on the screen. The back lighting used in LCDs is a cold cathode fluorescent light (CCFL) that is controlled by a voltage inverter. This is because a CCFL needs a potential difference of around 700 volts to operate, but a typical computer power supply will provide between 12 and 20 volts. This is the high voltage portion I was referring to in the introduction.
So how did I figure out which part of the process of displaying an image was broken? The screen had flashed on and off several times before it went permanently dark. I thought the video card was dead but I remembered the part about the LCD screen needing a backlight to display properly. So I grabbed a flash light, turned it on and aimed it at the screen. Then I got really close to the screen and discovered that the LCD was alive. The LCD was displaying an image and I could see the mouse moving and the computer responding to inputs. This is when it became clear that the LCD backlight was not working. However, there are two parts to this system, the CCFL and the inverter. It was time to figure out which stopped working and if I could find replacements for them.
Step 2: Opening the Screen

This is a fairly simple step that should work with most laptops. First of all, disconnect the power supply and remove the battery. After that, press and hold the power button for 5 to 10 seconds. This gives any capacitors with stored charge a chance to bleed off that power.
Now, lift the lid and inspect the screen. The Sager is built like a tank, so it has screws in four corners of the screen that hold the front bezel to the lid. Most newer laptops will only have clips but pay attention and make sure there are no screws or else you can snap the bezel when trying to pry it off.
Once the screws are off use a plastic wedging tool to pop the clips around the screen and pull off the bezel. This should expose the LCD assembly and the inverter board, typically mounted at the bottom. Most laptops will have a single purpose inverter board with a four pin connector that connects to the motherboard. The Sager's inverter board also operates some status LEDs (power, charging and email notification) which is why it has more than four pins on the connector that comes from the computer. However, ignoring the LED pins, the board has the same four pins required by a typical inverter board: Supply voltage, screen enable, screen brightness and ground.
The pin numbers and order given in these steps are for the Sager NP-888E, others will not be in the same order or will have other pins but an inverter board should at least provide the four mentioned above.
Take note of the pin orientations if you decide to pull off the inverter board, some connectors might be keyed to ensure correct orientation but I've seen some that don't.
If at this stage you decide to power on the laptop, DO NOT GET YOUR HANDS OR TOOLS CLOSE TO THE INVERTER, especially the side with the transformer and the output to the CCFL. If the inverter board is operational you could get hit with a high voltage discharge.
Step 3: CCFL or Inverter Board??

Inverter boards and the CCFL replacements are not terribly expensive. At this point, depending on your model, it might be worth ordering an inverter board to replace the one in the laptop. Most failures like the one on my laptop are due to a bad inverter board. However, if you are stubborn like I am and refuse to do away with the old laptop, the problem is not cost alone, it's also availability. Coming across reliable parts for the Sager is not easy. So I press on with the diagnosis.
Without another operational inverter board I can't test the lamp, and without reliably working lamp I can't test the board. DigiKey sells the lamps for about $11 US, so I could go ahead and order one to diagnose the board but meanwhile, time is wasting and if the problem is the board I still have the issue of finding a replacement inverter for my 14 year old laptop.
I took the inverter out and did some simple tests with the multimeter. I was able to determine that the fuse (PTC) from the supply pin was permanently open, so I could replace it and potentially get it working again. But when I did, the backlight remained off. Further inspection revealed a burnt capacitor on the signal path of the inverter IC. Being an SMD component I could not easily determine its value so I took a guess and replaced it with a 0.1uF. Still the light remained off. At this point I decided it was time to think about re-engineering the whole system.
Step 4: LED Strip Replacement
I decided that it was time to find a way to replace the inverter and the CCFL with something else because my chances of finding a replacement were not great. Sure I found some used screens on ebay for the model, but these are at least 14 years old as well and who knows how long they would last. So I came up with the idea of replacing the CCFL with a strip of LEDs. At first I thought this was an original solution. It turns out not quite. I later found a company that makes LED replacement kits for a variety of LCD screens, including the one on my Sager.
At this point I would recommend you consider the replacement kit as an option. The kits look to be of great quality and made to fit properly with an LCD assembly. However the one for my Sager was about $100 US which is more than my stubborn, cheap self was willing to pay for a solution being that I enjoy the whole process of solving the problem myself.
Measurements taken with the voltmeter indicated that the inverter board had the following pins that were relevant to my solution:
- Supply voltage line (20 volts)
- Enable screen signal (0.0 or 5.2 volts)
- Screen brightness control signal (0 - 3.0 volts)
- Ground
Electrically this is all we need. The next step is choosing LEDs and resistors that will have appropriate voltage drops and create proper current consumption to provide proper illumination. If you have made it this far and are considering building your strip, take good measurements and use a setup that works with your electrical supply.
Step 5: Designing the Strip

This part involved a bit of risk taking on my part. I asked Sager if they had the maintenance manual for my laptop (unfortunately they did not have it) because although the supply pin on the inverter board connector had 20 volts (the same output from the power brick) I did not know what kind of circuitry might be between the power brick and the connector at the inverter board. This is important because without tracing the line through the motherboard (which I did NOT do) it is hard to know what the impedance of the line might be. In other words, it is not known how much current can be safely drawn through the supply pin of the inverter board connector.
However, physical inspection of the connector revealed that there were 2 pins dedicated to the same ground and that the supply pin was doubled up (had two parallel wires connected to it). This gave me confidence that (by my own estimates) I could draw at least 100 mA from this line without damaging anything. This might be the same with your set-up, check it.
My design goals for the strip were:
- Use as little current as possible - Minimize power consumption and heat generation
- Provide proper light intensity
- Fit within the space provided - Minimize any requirement to cut away parts of the assembly.
Step 6: Getting to the CCFL

In order to build the LED strip without having the mechanical drawings of the LCD assembly it became necessary to disassemble the screen and extract the CCFL. This allows the opportunity to measure the usable space to build the LED strip.
If you are still following and are headed down this path you must know this step is delicate. Refer to the introduction where I posted the image of a typical LCD assembly. There will be layers of materials that are placed in a specific order. Do not mess with the order or the orientation, if you do you could end up making the screen unusable because the polarizing filters will block or distort the backlight. Also, these assemblies are put together at a factory in a clean room. If dust and/or debris gets between the layers they can scratch the material and cause distortions in the light. If you open the screen as I did it will be impossible to keep any dust from settling inside the screen but hey, we are reviving a screen. Just try to be as clean as possible, I used latex gloves to handle the screen because fingerprints will also stain the inside of the screen and then those can't be wiped off once the unit is re-assembled.
The screen I have only had one CCFL, some larger screens will have two lamps and two inverter boards. Just repeat the assembly for the seconds side.
The screen will have a data connector that comes from the video card. This is typically a flat wire that runs up the back of the screen to the controller board. BE VERY CAREFUL WITH THE CONNECTORS ON THE SCREEN. Many of them use flat flex cables that are very delicate and the connectors themselves are delicate. If any of these break or tear and cut through a data line the whole assembly will become useless.
Remove any connectors that you can before removing the screws that hold the screen to the lid. This will minimize the risk of breaking the cables while handling the assembly. Flat flex connectors usually have a clip that presses the cable into the pins to make electrical contact. These clips can be lifted with a finger nail or a small screw driver but they can be fragile and the clip can break. If it breaks then the cable will never make proper contact and the assembly will be useless.
Remove all the screws around the assembly, disconnect the cables and place the assembly on a clean and flat working surface to proceed. Keep track of all the screws and where they go. Otherwise after re-assembling the unit you will end up with all the extra parts that the factory put in when they built the computer.
What happens now depends very much on your screen, but on mine I had to first disconnect two flat flex cables that connect the LCD to the LCD controller board on the back of the assembly. The controller is hidden below some tape and is mounted on a very thin PCB. This is important to know because when pulling off the tape it can flex the thin PCB and crack it, again rendering the unit useless. Once all the tape has been lifted and the controller removed it is time to open the clips that hold the plastic assembly to the metal frame.
After releasing the clips the inside of the screen can be lifted to allow removal of the CCFL. For my screen I was able to lift the bottom portion of the screen enough to pull out the metal tab that houses the CCFL. This metal tab attaches to the bottom of the plexi glass that serves to diffuse the light. By carefully lifting the screen this way I was able to minimize the exposure of the LCD itself to dust and fingerprints as well as keeping the polarizers in order.
With the CCFL removed I could find out how much room I had to build my strip and thus which parts to buy.
Step 7: Building the Strip


The CCFL lamp itself is only about 2 mm in diameter. However the space where the CCFL sits is actually a channel about 3 mm wide by 5 mm high. So I looked around to find LEDs that would fit inside this constraints when mounted on some medium that kept them stable and electrically isolated from the metal parts of the screen. At the same time, the soldering will be done by hand which means the LEDs can be SMD but not too small and with leads that can be reached from the sides of the LED case, i.e., the leads are not only on the bottom of the case.
After some research I decided on the following LEDs:
https://www.digikey.com/short/3mj5rb
https://www.digikey.com/short/3mjf2b
They fit mechanically in the space, have leads that wrap around the sides so soldering is simplified and they need only about 20-30mA to provide adequate lighting. Given that they also have a viewing angle of 120 degrees then we can cut down on the count and spread them out a bit. I must say that I prefer the LEDs from the first link and if I did this again I would use only that model.
I ordered 20 of each thinking that I would try them and see if they were consistent with their published forward voltages. Also, I figured that 40 LEDs should be plenty to light the screen up. In the end the calculations will show that 21 was all I used.
So how many do we need on the strip? This will depend on the voltages available at the connector of your inverter board, but I will show you how I calculated the setup for mine.
My tests of the LEDs when they arrived showed that I could get proper lighting intensity with ~25 mA. With 25 mA running through the LED the voltage drop across the LED was around ~2.8 volts. The measured voltage at the supply pin of the connector is 19.84 volts. So to find how many LEDs can be lit with about 25 mA from the 20 volt supply we divide the supply voltage by the voltage drop:
LED count = 19.84 / 2.8 = 7.08
So just barely over 7 LEDs will drop the full supply voltage while keeping the current at ~25 mA without using any resistors. This is good because using a resistor to limit the current is another way to lose energy and generates heat without generating light!!
Now, seven LEDs are not enough to evenly spread out the light along the 16 inches of the screen, so I decided that since a group of 7 LEDs would consume ~25 mA then I could add two more groups to increase the light density and still remain well below my self imposed limit of a 100 mA current draw from the supply pin. And this is how my LED strip ended up with 21 LEDs, three groups in parallel with each group having 7 LEDs in series.
The next step is deciding how to mount the LEDs as a strip that can be placed inside the screen assembly. I looked around the house and I came across wooden skewers that we have to make kabobs on the grill. These skewers are about 3 mm in diameter so I took three of them and split them in half along their lengths in order to provide a flat side that will serve as the bottom of the strip for stability as well as creating more space for the strip to fit in the small space where the CCFL used to be.
So I measured the length of the bottom of the screen and I divided it by 21 which gave me the space between the LEDs to have them be evenly distributed. I used glue to carefully bond together the three skewers into one long piece. Once it dried I cut the strip to size and marked every interval where each of the 21 LEDs was to sit on the strip. Then I carefully clamped the strip to the table to make sure that it would hold in place while I tried to place the LEDs on it. My goal here is to align the LEDs as evenly as possible such that they are all facing in the same direction. This is a very important step because it enables the light to be evenly distributed. Failing to keep them well aligned will result in light flares that you can see on my finished product.
Once you have determined which end of the LED is the anode and which is the cathode then it is time to assemble. The idea here is that the strip will be fed a voltage on one end and the current will flow out the opposite side so the LEDs must all be aligned in the same direction. So with some super glue and a steady hand I started placing the LEDs onto the strip. I placed a drop of glue on the top of the strip where I had marked a spot for an LED. Then grabbed the LED with fine tip tweezers and checked and double checked the orientation before placing it on the drop of glue. The LEDs are small, do not use too much glue or it will cover the electrical leads and then it will interfere with the soldering. Repeat 21 times until done.
Once all the LEDs are glued on the strip the next step is to verify their orientation one more time. Grab a multimeter and place it on the ohms setting that allows diode testing, on my meter this is the 2Kohm setting. Now carefully touch the red lead of the multimeter to the connection on the LED that you believe to be the anode and the black lead of the multimeter to the connection on the LED that you believe to be the cathode. If the orientation is correct the LED will light up. If the LED does not light up it could be that the LED is reversed (so test it the other way), or it could be bad or maybe some glue got on the leads and they are not making contact. Fix any of these issues and ensure every LED is working properly before continuing to the next step.
Attachments

Step 8: Wiring the Strip


If you can believe it, this is the most tedious part of the process. The idea is to cut small strips of conductive material that will fit between the LEDs to link them together. You can try the technique that best suits you. I contemplated using conductive ink to draw the connections between the LEDs on the wood but the resistance of the paint was too high, causing a large voltage drop that made the strip not light up. So I used my supply of through-hole component leads. Every time I use a through-hole component on a PCB I clip the leads but instead of throwing them away I put them on a little bag and save them. Then it is times like these when my anal retentiveness pays off. The leads provide great conductivity and are almost the right size.
So I clipped the leads and placed them on the wood connecting the LEDs. I secured them to the skewer with a drop of super glue so they would stay in place when they get soldered to the LEDs.
Soldering the leads together is the next step. VERY IMPORTANT: use a fume extractor or a small fan blowing gently over the spots you are soldering. Besides the typical fumes the soldering will create, the high heat will evaporate the super glue and it creates some very irritating fumes. So grab your soldering iron and put the finest tip you have. Then proceed to carefully solder the LEDs together. Remember there are 3 groups of LEDs in parallel. When you get to the 7th LED DO NOT solder it to the 8th! A wire needs to be run from the beginning of the strip to the 8th. and the 15th. LEDs to supply them in parallel. The same needs to be done with the grounds from the 7th. and 14th. LEDs which needs to connect directly to the ground at the 21st. See the schematic.
Be patient, take time and do it carefully. It will pay off. After you finish soldering the LEDs and recover from fighting the tedium, it is time to.... TEST AGAIN!
Step 9: Testing the Strip


With the multimeter again on the diode test position, test the LEDs in the same way as before EXCEPT touch the multimeter leads on the leads that were just soldered. We want to test that the solder connections are good and conduct properly in and out of the LED. If there are any dead LEDs it could be that the solder did not connect properly or the LED burnt because it was kept hot for too long. Replace it, I had to do this with a couple of my LEDs. I was having trouble getting close to the lead with the soldering iron, I overheated the LED and killed it.....
Eventually it will be time to test with the full power supply. Since my inverter board supply pin had the same voltage as the power supply I just grabbed the power brick for the Sager and connected the strip directly to it. You should be rewarded with even lighting of all the LEDs.
Since the strip is working it is time to figure out how to wire it to the supply. In my case it was a matter of soldering some long leads from both ends of the strip to the LED controller board. I placed the strip along the bottom of the screen and took some approximate measurements leaving a bit of slack that can always be cut back to hide them inside the frame when re-assembled. Then I added a 2 pin connector to it that links it to the LED controller board.
Step 10: Assembling the Strip Into the Screen and Testing (again)


So now it's time to place the strip where the CCFL was and run the wires. In my case it was a matter of carefully fitting the LEDs underneath the assembly. The critical step here is to be gentle so that the strip does not twist or that the LEDs are not jammed into place risking a broken connection or a LED that falls off the strip. I used individual wires from a ribbon cable to make the connection to the LED controller board. These were thin enough that they fit within the existing channels on the plastic frame meant for holding lamp wires. The wires are also of enough gauge to allow the ~75 mA to run without a noticeable voltage drop.
Once the LEDs are in place it is time to see the screen light up. Double check your connections making sure there are not shorts. There are metal parts in the frame and the frame is grounded so if any of the connections on the strip touch a metal portion of the assembly it will likely create a short and the LEDs won't light up. If everything is in proper order then it is time to light it up! Connect the supply as you did with the previous test and enjoy the glow!
At this point the backlight is working and you could make it a manual task to connect and disconnect the light when you power down the laptop to turn the screen on and off, but for the effort that has been exerted so far we might as well make proper connections that synchronize the light's operation to the functionality provided by the computer.
LET'S GO!
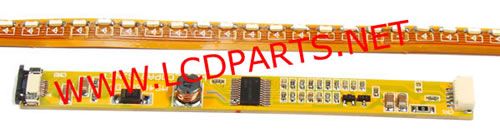
Step 11: LED Strip Controller Design

So the light will come on with power from the power supply but we want to have it respond to the enable/disable signal and who knows, maybe even the dimming/brightness control!
There are many ways to achieve the above but my solution focused on using a microcontroller to allow some software customization and reduce component count. The microcontroller can also be removed if one does not care for the dimming control. The schematic shows that the enable/disable signal from the computer can be connected directly to the gate of the mosfet thus having the LEDs turn on and off as the computer determines they should, such as with power on/off, standby or power save modes for example.
The main use of the microcontroller is in converting an analog signal on the dimming control pin to a PWM signal at the gate of the mosfet. I took a look at the inverter IC on my board and found its datasheet. This showed that the expected range of voltages at the dimming control pin should be between 0 and 3 volts.
The schematic provided has 3.3 volt zener diodes with current limiting resistors at the inputs of the enable/disable and dimming control pins to the microcontroller. Depending on your setup you can keep them to protect the controller or remove them if you like to live on the edge. In my case the resistors I had in hand to configure the voltage regulator made it so that its output (VCC) was 4.75 volts to drive the microcontroller. However the voltage measured at the enable/disable pin for my board is 5.2 volts, so the zener makes it possible to interface these two voltages without overloading the input of the microcontroller. Unless you are really tight on space I would recommend leaving them in. If you don't know why the zeners protect the controller then leave them in.
The files attached are the schematic in Eagle CAD format and the bill of materials to assemble the LED controller.
Step 12: LED Controller Software
The software that goes into the ATTiny85 is very basic. The microcontroller will monitor the enable disable signal. If the signal is low then the gate of the mosfet goes low and the LEDs are off. If the enable signal is high then the microcontroller reads the voltage at the dimmer control line and adjusts the duty cycle of the mosfet gate output to control the brightness of the LEDs.
In the software one has the opportunity to tweak the values to whatever range the brightness control levels will be appropriate for your setup. Yo do this by changing the last two numbers in the map() function. I have modified mine to provide an offset at the low end so the last two numbers are 128 and 255. I realized there was no point in making 0 volts on the dimmer control signal be fully off on the LEDs as this makes the screen unreadable.... Anyhow, feel free to tweak it to your heart's content.
The values for maximum and minimum brightness are auto-ranged on first use. When running for the first time, use your screen's brightness controls to cycle up and down all the way a couple of times. This will calibrate the inputs on the ADC. These values should then store to the controller's EEPROM so that they can be recalled after a power off state and thus you should not have to perform the auto-ranging calibration again. If for some reason you would like to reset the auto-ranging then remove power to the microcontroller, connect the debug pin (pin 5) to ground and re-apply power. This will engage the EEPROM reset logic and allow you to re-do the calibration. After that the values should be stored again when the controller receives a screen disable signal (usually before computer sleep or power down).
I also added a sleep mode to the ATTiny. When the enable signal goes low, it turns the mosfet off and then goes to sleep. This takes the power draw of the ATTiny from ~3.0 mA to 0.3 mA when the screen should be off. The software enables a pin change interrupt on the enable pin so that when the ATTiny is sleeping, the enable signal will wake it back up and it can resume operation.
The attached files contain the code in AVR C++ to load onto the ATiny85. Other AVR controllers can work but the ATTiny series is perfect for this setup. The code is written using Atmel Studio 7 but it can be pasted into the Arduino IDE and built there if you are more comfortable with that interface.
Step 13: Connecting the Computer Signals to the LED Controller Board


Depending on your setup this can be really simple. Purchase the correct connector and just plug it with the correct polarity and enjoy!
Not me though, did I mention the Sager has a custom inverter board? So I need to use the Sager connector if I want to keep the functionality of the indicator LEDs on the lid and minimize the amount of hacking required to get the signals connected. Using the multimeter and the datasheet for the inverter IC on the board I was able to reverse engineer the connector on the Sager and determine the functions of each pin.
So I carefully soldered a 4 wire ribbon cable to the pins on the inverter board connector and used those to feed the LED controller board. The one thing to note is that I did NOT wire the supply power pin at the connector but instead I wired it at some decoupling capacitors that sit right after the fuse. This way we can get a bit of noise filtering and over current protection in case the LEDs go bust and start trying to overload the supply.
At this point the right half of my inverter board (where the inverter itself sits) is useless. It has been bypassed and I will carefully cut it off to free the space and then mount the LED controller in its place to the laptop lid.
To the assembly line!!!
Step 14: Assembling And.... Testing, Oh Yeah


We did not make it this far just to leave the disassembled screen on a desk. So carefully re-check your LED strip and its connections. Then gently reassemble the screen onto the computer frame. Make sure the flat flex cables are connected to the LCD controller board properly and not being pinched or left loose. Carefully attach the LCD controller to the back of the display assembly with any remains of the tape. In my case I had to take it out after my first attempt to assemble because I did not notice that the controller had been misaligned when mounted and that created a faulty connection on one of the flat flex cables. The result was an unreadable screen with streaks all over it.
If you are confident in your re-assembly of the screen then it is time to connect the LED controller to the computer, the LED strip to the LED controller and the power brick to the laptop.
At this stage with the laptop off, the LEDs should remain off. If they turn on when the power supply is connected and the laptop is off then the mosfet is letting current through. Check the mosfet wiring and connections. Maybe my software was not correct. Did you use the same pins on the controller hardware as the ones driven by the software?
If the LEDs are off when the power is connected but the laptop is off then it is time to fire up the laptop and see what happens. I decided to keep my hand close to the power brick connector in order to quickly pull the plug if any component started losing its capacitive smoke. If everything goes well you should be rewarded with a functioning screen once again!!! (See pictures above). If you decided to connect the dimmer control then test it, the screen brightness should be controllable from the computer. If not, check the wiring and check the software on the microcontroller. Measure the brightness signal level and make sure it is being scaled appropriately by the ADC in the microcontroller and then turned into a proper PWM signal at the mosfet gate pin. An oscilloscope is immensely helpful in this kinds of situations.
Congratulations, your screen should be revived and you can go back to cleaning up your mess and using the old laptop again!
As a side note, I'd like to point out the light flares at the bottom of my screen assembly. When the front bezel is in place and computer is running the flares are not noticeable or distracting. But they are the result of less than precise alignment of the LEDs at the strip assembly stage. The flares come from the LEDs that are not pointing straight up into the plexiglass diffuser and portions of the light concentrate against the front face of the diffuser causing the flare. So do your best to align the LEDs when assembling the strip.
Still, I'm extremely pleased with the result and knowing that the screen should last a long time. Some other component on the trusty Sager will likely give before the LED strip or controller dies.

Participated in the
Maker Olympics Contest 2016


