

Introduction: LED Pixel Clemson Tiger Paw


I made a Clemson Tiger paw with 425 WS2811 bullet pixels. This paw will be used in my Christmas light show for 2019 and beyond
Each LED light is RGB and individually addressable which allows for many cool effects to be played on the paw.
Step 1: Parts + Equipment List
Supplies
- 10mm Corrugated Plastic aka "Coro". I used 10mm thick so that the paw would have a rigid structure without needing to add a frame. I ordered fluted polypropylene from Piedmont Plastics (shout out to Todd Wuerfel, he's a cool dude) and picked it up in Greenville to avoid shipping costs. The original size for the sheets is 48"x96" so I had them cut it to sheets of a size that would fit on our laser cutter (6 pieces of 24" by 32").
- Lights - The type of lights I used are known as WS2811 Smart Pixels. They are individually addressable, waterproof, and have 4 inches of wire between them. I bought mine from WiredWatts and used the Paul Zhang connector (I use Ray Wu for my 12V lights and Paul Zhang for my 5V lights)
- Orange spray paint - Ideally Krylon Fusion, but normal Krylon works too
Tools
- Laser Cutter - I used the laser cutter at Clemson's Makerspace to cut the corrugated plastic. However, you could also cut it using a scrollsaw or a jigsaw or a CNC machine or a hacksaw.
- Exacto Knife / Box Cutter for cleaning up the laser cuts that didn't go all the way through
- Step Drill Bit set for drilling the 12mm holes for the pixels
- Dremel with blade and routing bits
- Hot glue gun
- Coffee
Controller and Software
I used a F16V3 controller for this project and most of my other Christmas lights. You could also control it with a pair of ESPixelSticks or a Raspberry PiHat or an ESP8266/Arduino Mega.
The xLights software is free and essential to have if you want to do effects that are mapped to your pixel layout.
Step 2: Design in Adobe Illustrator
First, as with any project, I download the vector file of the Clemson Tiger Paw from the official logo page. I always use "Tiger Paw / Outline" for laser cutting.
Next, drag the vector file into illustrator and Embed it in your project, then Ungroup it so you have each pad of the foot separate. Then I recommend "Locking" the paw in place so that you can't accidentally select it and delete parts of it.
Now we need to make the circles for the lights:
Quick steps to make a grid of circles
- Draw a rectangle or square of the size you want your circle grid to be in. Let's say we draw a 15" by 15" square.
- Select the square and do Object > Path > Split into Grid.
- Do the math and figure out your spacing. I used 1.5" spacing between the centers of the pixels, so 15"/1.5" = 10 rows and 10 columns.
- Enter 10 (or your number) for the Number of Rows and Columns
- With all your squares selected do Effect > Convert to Shape > Ellipse
- Select "Absolute" and enter the size of your circles. If you want to use the laser cutter to fully cut out each one (or just visualize where they go), make their width and height 12mm (it will convert it to inches for you)
- Click OK and you should have a grid of circles!
- Resize them: If you find that your circles are too big or small for your laser cutter (my lights were loose when I did a test cut of 12mm), do this:
- Select all your circles and do Object > Transform Each.
- Uncheck these boxes:
- Check these boxes:
- Enter the scaling factor for your circles. I did 95% to make them just a bit smaller
Cleaning Up
At this point you should have a grid of circles over your shape Manually go through and select all the circles that are outside of your shape or touching the edges. I also used the Direct Selection tool to modify the edges of my shape a bit if a circle was right on the edge or I thought it would look better with a circle there.
Once you have light circles only where you want, I recommend grouping things for easy editing later. I made a layer (use the Layers window liberally) for each toe/pad and made a group of items for all the circles in that toe in the layer.
Once I had my layers and groups of circles I moved them around to maximize their fit on the Coro sheets. If you have more items being cut you should use a website like https://svgnest.com/ to optimize the layout and nesting of your objects to maximize your use of material

Step 3: Laser Cutting


Note: You don't need a laser cutter, it just makes things easier. You could also cut the coro with a scrollsaw, jigsaw, water jet, cnc, or many other tools depending on the size and shape of your design. Don't think that you can't do something because you don't have access to a laser cutter!
Settings
After a few test cuts, I decided on the following settings to cut the 10mm fluted polypropylene with our 60W Epilog Fusion M2 40 laser cutter:
- 100% power
- 7% speed
- 100% frequency
- No power/speed compensation
- 6 ish passes
I tried lower speed to blast through it in one or two passes but it ended up melting the edges of the plastic and shooting out 2" flames and just wasn't a good time.
For the main paw (the first thing I cut) I had the laser cutter cut the outline and the circles all the way through, but it took over an hour and still hadn't cut all the way through every flute on the panel so I had to manually go through with an exacto knife and cut out the circles and outline. For all the other pieces I made the circles smaller just as a pilot hole for my step drill bit and only cut the outline of the piece all the way through with the laser cutter.
If you decide to use wood or thinner corrugated plastic your settings will be different. I found for 4mm panels that they cut beautifully at 7% speed 100% power.
Step 4: Cleaning Up the Cuts and Holes


The laser cutting was a very frustrating experience because even with 5 or 6 passes sometimes it wasn't cut all the way through. I went back through with an exacto knife, box cutter, and dremel to clean up the holes. I found that the exacto knife worked best.
I also tried drilling the holes myself with a step drill bit. It drilled through easily, but the flutes in the plastic caused it to jump to a spot between two flutes and resulted in a wavy non-uniform scatter of holes instead of a nice grid. From a distance it isn't too noticeable so I left it. The step drill bits are 100% better than a normal 1/2" bit because the normal bit just shredded and twisted the plastic. The step bits just smoothly passed through.
I painted it with standard Gloss Pumpkin Orange "Krylon Color Maxx Paint + Primer" spray paint. Everything online said to use Krylon FUSION but I couldn't find it in the color I needed. The paint I used seems to stay on really well.
Step 5: Making a Frame
My dad made a frame out of copper pipes and various angled fittings. We used some 1" pipe sections with an end cap to offset the frame from the Coroplast, and then used screws from the front into the copper cap to hold it in place. If I did it again I would 3D model + print some frame pieces for EMT.
Step 6: Adding Lights
Easy - push the lights in! I did it so that they never went over the copper frame, just in case the frame ever needed to be removed. I wired it as 425 sequential bullet pixels, and power injected every 70 ish LEDs.
Step 7: XLights Setup
I first used the built in tool to detect light location from a video, but eventually I had to go in and manually tweak that model a ton to make it work. If I did this again I would probably just manually type all the numbers out because it would be less time than messing with xLights for it.
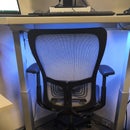
Step 8: Final Product


I will upload more pictures of it running eventually, but here it is off and covered with snow!


![Tim's Mechanical Spider Leg [LU9685-20CU]](https://content.instructables.com/FFB/5R4I/LVKZ6G6R/FFB5R4ILVKZ6G6R.png?auto=webp&crop=1.2%3A1&frame=1&width=306)


