

Introduction: LabVIEW Tutorial: Game Discounts


This project uses some more advanced LabVIEW code that searches user inputted games and then returns the discount for each game entered. This code walkthrough will give you some experience with HTTP GET requests and Regular Expressions as well as LabVIEW Front Panel controls using property nodes and invoke nodes!
If you have any questions, please feel free to leave a comment here and also check out the LabVIEW MakerHub forums.
Step 1: Install LabVIEW

Before we start coding, you'll need LabVIEW. Digilent sells LabVIEW Home Bundle for makers who want to use LabVIEW to code their projects!
If you are installing LabVIEW Home Bundle, check out this instructable for a how to.
Step 2: Download Code
First you'll need the code I wrote so you can follow along with the tutorial. Below is the zip file that contains the main VI called "Get Discounts Final.vi" and two subVIs that I made called "Find Name and App Id.vi" and "Get Discouts.vi".
Extract the zip and open Get Discounts Final.vi. When it looks for the subVIs, it will open a dialog after searching that will allow you to point to the subVIs I have included. Once it knows where those are, your VI should be ready to go!
Attachments

Step 3: LabVIEW Code Overview


If you go to the block diagram, you'll see that we take an array of games to check the discount on on the far left and then we have a flat sequence structure that executes the code in each frame sequentially. The array of games is sent into the first subVI that returns the names found by steam and the app ids for each game (more on how this actually works later). The app ids are then sent to the last subVI that then returns the discount for each app id (explained later as well).
If you're somewhat new to LabVIEW, you might not recognize some of the code in a lot of the frames (pictured above). These are called property nodes and you can do pretty much anything you can think of with them. Before we talk about how I'm using these property nodes, let's first finish walking through how the backbone of the code works to get the game names and the discounts.
Step 4: Getting the Names Part 1


In the second frame of the flat sequence structure, we use the get name and ID subVI that returns the name of the game that you entered as it appears on steam and the app id that corresponds to that game. When you double click on the subVI, it should open and the block diagram should look like the one pictured above.
This uses a for loop to get each game in the array and use the steam API to get the name of the game and its app id using an HTTP GET request. A get request sends a request to a sever which then replies with information. To search for a game on steam (for example Metal Gear Solid V), the URL is "http://store.steampowered.com/search/?term=Metal+Gear+Solid+V". Notice how the spaces are replaced with "+"? We need to do the same thing!
When the array of games comes in, we use the "Search and Replace String" to find all spaces in the game name and replace them with +. Then we take that term and concatenate it on to the end of the URL so that when we do a GET request on the whole string, it will send the response you would get when trying to search for that game.
When you do a get request on this URL, you'll get a bunch of information that we then have to sift through in order to find what we want. In our case, we're looking for the name of the game that shows up first since it is the best match to what game we entered in the array.
Step 5: Getting the Names Part 2

The response is now split so we can find the app id and the name of the game at the same time. We use the "Match Regular Expression" block in LabVIEW to search the junk from the GET request for something specific. If you've never heard of a regular expression, you can read more about it here.
To get the name, we search for span class="title">.*.<. What this does is look for span class = "title"> and then grabs all the stuff between that and the < on the other side. So if the game is named "NAME" the whole match would read: span class="title">NAME<. We can then strip off the extra stuff and we'll end up with NAME which we then return to the user to make sure that is the game they wanted to check.
Similarly, we look for data-ds-appid=["][0-9]* to find the app id. What this does is search for data-ds-appid= then a quote and then after the quote it will grab all numbers between 0 and 9 until a number isn't found. For instance, if the number was 234A, it would find 2 then 3 then 4 and stop because A is not a number. Once we have the whole match of the app id, we cut off the extra stuff we don't need and then output the app id.
Because of the for loop, we execute this code for each game and return arrays of the matched names and the app ids.
Step 6: Getting the Discounts


Next, close this subVI and open the next one that gets the discount called Get Discounts. The block diagram should look like the one pictured above.
This may look familiar to you because it should! It's more of the same with a slight twist at the end. Steam has an API that you can use to get information from games in programs. Thus the URL http://store.steampowered.com/api/appdetails/?appids<ID GOES HERE> returns a ton of information about the game whose app id you put into in the URL above including things like minimum specs to run the game and the price of the game.
From our get request, we then look for percent_savings_text":"[-0-9%]*". This matches a negative sign, numbers, and percent signs until a end quote is found. Thus it would find something like -75% if the whole match was percent_savings_text":"-75%". The extra parts of the string are then stripped off and the discounts are displayed.
If there is no discount, it displays percent_savings_text":"". Thus once we cut off the extras, it will be an empty string and display nothing. Thus we want to check for empty strings and if it is empty, display a -0% discount to the user instead of an empty string. If there is a discount, the string will contain the information we want and we can just feed that out to the user.
Step 7: Property Nodes


Alright now we know how the code is working, let's check out the front panel magic. Starting in the first frame (pictured above), we can see we are setting a value of "false" to the visibility of Matched Names, Yes, Discounts, and No. We are also setting "false" for the values of Yes and No. This makes it so that when the code starts, we hide all of those controls and indicators and set the boolean values for the Yes and No booleans to false. As simple as that!
In order to set a control as invisible, here's what you would do. Get a property node, right click it and go to Link to->Pane->Control you want to link to. This is pictured above. Now to change to a write, just right click the property node and click "Change All To Write".
From here, we can click on Property on the property node to open a giant list of properties that we can read/write (pictured above as well). If we choose visibility and wire in a false constant, if we run the VI it will make the control disappear from the front panel!
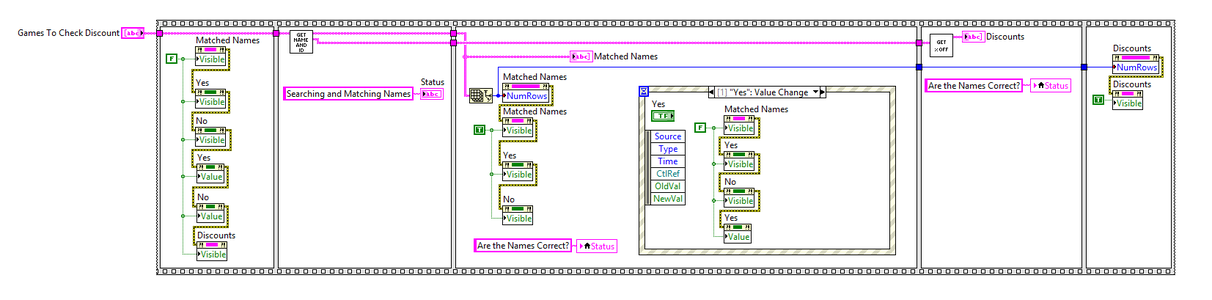
Step 8: Checking Correct Game and the Event Structure


In the third frame of the code, we use property nodes to set the number of entries we want for our matched names so that its size matches the size of the array that the user fed in. We also set the Matched Names, Yes, and No controls/indicators to visible so the user can see them.
The user then chooses if the matched games are correct or not (pictured above). A event structure is used to wait until the user presses yes or no. If yes, the controls/indicators are hidden again and the code continues. If no is pressed, the controls/indicators are hidden and then the VI is aborted. This is pictured above in the event structure. This uses an invoke node to stop the VI. If you'd like to learn more about event structures check out the NI documentation and this super helpful YouTube video that goes over how to use an event structure and why they are useful.
This ends my code walkthrough! Please let me know if you have any questions in the comments.

Participated in the
Digital Life 101 Challenge


