

Introduction: Laser Cut Dye-Sublimation Ornaments


The holiday season is the busiest times of year in my makerspace as all of my students are applying what they've learned to make uniquely personalized gifts for family and friends. This year, I thought I'd try to combine two of our favorite production methods, CNC Laser Cutting and Dye Sublimation Printing to make unique and professional looking ornaments!
What is a CNC Laser Cutter? A laser cutter is a computer numerically controlled (CNC) machine that uses a beam of light to cut and engrave materials. There's lots of different types of lasers out there from cheap diode to industrial fiber machines. I am using a 40 watt, CO2, Universal Laser cutter / engraver in this Instructable. Any CO2 laser would do for this application, as would a fiber, but a typical diode won't have enough power to cut through the material stock I am using.
What is Dye Sublimation Printing? Dye Sublimation is a type of color printing that uses heat to transfer dye onto a material. Dye Sub printing is a relatively cost effective and versatile printing method as there are flat and round presses that can be used to heat and print anything from mouse pads to coffee mugs or flip flops. You can't print onto any material, but many plastics and ceramics can be coated to be printed through a dye sublimation method. Polyester t-shirts can also be dye sub printed while cotton fibers will not bond to the dye.
Through this Instructable, we will explore how to prepare an image to be laser cut out of a dye sub compatible sheet stock to create a full color transfer print on to any shape imaginable!
Step 1: Choosing a Design Program

The first step is to prepare and create your design for cutting and printing! Dye sub will work with any image, so possibilities are endless! You can use any vector or raster program to print as a dye sub printer isn't much different from a regular inkjet printer. However, laser cutting requires a vector file so I will be using a vector program for the whole process.
There are tons of vector programs out there. Vector programs are programs that allow you to create outlines and path files, rather than image files comprised of pixels. This is important for CNC production as a CNC machine follows the path of a vector file to cut our your designs. Adobe Illustrator is the industry standard, but pricey with monthly subscription fees. Gravit Designer and InkScape are popular free alternatives. In my makerspace, my students use Gravit Designer because it is free, user friendly, and chromebook compatible. Check out my collection of Gravit Designer tutorial videos here!
Step 2: Preparing Your Image


After choosing your image, scale it to be the desired size of your ornament. In general, 4" x 2" makes a good ornament size, but variations are endless. Next, trace the image using a shape or pen tool to create your vector outline. This shape will be the profile that is cut out using the laser and the actual shape of your ornament. You could use a pen tool to trace a custom profile around your image (as shown in my example images), or you could clip your image to a shape like an heart or a star.
Once your image is traced, make a copy of your drawn path so one is around your image and one is off to the side. Select your image and the path that is over it, then create a clipping mask. This will crop your image to fit your drawn path. You may also want to add some text or artwork to enhance your ornament, dye sub will print anything in your design so have fun with it! At this point, the image is ready to be printed, but the path still needs a little bit of work.
To complete the path, we must add a hole to hang the ornament from. I used a 1/8" (0.125") diameter hole for my ornaments. On some ornaments you may want to add a tab that extrudes off of it so the whole doesn't cut through your design. Lastly, you may also need to change the color and weight of your path so it can be laser cut based upon your laser's specifications. My Universal requires line weights of 0.001 pts and a stroke color of pure CMYK red to cut.
I've also included some basic vector ornament shape templates to this step to get you started!


Step 3: Printing Your Image


As mentioned in the previous step, Dye Sublimation printers aren't very different from a typical inkjet printer. With more robust printheads and special dye ink, a dye sublimation printer can print just about any image onto a special transfer paper.
I use a Sawgrass SG500 printer that has a maximum print size of 11"x14" (legal). It's essentially a modified Ricoh printer but comes ready for dye sub out of the box and includes Sawgrass software which makes preparing your images painless. The software allows you to flip your image (you need to print your image mirrored or else your ornament will be backwards!), as well as adjust color tones based on what substrate you are printing onto.
Alternatively, you may be able to find a kit to modify your inkjet printer so it can handle dye sublimation printing..... though I personally would not recommend this route if you plan to go back and forth between dye sub ink and inkjet ink on a regular basis.
Once you've mirrored your image and connected to your printer, print as you normally would! Then use a pair of scissors to cut it out and your ready for the next step!
Step 4: Laser Cutting the Blanks


For the ornament stock, I am using 1/8" unisub hardboard that is designed specifically for laser cutting and dye sublimation printing. It comes in many precut sizes to fit your machine and can also be ordered in 1 or 2 sided configurations. Many dye sub materials include plastics that cannot be laser cut due to toxic fumes, so ensure what your material is made of before you cut!
Before you cut your hardboard, I recommend you mask it using some transfer tape. The hardboard comes with a plastic coating, but I don't like cutting through it due to the residue it leaves. Transfer tape leaves no residue and will prevent any burn marks on your blanks.
Every laser manufacturer offers its own CAM program to control the machine. For my Universal, sending my design is as easy as pushing print from my vector design program once I set my stroke to be the correct color and weight. The specified cut settings that came with the hardboard did not work for me. Instead I cut at 100% power and 3.5% speed on my 40 watt machine.
Once cut, remove from the laser and peel the transfer mask to prepare the blank for transfer printing!
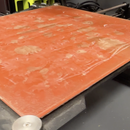
Step 5: Heat Transferring the Dye


The final production step is to use a heat press to transfer the dye of your image onto your laser cut blank. I am using a basic clam-style t-shirt press with a piece of plywood under the blank and a teflon sheet over the blank. The rigid plywood under the blank ensures consistent contact across your image while the teflon reduces the change of burning or melting your materials.
To prepare your ornament, line the laser cut blank on to the printed image, then use a few pieces of thermal transfer tape to secure it in place.
Press at 400 degrees Fahrenheit for 70 seconds. Then peel the paper image off your laser cut blank quickly and while it is still hot (and carefully to avoid getting burnt)!
Lastly, let your ornament cool and avoid stacking as the ink can transfer off of the blank until it cools fully.
Step 6: BONUS - 3D Ornaments


If you want to add some greater detail and uniqueness to ornament, make it 3D! The steps are nearly the same as above, but you need to create multiple prints and cuts for each ornament. After creating your outline and clipping mask as described in step 2, duplicate this for as many layers as you want. Create more outlines and masks, each of just a single part of your image that will be stacked to add depth. You are still going to need one full image as if it was a single layer ornament to act as the base, then smaller clipped images and pieces will be bonded to it for the 3D effect.
Proceed with printing each clipped image on the dye sub printer, and cutting each blank on the laser as described in steps 3 and 4. Then proceed with transferring the images onto each corresponding blank using the heat press as described in step 5.
After each piece cools, use super glue (I recommend liquid professional by loctite) to adhere each layer to the base layer!
Step 7: Happy Holidays!


Dye Sublimation is quick, cost effective, and provides professional quality results with ease. Laser cutting is one of my favorite production method as the versatility and possibilities of a laser cutter / engraver are endless, especially when combined with other manufacturing techniques like dye sub printing.
Whether you use this method for ornaments, keychains, artwork, or other uniquely designed items, I hope this Instructable helps guide you in your creations! Thanks for reading and happy making!

Participated in the
Holiday Decorations Speed Challenge


