

Introduction: Laser Engraving on Your Prusa MK3


Yes, your 3D printer is totally capable of making awesome laser engravings. Follow along to see how I did it. Hint: it's not complicated (well, probably just a manageable amount), and I created tools to make it easy for beginners and advanced skill levels to jump in and laser away.
There are many steps and I included a lot of details. I want to be sure you understand why and how things are happening.
Disclaimer: Lasers are very dangerous, so you need to use proper care and basic common sense to not get in trouble. I warned you, I will not be responsible if you shoot down a space pirate... or lose an eye. Arrr.
You can do this! Let's get to it.
Step 1: Laser Module


First and foremost, you'll need a laser module. You can find these all over sites like eBay, Amazon, AliExpress, Banggood etc. Look for something like this, or this - there are tons of modules out there, with new ones coming to market all the time. Get one and make sure you read through this Instructable while the laser is on its way to you. Depending on the model of laser module, you might need a pull-down resistor (more details in step 4).
Requirements for the laser module:
- Make sure it's at least 500mW. You'll need this amount of power to be able to burn wood and soft surfaces like leather, paper, cardboard etc.
- Absolutely important to have proper safety glasses that are paired with the wavelength of the laser! If you get a 405nm laser, make sure the glasses are also rated for that wavelength. If you're concerned about safety, putting on two (yes, 2) safety glasses will be safer for your eyes. Safety squints will not protect you!
- Depending on what material you'll be etching, it's also advisable to properly ventilate the room and protect yourself from the smoke that will result from burning.
- Always, ALWAYS wear your safety glasses while the laser is connected! Make sure that anyone else who's in the room with you wears them as well. Sure, you can look directly at the beam, but there's also scattered laser light that might be harmful, so always take the proper precautions! I can't stress this enough.
- Make sure the module has TTL capabilities. This is the way your printer will be able to communicate with the module and tell it when to turn on and off.
- You'll need an external power supply to power the module. Your MK3 runs on 24V and most laser modules run on 12V. It is possible to use a DC-DC step-down converter to make 12V out of the 24V but you'll have to run the wiring from the main board (if you're feeling inclined to go that route).
- Lasers come in all sorts of wavelengths (i.e. the color of the laser light). Most laser modules suitable for our kind of application are around the 400nm wavelength, meaning they emit blue or purple light. I haven't tried any other wavelengths yet, but let me know if you do!
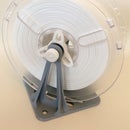
Step 2: Laser Mount


I designed a mount that attaches to the extruder motor of the MK3, which makes it possible to quickly swap between laser etching and printing without having to disassemble anything.
Attached you'll find the STL files and also the STEP file (editable in Fusion360), because more than likely you'll have to adjust the holes on the mounting plate to fit the holes on your laser module.
I strongly recommend printing these in PETG as you'll need the flexibility of the material to successfully wrap the cuff around the extruder motor.
You'll also need a couple M3x6 screws, 2x M3 threaded inserts and an M3 square nut to finish the assembly (see illustration).
When finished printing, the first thing you want to do is melt the two threaded inserts into their holes with a soldering iron. Once that's done, make sure the holes are nice and in-line with the mount holes. Adjust with a hot soldering iron if needed.
To wrap the cuff around the extruder motor, first unmount the part cooling fan for easier access. The cuff will allow enough flex to get around the width of the motor, but don't bend it too much or it will eventually snap.
Make sure you guide the cuff UNDER the extruder motor wires so it lays flat against the surface of the motor.
Once it's in position, drop the square nut in the pocket and fasten a screw through the holes. You should end up with a nice snug fit around the motor without any play.
Great, the cuff is now mounted!
Onto the mount plate. This one is simple. Align the holes with the back of the module and fasten the screws until the surface is flush (you need a surface that doesn't have screw heads sticking out, since this whole area will sit against the motor's back). Once mounted, attach it with two screws to the cuff and you're done!
My mount plate is permanently attached to the module and the cuff is permanently attached to the extruder motor. This way I only need to screw in two screws to mount the module on the cuff and I'm ready to laser etch. When I'm done, I unscrew the two screws and remove the module and everything goes back to normal 3D printer mode. The switch from 3D printer to laser engraver and back takes less time than changing filaments - which was my aim in the first place.


Step 3: Soldering Attachment Wires to the Part Cooling Fan Terminals


This step might get a bit challenging, depending on your skill level with a soldering iron and a Dupont crimping tool (if you decide to go that route). If you plan to do this mod on a different printer than the MK3, make sure there's 5V flowing to the fans! Some printers will have 12V (or even 24V) and you'll need to step that signal down to 5V, otherwise your laser's control module will burn out.
What you'll need: soldering iron, two ~24 gauge wires (preferably red and black), heat shrink tubes, solder and rosin, connectors of your choice.
If you use Dupont connectors (like me), then you'll need a 2 lead connector housing with 2 male pins.
At this step, we need to unmount the part cooling fan and solder a couple wires to the terminals. Sounds scary, it's not too bad - just be patient, take it slow, and most importantly try not to burn yourself or any of the surrounding plastic parts.
First, turn your printer off. Unscrew the two screws that hold the part cooling fan, then remove the sticker from the back to gain access to the terminals. You'll see three wires, we'll focus on attaching two more wires to the RED and BLACK wires.
Prep 5-6 inch long wires of similar gauge as the fan wires, preferably the same colors (red + black). Tin all the tips for easier soldering later on.
I found it's easiest if you de-solder the two fan wires off the terminals first. Then, wrap your separate wire tips around the tips of these. Red to red, black to black. Solder the joined tips, then solder these back onto the fan terminals. Be careful not to solder the terminals together! It's a good idea to put heat shrink tubes on the wires before you start soldering onto the terminals themselves. Once you're done, just pull the tubes on the connections and shrink them with the tip of your soldering iron.
Crimp two male pins to the ends of the attachment wires and put them into a 2 lead Dupont connector housing.
Use a multimeter to check for connectivity, and most importantly to check if the two wires are getting a connection between them--they should NOT!
To protect the soldered joint from coming undone from all the movements, it's advisable to create a strain relief. I added a zip tie to the fan mount screw to hold the wire steady (see image).
Step 4: Making the Connections Between Fan, Power Supply and Laser Module


What you'll need: power supply female connector (in my case a female 2.5mm barrel connector), red and black 24 gauge wires, 4 lead and 2 lead Dupont connector housings, 2 male pins, 4 female pins, heat shrink tubing, soldering stuff.
This step is all about wiring things up. It will vary depending on your laser module--some of them have the electronics in a separate board, in which case this step might be a bit different. Either way, try to wire up your electronics following the attached diagram.
Regardless of module, there will always be a power supply line and a TTL line. You want to make sure not to switch these since the voltages are different, and you wouldn't want to damage your electronics (including your MK3 main board!). This is the reason behind using the male and female connectors, to reduce the likelihood of switching them up. You still have to pay attention to the polarity of each connector. For this, I laid out the connections so the housings are all facing the same way (the little square windows are all on the same side).
Again, use heat shrink tubing where possible to make sure everything is nice and isolated.
Phew, that's it for wiring. You can have some gummy bears now.
Note: Some laser modules (like the Eleksmakers) require a pull-down resistor to work properly with TTL. If your laser is constantly on as soon as you plug it to power, then all you need to do is to put a 1-4 kOhm resistor between TTL+ and GND-. This assures that the digital pin is pulled down to 0V when there is no signal and only turned on if there is.
Step 5: Testing and Focusing the Laser


OK, you got your module mounted, it's all wired up and ready to go. Time for some testing!
Safety first! This is a good time to rock those laser shades! As I said before, always have them on when the laser module is connected to it's power supply cable - even when it's turned off! Cable in socket = glasses ON.
Turn your printer on, hook the USB cable to your computer and fire up Pronterface, or your preferred software that's capable of sending Gcode to your machine (like OctoPrint).
The laser turns on if there's 5V flowing to the part cooling fan. This means if you send a command that turns the fan on, the laser also will turn on! Neat, eh?
Before you turn the laser on, make sure of a couple things:
- Have your safety glasses on (again, I'll be repeating this over and over, because it's that important)
- Make sure that your PEI sheet is removed or covered by something (preferably something that's metallic, like a piece of sheet metal). PEI will get burned through instantly if the laser beam touches it. You wouldn't want to ruin your expensive PEI sheet, would you?
- Set the Z height to 50 mm either by holding down and then turning the knob on your LCD, or by sending this command: G0 Z50.
- On your MK3 LCD, go to settings and turn off Fans check.
- Note that when you turn the laser on, the beam will hit whatever it's underneath it at a constant rate. This means that if you have something that the laser can burn - like paper, wood, leather etc. - it will burn through it or it even could catch on fire! Hence the recommendation to put something that's metallic underneath. These laser modules don't affect metal as much, so that's your safest bet.
OK, now that you know what's about to happen, turn on the laser by sending the command M106. The laser should turn on and you should see a beam on the surface below it. To turn the laser off send command M107.
In order to engrave neatly, we have to make sure the laser beam is focused properly at and near the surface. There's a focus ring at the bottom of the module and you can rotate it both ways to find the perfect focus spot.
Turn the laser on and grab a sticky note or a smaller piece of paper. Slide it under the beam and take note of the width of the dot and the mark it leaves while you move the paper around on the surface. While you move the paper with one hand, use the other to turn the focus ring until you see the traces turn to about the width of a hair.
That's your laser focused. Turn off the beam (M107) and onward!
Step 6: Adjust the Print Bed

There's a significant difference now between where your 0 point on the Y axis will be. The module is that much more offset from the extruder's hotend. Luckily the MK3 has magnets on the bed and it's fairly easy to move the sheet about 50mm or so towards the LCD screen and still be useful to place work items on it.
Just be aware to not put anything heavy on the bottom, dangling part.
You can go further and get steel sheet metal that is longer than the normal bed size, and put markings on the surface for where your laser's print area is.
Step 7: Software
There are two laser etching methods available with our setup: raster and vector.
Raster etching lets you turn any image into scan lines, and your printer will go line by line to burn the pixels. This is similar to a dot matrix printer, where the only two options are whether the printer makes a mark or not (in our case, whether the laser is on or off, burn or not burn).
Pros: You can etch any image, even photos.
Cons: Limited resolution. Sharp edges will likely suffer from artifacts since everything is built line by line, similar to how your 3D prints will have a certain quality about them since they are constructed layer by layer. It's also a slow process.
Vector etching means the laser will follow a 2D path and burn lines as it goes.
Pros: Very precise. Super fine, even microscopic details are achievable.
Cons: Not really suited for photo reproductions. You'll need previous knowledge of vector graphics to create designs.
Some laser engraving software might have the ability for customization, so your printer can execute the commands properly. The usual parameters you need to be aware of:
- Laser ON is M106
- Laser OFF is M107
- TTL values are defined by choosing a level from 0-255 like this: M106 S123
- Build area is 250 x 210 (mm)
- Z height is the height you focused the beam at (50mm) + the height of your work item (because the focus will have to be offset by this height to still be precise)
- Speed of movements and speed of burn will vary depending on the material you're etching. Some things need more time to create a deep enough mark while others burn instantly, so you'll have to adjust the movement speed while the laser is on. Faster speeds = less burn, slower speeds = more burn.
- In the case of the MK3, homing needs a W (like this: G28 W), otherwise it will start mesh bed leveling, which we don't need
I've experimented with quite a lot of software packages, but still haven't found one that would work well or be easy enough to use.
So, I came up with my own app that takes care of the vector engraving part by converting an SVG file into MK3-ready Gcode. My aim is to lower the threshold as much as possible so any beginner could jump in and start creating without much hassle.
In the next step I will guide you through an example of vector engraving with Adobe Illustrator and my app, which I named (true to Prusa tradition) Laribo (the Laser Haribo... get it?).
Step 8: Let's Engrave Something!

In the next steps, I'll show you how to etch this illustration of Benchy as your first laser etched image on your MK3.
We'll prep the SVG file, save it to spec, convert it into MK3-ready Gcode, and finally, use the newly set up laser module attachment to engrave it!
The SVG end result needs to be set up in a certain way so that it can be converted properly. My app is fairly basic and allows you to control some of the adjustments that are necessary for the printing part. The adjustments are meant to alter the Gcode output, while everything else tied to the appearance of the design needs to be done in the SVG file (placement, scale, fill patterns etc). The app only does the conversion of the SVG, so it's on you to create your SVG file to your specifications.
The work area is equal to the MK3's bed area, 250mm width x 210mm height. The app expects an SVG file that is sized to the full area of the bed (again, 250x210).
Think in lines! All the shapes and paths will turn into commands for the laser to follow along. Filled areas will only be etched on their outlines, so you'll need to generate a fill pattern in your vector editing application. Fills can only be achieved by drawing lines that are close together - similar to infill patterns in 3D printing. I will give an example of fill pattern generation in an upcoming step.
SVG files can be created with many applications, and my preferred tool is Adobe Illustrator (Free 30 day trial available). In upcoming steps I'll walk through how to etch an SVG file with Laribo and Illustrator.
Another available free option is Inkscape, though less capable and with lots of quirks. I'll give some details at the Save step further down about how to properly save SVGs out of Inkscape.
SVG is a popular format these days, and there's an ever growing list of apps available that can handle SVG export.
Step 9: Tips for SVG Creation in Adobe Illustrator

- Create a new file. Set width to 250, height to 210, units to millimeters. Or use the attached "laribo-ready-blank.svg" file.
- Think of your vector file as the bed of the MK3, same size, same orientation. For example, a 10mm circle in the top left corner of your atboard will be a 10mm etched circle on the top left of the print area when you face the printer.
- Create your graphic or paste it on the artboard. Feel free to use the attached "benchy-outline.svg" as a starting point if you'd like.
- Make sure that everything is lines only. Only the outlines of filled shapes will be etched(unless you follow the next step).
- Delete everything that's not meant to be etched. Hidden layers and paths with no strokes will still get converted and etched.
- Try to optimize your lines. As a rule of thumb, fewer points mean steady speed, which then translates to nice and even burns. The Object > Path > Simplify command can help you reduce your point total quite a bit if you play around with the values. Fewer points also mean less time to calculate and less time to print. Distribute your points evenly if you can.
- When looking at your file's layers, note that the order of etching is from bottom-most to top-most. Arrange your layers according to how you want the draw progression to be. Bottom layers get etched first, top ones last.
- For areas where you need multiple passes, just duplicate the shape on top of itself (useful if you want to cut masking tape with the laser, for example).


Step 10: Fill Patterns in Vector Laser Etching

You'll probably have designs where areas need to be filled in, like the MK3 writing in my example design. The way to fill an area with a laser beam is by tracing lines close to each other. Just like the infill patterns in 3D printing where the extruder bounces inside the outlines of a shape until it's filled in.
There are many possible ways to create these fill patterns. The simplest I could come up with is an Illustrator effect called Scribble. To use it, select the shape you'd like to fill (make sure the shape actually has a fill applied to it) and click on the menu item under Effect > Stylize > Scribble.
Take a look at the attached image to see how I set it up to generate a line fill pattern.
Couple things to note:
- To change the density of the fill, adjust the Spacing slider. Materials that burn easily (like cardboard) will need to have less line density (i.e. more space between the lines), otherwise the whole thing might burn to ash. It's not a good look...
- You might want to play around with the Angle dial. Sometimes there are gaps in the fill and you can get rid of them by adjusting this angle parameter. Clicking on the field and pressing the up and down arrow will come in handy.
When you're happy with the results, click Ok and go to Object > Expand Appearance in the menu to make it into lines.
Laribo also has an experimental fill pattern generator. Just be aware that it will generate a fill for every shape. There are occasions where it can come handy, but it's still a work in progress.
Attachments

Step 11: SVG Saving

When you're ready to save, go to File > Save As... and choose your filename and directory.
Follow the attached example for SVG save settings:
- SVG profiles: SVG 1.0
- Fonts type: Convert to outline
- Advanced options (have to click on More Options to appear)
- CSS properties: Presentation attributes
- Decimal places: 6
- Uncheck all checkboxes
- Hit OK
Sidenote:
If you use Inkscape, play around with the SVG formats (Plain SVG, Optimized SVG). The most important thing is to expand your shapes before saving—Inkscape tends to leave shapes open otherwise, which will result in weird unclosed lines at etching. Also, adjust the number of significant digits for coordinates: set at highest (at least 5) for more precise lines.
Step 12: Convert SVG to Gcode With LARIBO

Enter LARIBO, the app I created to make it as simple as possible to convert SVG files to Gcode, which can then be copied to an SD card, plugged into the MK3, and laser etched!
You can download Laribo here. (Free of charge, available on Windows and Mac)
I'm developing this app on my free time, which these days I don't get a lot of, unfortunately. If you have inquiries / requests / ideas / suggestions, or you'd like to show me what you created, drop me a line to no-reply@vandenmar.com (it's a normal email address BTW, but less likely to get picked up by spam bots - hopefully)
If you find Laribo useful, consider supporting its development.
Now back to the steps:
- Load your previously created SVG file (or the benchy sample file) by clicking the Load SVG file button
Adjust sliders according to your needs as follows:
- Burn speed: if you need a deeper burn, go slower. Some materials, like leather, need more etching time to leave a proper mark. Others, like cardboard, burn very easily, so you'd want to go faster there.
- Movement speed: it's the speed of the laser head between burns. Very high speeds should be avoided as it can either move the work piece or shove it right off the build plate if the acceleration is too high.
- Laser height: Z height in mm. If you focused your laser at 50mm, you want to use 50 plus how much the height of your work piece is. For example if you're etching on a piece of wood, and the thickness of it is about 10mm, you'd want to set this value to 60. Note that the focus of the laser is still burning pretty accurately within +/- 15mm of the focus height (depending on your module).
- Curve resolution: all your curved lines are made up of tiny straight lines, and this slider adjusts how fine the resolution of these lines are. A lower number will make curved lines appear zig-zagged, made up of visibly straight lines. A high number will add more points, creates smoother results, but will take longer to calculate.
- The Fills button enables an experimental fill pattern generation - similar to the Concentric infill algorithm. Adjust the density of the generated lines with the slider.
In order to avoid recalculation every time you make an adjustment, a warning will be displayed to manually reload/recalculate the modified settings. Large files can take a while to generate, and it's not fun to have to wait for that every time you adjust a tiny thing. Make sure you regenerate before saving, otherwise your adjustments will not go into the Gcode.
You can use the sliders at the bottom of the viewer to preview the progression of the etching.
You can scroll to zoom in and out and pan with a click and drag on the view area.
Etched lines appear black, movement lines appear orange.
Reload will regenerate the design. Clear All will reload the default settings and clear the view area.
When you're ready, press Save Gcode to save the Gcode output.
Copy this file onto your SD card and let's go back to the printer to get things etched!
Step 13: Lasers on Full Blast, We're Zapping Things Over Here!

Go to your powered-up and lasered-up MK3. Adjust your safety glasses, because you have them on of course, right??
Don't place your work piece on the print bed just yet! At the beginning of the "print" the extruder will home on all axis. This means the extruder assembly will come down to the zero position. Make sure there's nothing in the way! Otherwise you risk crashing the extruder assembly into the work piece.
Pop your SD card into your MK3, go to Print from SD and select your file. The printer will warn you that the file is incomplete (probably because we don't do any mesh bed leveling, etc.) - ignore this and press Yes.
The printer will first home all axis then climb up to the set Z height and wait there. This is your cue to place your work piece on the bed, line it up, and fasten it down. When you are ready to continue, simply press the knob and the printer will commence engraving.
This is it! You should now see Benchy getting burned onto whatever you set underneath the laser beam. Adjust settings if the burns are not the proper depth.
You're not a cat, so skip the part where you just stand there and stare at the laser beam.
Step 14: Raster Etching
This is a bit different from the vector type we just ran through. The idea is to convert a grayscale image into scanlines, and either vary the power of the laser as it scans through each line of pixels or apply an algorithm where the laser burns dots along the way (dithering). Varying the power is done by pulse width modulation (PWM) whereas for dithering, the laser will be at full blast or completely off.
There are multiple applications available. I'm still experimenting with them, trying to find the right one. So far I've had success with these apps:
- Viktorglekler's Image to Gcode Converter, works great. Use the start/end scripts from below. Runs on Macs through Wine!
- Laser GRBL (Windows): lasergrbl.com/en/, needs a bit of manual work done on the output file to replace the laser on/off commands. Otherwise, it's really neat with nice conversion algorithms. No Mac version, though.
- Nebarnix's online tool to convert images into Gcode: nebarnix.com/img2gco/. This one is great because it uses the same principle that our setup uses - to control the laser through the fan. Needs Z height adjustment either added to the Gcode or set up before the run.
- 305engineering's Raster 2 Laser Inkscape plugin: github.com/305engineering/Inkscape. Works well, offers multiple conversion algorithms. Needs Z height set in the start script in the Gcode output.
Check these out to get started. They also have plenty of documentation available and same principles as with vector etching should still apply (area, burn speed, movement speed, etc.).
If you have the ability to add a start/end Gcode here's what works great for the MK3:
Start Gcode:
M107 ; Turn off fan/laser
M104 S0 ; Turn off extruder
M140 S0 ; Turn off heat bed
G28 W ; Homing all axis without mesh bed leveling
G0 X0 Y0 Z50 ; Goes to 0 on XY and raises to 50mm on the Z
M1 ; Pause printer until item is placed on bed and knob is pushed
End Gcode:
M107 ; Turn off fan/laser
G0 Y210 ; Slide bed to front
Within the confines of our fan-to-laser setup, if you know of other software you had success with, please share your experience.
Step 15: Yay!


Hopefully this walkthrough lit up a laser light bulb and inspired/empowered you to create your own amazing designs to laser etch onto everything etchable :)
Good luck and happy (+ SAFE) lasering!!!


