

Introduction: Linkit One Stolen Car Tracking and Retrieval


I have a Linkit One board and have been trying to come up with new ideas on how to use it. I looked over other projects here on instructables and wanted to come up with a new idea to combine other ideas I have seen.
In this project we will make a Linkit One Stolen Car Tracking and Retrieval device. This device is small enough to fit in a box the size of the one the Linkit One is packaged in as you can see in the picture above. The device could be hidden inside the back seat or the trunk. If you need to locate your car, all you need to do is send it the 'W' (Where are you) and the device will text you back with its GPS coordinates that you can type in to Google Maps. The location of you car will show on the map. If you text it 'B' (Battery Level), it will text you the amount of battery left.
Step 1: Credits and Acknowledgements
I found these three fine articles and I give credit to them for information on SMS texting and working with GPS. I have copied, extracted and modified code from these three projects to come up with a new device. They have all been kind enough to publish their projects with the Creative Commons sharable license.
LinkIt ONE Pager
by jckelley in Microcontrollers
Linkit ONE GPS Tutorial
by DangerousTim in Microcontrollers
LinkIt One Texting Door Alarm
by jckelley in Microcontrollers
Step 2: Parts Needed
Here is what you will need to make the project.
LinkIt ONE board
This has the battery, GPS antenna and GSM (cell phone) antenna included
Pre-paid SIM Card
You will need a SIM card to be able to send cellular text. You can buy a separate one or use one out of any cell phone that you have access to if you just want to try it. The cell plan will need to include texting.
Grove - LCD RGB Backlight (optional)
I picked up a Grove LCD RGB Backlight device. This is a display that plugs right into the Linkit One board using the IC2 Grove connection. This display is easy to use and very handy for debugging. I don't use it on the final packaging of the device, but I have code to display all the pertinent data for development. If you just want the final device you don't need this.
You'll need to install this library in order to interact with the LCD on your Linkit ONE Board. This is a special library that allows us to easily send commands to the Grove LCD.
Step 3: Put It All Together


The picture above shows everything plugged together. Plug in the GPS and GSM antennas, plug the Grove LCD into the I2C socket on the Linkit One board and plug in the battery. You will also need to insert the SIM card. An earlier picture shows mine inserted. I chose to package my unit in an IPhone box I had laying around to make it convenient to carry around for testing. As I mentioned before the LCD is used for testing and monitoring that everything is working. Once the testing phase is over, it is removed to save battery power and make the unit smaller so you can hide it away easier.
Step 4: Load the Software
MediaTek Linkit ONE is developed for wearables and Internet of Things (IoT) devices, which using hardware and API similar to those offered for Arduino boards. So you can code on it by Arduino IDE just like on Arduino (I have found the Arduino IDE 1.6.5 works the best at this time). There is a website with a detail introduction of Linkit ONE and its SDK. First you need to install the Arduino IDE on your computer, then follow the steps on the Mediatek website to install the Linkit One board libraries into the Aduino IDE.
There is more than one Instructable that covers setting up the Linkit One so I won't go into that here.
Here is my code for the tracking device.
Here is the code overview.
You need to put your phone number where it says TEXT_BACK_PHONE_NUM "1115551234"
Setup the display, GPS and texting
Go into a loop
Get the GPS information and parse it
Display the information in the LCD
Look for text messages
Respond with a text if a command is received
For more details on texting and GPS refer to the instructables I gave credit to earlier in this instructable.
Attachments

Step 5: LCD Output


You can see the output on the LCD above.
GPS Coordinates
Number of satellites we are tracking
The time received from the satellite
Battery condition of the monitor
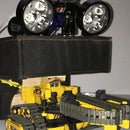
Step 6: Final Packaging Ideas


Here are some ideas for the final packaging of the tracking device
- Just the unit itself using the internal battery - (good for 2 or three days, could fit in a purse, backpack or lunchbox
- Powered by a cell phone battery bank - (good for a while, I haven't tested it)
- Powered by a cell phone car charger - ( good for indefinite use, you could solder wires to the phone charger and run them to the car battery)


