

Introduction: Lumberjack Bar Table


I wanted a bar table that could be wheeled wherever a place to congregate was needed. This is how I solved my problem.
Step 1: Collect the Pieces
For this table, I used
1 36" dia oak round 5" thick
1 12" dia ash trunk 35" long
3 lengths of 6" x 20" x 1.25" oak rough sawn planks to be cut into the base to the center
6 lengths of 6" x 14" x 1.25" oak rough sawn planks to be sistered for extra depth
3 castors
All was from trees that were standing dead or taken down out of necessity for safety.
The lengths and sizes of your lumber will vary depending on what is available, this instructable is just to show what I made and how I made it.
This table ended up being 42" tall. Comfortable for both barstools and standing.
Step 2: Square Up the Pedestal As Best As You Can
I eyeballed the cuts on either end of the ash pedestal. They don't have to be perfect, but need to be close as you can get. This makes a difference when you have to invert the pedestal to work on cutting in the legs.
Step 3: Tabletop


In order to create your tabletop, you must find a suitable log with the dia that you wish, then cut like a loaf of bread away everything that doesn't look like your tabletop.
Unless you have a chainsaw bar long enough to get through your piece, you'll have to get creative.
I scored the log with a sawzall as a guide for the cut. The farther you are from a planar cut, the more work flattening for you later.
I tried a few different methods to bring down the high spots, but what worked best for me was a hand held electric planer.
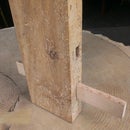
Step 4: Legs


Prior to cutting in the legs, I cut an inch off of the pedestal bottom in order to use it as a cap later. I used the height of the castors as a reference so that the bottom of the pedestal to float above the ground when fully assembled.
Using the newly exposed bottom (that will be re covered with the cap later), I marked the center and drew the guidelines for my legs. 3 legs by 120degs= 360.
Using the rough planks (or whatever legs you choose), you can draw guide lines on the bottom and on the cylinder, and use them to guide your chainsaw cuts into the log. I's important to do this carefully first, and level and plum a close second. .
I did some cleanup work with a chisel, and ended up with a pressfit slot that received the plank with some motivation with some taps from a hammer. Of course these were screwed in as well once they were in position.
Step 5: Dressing Up the Base


The cut in legs look a little puny, so I sistered them on each side to give them some heft. With a chisel, the ends can be cut into the log to make it look like it's more integrated into the pedestal.
The castors can be screwed or bolted into place on the bottom of the legs. The pedestal should float.
finally I squared up the top of the pedestal and used a dowel screw (a double ended screw), in the center of the pedestal to receive the table top.
Step 6: Top It Off

With the top planar, I inverted it and checked the general parallelism of the top and bottom surface. If needed, get your electric planer spinning and do your best to even it out.
Drill your pilot hole in the center to receive the dowel screw.
Heft it up with help with a friend, and start screwing it on for a test fitting. If it fits the way you'd like you can employ an anti rotate screw underneath through the pedestal into the top.
Step 7: Finishing Touches


Finish as you see fit.
My top remains rustic as of now but my plans are to fully sand, butterfly the top along the deep checks and coat with epoxy, and I will update the post then.
There will be many better 'ibles about using epoxy and butterflies for certain.
Thanks for viewing!
Be safe and have fun

Participated in the
Wood Contest

Participated in the
Let's Party! Challenge


