

Introduction: Magic Card (with Template)


What to do on a windy Sunday when it's raining outside? A Magic Card! The concept is pretty straight-forward: first, you see only a simple object or sentence, then you pull the card and magic things appear! It's a nice project you can make as a gift for somebody :)
You have two options:
1. Making it all by yourself following the instructions (step 2)
2. Printing the template I have prepared for you (step 1)
PS. On the last step there's a video where you can see how this works.
MATERIALS:
- Paper
- Glue Stick
- Plastic for binding (or something similar)
TOOLS:
- Scissors
- Cutter
- Cutting table
- Permanent sharpie
- Pencil colors, sharpies... whatever you need to paint and to decorate the card.
Step 1: TEMPLATE

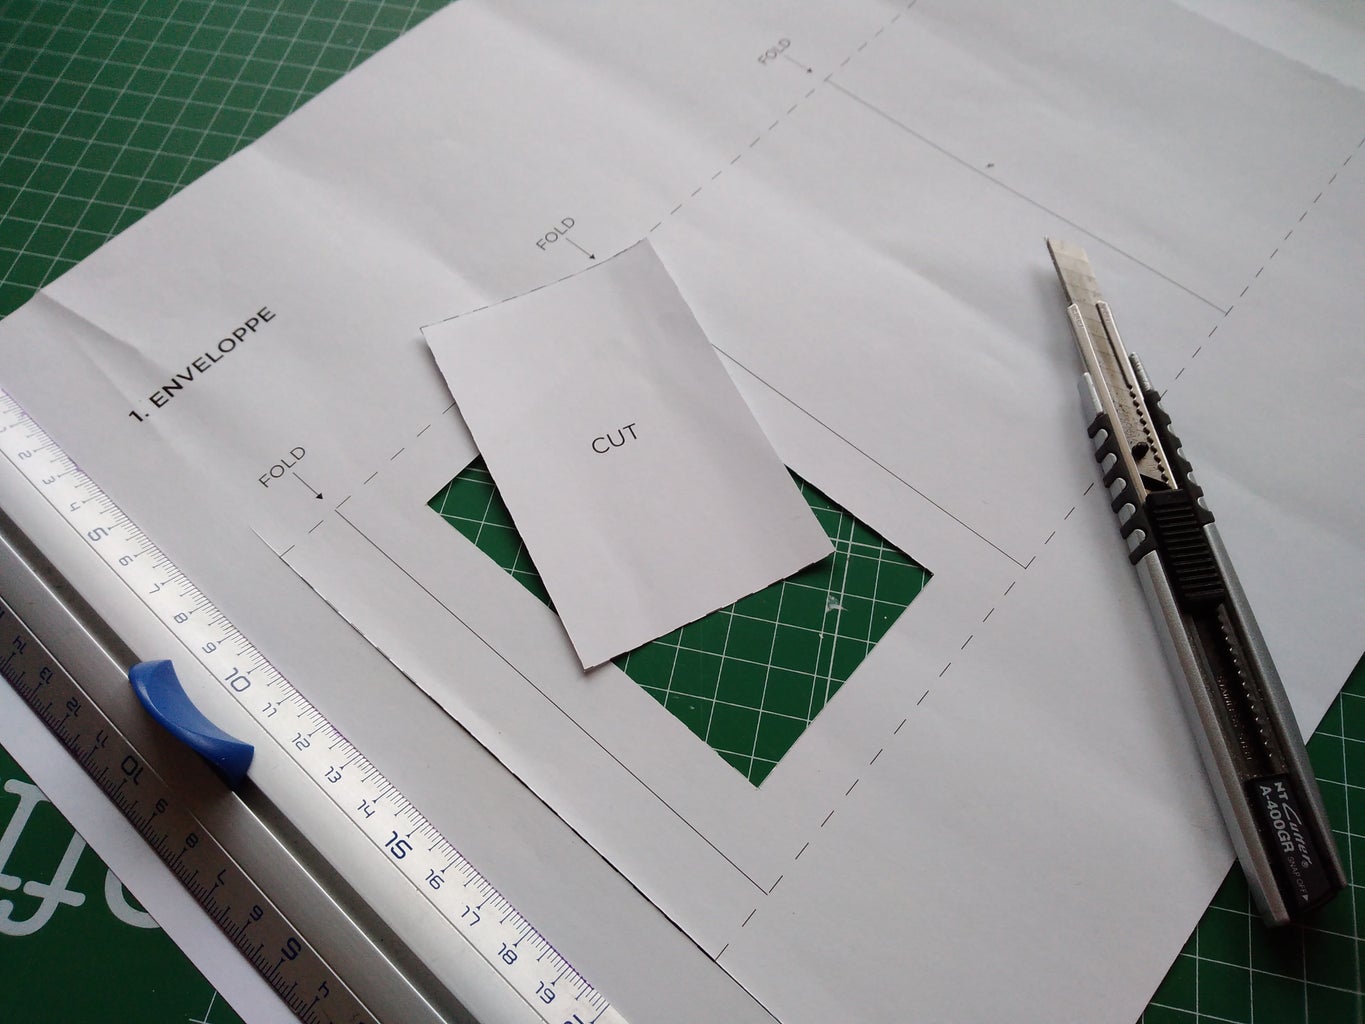


I created a template for your Magic Card. You just need to print it, cut it, fold it and assemble the pieces — no need to measure anything.
INSTRUCTIONS:
1. Download the template
2. Print it. You need to print it on an A3 sheet
3. Cut it
4. Fold it
5. Once you are done, go to STEP 7.
P.S. Take a look at the pictures for more details on this step.
Attachments

Step 2:

First, you need to make the "magic" envelope that will contain the drawing.
To do this take a paper sheet. First, measure a 1 cm margin (which will be used to close the card). Then divide the rest of the paper into three equal parts, as you can see in the picture.
Step 3:


Fold the paper as shown in the picture.
You will obtain a back sheet, a middle sheet and a front sheet. These will form the outer envelope.
Step 4:

You have used a whole paper sheet to do the folding. Now you must decide your card's length. Then cut the leftover paper
To provide some context, my card measured: 13 x 9.8 cm.
Step 5:


Now you need to cut the front page to create a frame. Open the card, select the front sheet (the one next to the margin) and draw a 1,5 cm margin. Then cut it off with the cutter.
Now you have a front page with a hole, a middle sheet and a back sheet.
Step 6:


Once your envelope is ready, you will need to create the card that fits inside the envelope. You need to create two different pieces: a paper sheet and a plastic sheet. This step is difficult to explain, so take a look at the pictures and the drawing below.
PAPER SHEET:
First, measure the middle sheet of the envelope. Then, subtract 2 or 3 millimetres to each edge to make sure that the card fits inside the container and that you can pull it out easily.
Then, add 3 cm at the one side to create a flap that will be used to pull in and out the card from the envelope. The flap should measure 1.5 cm, so leave a 3 cm margin and fold it in half.
Step 7:


Now cut a sheet of plastic to complete the inside card.
Repeat the last step, but instead of adding three extra cm for the flap, just add 1.5 cm. Glue this extra bit onto the folded part of the flap. Again, take a look at the picture for the sake of clarity.
THE TEMPLATES ONES:
Welcome to step 7! Take the rectangle you cut and trace it on a plastic sheet. And follow the instructions.
Step 8:


When the two main pieces are ready, glue them together.
Put some glue on the flap and insert the plastic sheet in the middle. Close the flap and you are done!
Step 9:


You have completed the most difficult part! The two parts of the card are ready: the outer envelope and the inside card.
Here starts the creative part: start painting and decorating the frame of the envelope.
Step 10:


Take the inside card and slide it in the envelope, leaving the plastic sheet outside. Then, trace the outer edge of the frame on the paper sheet. This will allow you to see where you can actually draw (anything outside this trace will not be visible when the card is inside its frame).
Pull the card outside and start drawing whatever you want on the paper sheet (inside the "frame" you have just created, of course).
Step 11:


When you finish drawing, close the card and take the permanent sharpie. Now trace on the plastic sheetall the elements you want to show at first. In other words: trace only the features that will appear first. In my case, I only traced a sentence.
Then, let it dry.
Tip: if you make a mistake on the plastic take some cotton, pour some alcohol on it and clean the sheet with it. Let it dry and start again.
Step 12:


Insert the card in the envelope but remember: inside the envelope, there is a sheet that separates the back from the front.
You should start by sliding the drawing you made on paper behind the middle sheet, then the plastic sheet on top of it. The middle sheet must stay between the plastic at the front and the paper at the back.
Step 13:


Now when the card is fully inserted, you can only see the drawing on the plastic sheet. When you pull the card outside the envelope you see the whole drawing. Magic!
Step 14:

The great thing about this little project is that you can create one single frame and many drawings to use with it. I made three (this is why the drawings are not always the same on the pictures: it's not easy to draw and to take photos at the same time).
Step 15:
And here is a video to show the result!
I hope you have enjoyed it. I would love to see your version! You can also vote for my project on the Paper Contest :) Thank you, and have a great time!

Participated in the
Pocket Sized Contest


