

Introduction: Make a Cardboard Glock With Working Parts


The Glock pistol is one of the most iconic, and praised weapons in history. Famous for its internal-striker system and polymer frame, the Glock pistol is not only an amazing weapon, but an impressive piece of engineering. This weapon is also one of the most popular weapons to use "on screen," adopted eagerly by several major movies and famously brandished by iconic actors such as Arnold Schwarzenegger and R. Lee Ermey. So there's a little description on the glock, so now, let's get down to business and build one ourselves.
Step 1: Build the Frame

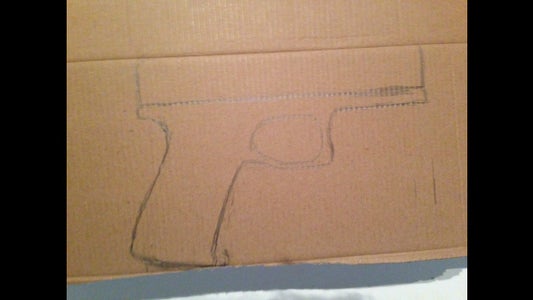


In this instructable, I will be making a Glock 23 prop. The glock 23 is a subcompact pistol chambered in the .40 smith and Wesson round. It is very popular with American police forces due to the combination of accuracy, controllability, and raw stopping power the .40 provides. Using a picture I got online, I drew and cut out the frame from some shoebox cardboard. Cut out two sides, then cut a long strip that's the width of the frame you want, and hot glue the strip to the sides of the frame. Make sure to leave a open spot the shape of a rectangle. This will be the magazine well.
Step 2: Build the Slide


To build the slide, just cut out a rectangle then bend it to create a box with an open bottom. Cut a hole in the front for the barrel, and another on the side of the slide for the ejection port.
Step 3: Now for the Working Parts Uh.. Part.

First, fold a cardboard piece to glue the barrel you're about to make to. This box should raise the barrel to just under the height of the barrel hole at the front. Then, cut out and roll a barrel from some paper. Cut a cardboard piece to go over the barrel where the ejector slot will be. This will be the fake ejector plate. Also, cut and glue a trigger guard from cardboard to the frame. Then, wrap the frame in masking tape except for a rectangular area on the grips. This will become the fake grip plating.
Step 4: Continuing the Working Parts...


Cut two slots into the left side of the fake ejector slot to hold a rubber band as seen in the picture. Cut out a clip of cardboard and glue it to hold the other end of the rubber band to the top of the slide. Next, cut out and glue a piece of cardboard between the sides near the rear of the slide. Then, cut, fold and glue a piece of cardboard so it holds the piece between the slide down. Finally, cut a cardboard piece out and glue it to the end of the slide to cap off the back. Also make some lines in the end of the slide to emulate the gripping, but make sure not to cut through!
Step 5: Add Some Sights


Cut a slit at the rear of the slide, then cut out a rear sight to fit in the slot. Bulk it up with duct tape to make it snap. Make a front sight and glue it to the front.
Step 6: Finishing Touches to the Frame


I cut off a short length of locating rail from an old airsoft and glued it to the front of the frame so I can mount a tactical light or laser if I want. Then, I cut out and glued cardboard pieces to emulate the slide catch, magazine release, and front recoil spring rod.
Step 7: Make a Magazine


Make a magazine by cutting a piece of cardboard and folding it so it becomes an angled rectangle. Then add a floor plate to it. In the pictures, you can see the test fitting.
Step 8: Make the Famous Glock Double Trigger


The glock pistol is famous for having a patented double trigger which acts as a safety mechanism. The shooter must first pull the outer trigger, then the main trigger to fire the gun. This prevents accidental discharges. To make the trigger, just cut a piece of cardboard, and wrap it in tape, then bend it to the correct shape. Next, cut out a smaller piece and glue it to the first and you have the famous glock safety trigger. Glue it inside the trigger guard.
Step 9: Paint and Enjoy!


Since this was really just a small build, I didn't spend much time on painting; just a simple coat of flat black economy spraypaint. The result looks nice though, so I have no complaints. Because of the rubber band, the slide rams back when you charge it just like a real pistol, and because I mounted the barrel slightly lower than the slide hole, it actually tilts like the real glock barrel does. I hope you enjoyed this tutorial. Comments are always welcome, and greatly appreciated. Have a good one!

Participated in the
Papercraft Contest


