

Introduction: Make Fake Leather From Tinfoil and Foam!


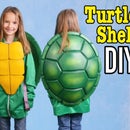


When I first started out making steampunk costumes from foam, one of the problems I wanted to solve was how to transform the brightly coloured foam into an object that actually looked like it was made from leather. Painting could give it the colour, but how to get the texture???
In this quick instructable, I am going to show you an easy way to turn your flat, boring piece of foam into a textured leather look-alike masterpiece!
Supplies
- Sheet of aluminum foil
- A sheet of EVA foam (craft foam) that you want to texture
- Old Iron that you don't mind getting wrecked
- Insulating glove- so you don't burn your hands
- Acrylic paints- I used Liquitex basics "Burnt Umber", "Raw Sienna" and black
- Heat resistant surface to iron on
Step 1: Crossing Over From Jewellery to Foamery

I started off my working life as a jeweller. One common jewellery making technique is called "lost wax casting". The basic vibe is that you make an exact model of what you want out of wax, and then through some fancy jewellery wizardry, replace the wax with precious metal. Our instructor taught us a technique to get a unique texture, and that was to pour molten wax on crumpled up tinfoil. Once cooled and removed from the tinfoil, the wax would have a wrinkly texture that would be very hard to create any other way.
Anyways, this all came back to me when I was seeking a good way to make foam look like leather, and that is how this technique was born!
The picture above is a ring I made in jewellery school that used the tinfoil and wax technique. I guess there was a reason I kept it all these years!
Step 2: Turn on Your Iron

It is important to use an iron that you don't mind destroying for this. Any fancy non stick surfaces will likely be shredded by the foil, so I just use an old iron I bought at the thrift store for a couple of bucks.
Foam can give off fumes if it is heated too hot so you'll want to do a bit of trial and error on a some scrap foam. Start with the iron at the lowest possible temperature and slowly increase it until you get satisfactory results. As you can see from the picture, my iron is set quite low, and that worked well for me.
*** As far as I know, this only works with EVA foam, so make sure that's the type of foam you have before starting**
Step 3: Crumple Your Foil. Uncrumple Your Foil


Take a sheet of foil and start to crumple it up. The amount of crumpelosity will determine the coarseness/fineness of the final texture that gets transferred to the foam.
After it's crumpled up, open it up again and press it flat with your hand on a hard surface.
Step 4: Iron the Foil


Put a heat resistant glove on to protect your hand from possible burns.
Do this in a well ventilated space to avoid any fumes.
Place the foil on your foam sheet and use your iron to press down and heat the foil. It usually takes 5-15 seconds for the heat to radiate through the foil into the EVA foam. When EVA foam is heated it becomes very malleable, and as it cools, it will hold the form that has been "heat pressed" into it.
At the beginning, start with a short time, then peel up one of the edges of the foil to see if the texture is being transferred properly. Once you have a good idea of the pressing time needed, press the foam, then remove the iron and hold your gloved hand down on the tinfoil for a couple of seconds while it cools a bit- this helps "lock" the texture into the foam.
The foil doesn't need to cover the whole sheet of foam, in fact it works better if you do it in small sections, just a bit larger than your iron. You can use the same section of tinfoil over and over again, moving it around on the foam until you cover the whole sheet. If you don't like how some areas turn out, go over it again until you have the texture you desire.
** Make sure the iron only contacts the foil and not the actual foam**
Step 5: Paint It Brown


Of course everyone is going to be doing something different with their foam leather, but likely you will want something different than its original colour. Here's my basic painting technique, but you can switch the colours you use depending on what you like.
First I give the foam two coats of a dark brown paint. In the example I use Liquitex Basics "Burnt Umber". Try not to leave too much paint sitting in the depressions in the foam, it'll take longer to dry and will also reduce the depth of the texture. I thinned my paint just a little so that it would flow nicely and I could easily get it into all the cracks.
Let both layers of the base coat dry completely. This is important or you might wipe away the base coat in the next step.
Step 6: Paint It Black


Thin some black paint by adding water, until it is quite runny.
Paint a section about 10cm square, and immediately wipe the black paint off the surface with a cloth or paper towel in a circular motion. This removes the paint from the higher surfaces while hopefully leaving some in the valleys.
Keep repeating this until you have covered the whole piece.
Wait for the black layer to dry.
Step 7: Paint It Brown (again)


If you want to add some more interest to your leather, you can add another highlight colour to the top surfaces.
Put on a rubber glove.
Find an old cloth and cut a small square from it.
Find a lighter brown paint than the first layer (I mixed Burnt Umber with Raw Sienna to get the colour I used)
Squeeze a small amount of that lighter brown paint on a piece of scrap cardboard.
Wrap the cloth tightly around your index finger and then dip just a tiny bit of it into the paint.
Rub your finger on some clean cardboard to remove most of the paint from your finger.
Rub your finger lightly over the foam, in a circular motion, depositing just the smallest amount of paint on all the raised surfaces. If you have too much paint on your finger, the paint will find it's way into the cracks, which is exactly where you don't want it to end up!
Continue dipping and rubbing until you have covered the whole piece.
Step 8: Done.

That's it, now you just need to make something from your faux-foam leather!
Thanks for hanging out with me!
If you'd like to see more of my projects you can find me here:
Subscribe to my Costume Making YouTube Channel
Subscribe to my "Everything Else" YouTube Channel
Follow me on Instagram
Check out my pattern shop
Second Prize in the
Tinfoil Speed Challenge


