

Introduction: Arduino + Android Burglar Alarm - Home Automation


Contents:
Introduction:
Materials, Tools and References
Circuit and Sketch
Android App development:
Conclusion:
Step 1: Introduction
I have been recently listening and reading a lot about Internet of Things (IoT) and among them home automation and controlling the home appliances using smart phones intrigued me to work on some DIY. So thought of to start with a very basic android app that controls speaker sound using Arduino UNO. As I went on learning the tools available in MIT App inventor, started adding up tools like Twitter client (Tweet124), SMS to the same app. I thought it would be good to share my learning in my project. Provided few references in the next step which helped me while working on this project.
Just for Fun: Where to use this setup?
I had plans to set up this package in the hall and operate the module by making irritating buzz to disturb my roommates sleep early in the mornings by turning it on and off frequently. Since my peizo buzzer sounds similar to the door bell, probably they might open the door frequently.
Attachments

Step 2: Materials, Tools and References


Materials:
Arduino UNO
Any Bluetooth Module (HC-05 -$12 / INR750)
Female to male Jumper wires
8ohm Speaker
Tools:
MIT Android App inventor (http://appinventor.mit.edu/explore/)
References:
1. https://www.instructables.com/id/Voice-Activated-Led-ARDUINO-and-ANDROID/
2. https://www.youtube.com/watch?v=jefSsxyBIO4
3. Few Basic videos available in MIT App Inventor official Website.
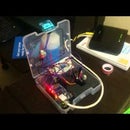
Step 3: Circuit and Sketch

Warning: "avrdude: stk500_getsync(): not in sync: resp=0x00"
Solution: While uploading Sketch from Arduino IDE, disconnect the RX(D-0) pin from Arduino. As Arduino IDE uploads the sketch through USB interface to RX pin, uploading may not successful if the Rx pin is connected to Bluetooth. Once the sketch is upload, reconnect the Rx pin to Tx pin of Bluetooth.
Note: There are numerous ways to write a sketch and this is my own where I tried to make it simpler.
Attachments

Step 4: Android App Development
For beginners (like me), Lots of tutorials available online in Youtube to build an app using MIT App Inventor.
Please follow the guidelines and schematic shown in the attached presentation (First App.pptx)
Find the attached "FirstApp.apk".
Attachments
Step 5: Conclusion
What next:
Currently with this set up, it can be used only in the interior. I tried powering this Arduino and Bluetooth circuit with a 9V 6F22 battery which is converted to 5V using Voltage regulator and couple of 1micro and 100micro farad capacitor, but unfortunately Bluetooth module is draining the battery. Using a better battery resource like Lithium ion batteries might be useful to take this setup outdoor. Any suggestions to take this setup outdoor is most welcome.
Applications:
This setup can be fixed to a bike and using a dynamo, the battery can be charged seamlessly. Hence this can be used to locate a bike at night. Replace LED's instead of Speakers making it more visible.
Android App
"SendSMS" tab can be improved by calling contacts (using "PhonenumberPicker" component) instead of typing the phone numbers in the textbox as in my app. This facility isnt supported by my mobile. So if your mobile supports this feature, you can improvise the app.
P.S: This is my first and very simple app that I had developed, please drop in your comments about the app and at the same time on the battery issue which I spoke about in the beginning of this section.


