

Introduction: Make Your Own "audiophile" Quality Speaker Cables!


Welcome to my Instructable on how to make your own high end audio interconnects! This guide will take you from start to finish through the process of building your own DIY, braided, multi-strand speaker interconnects like the ones shown above. These can be made in any length and in many different colors and styles, limited only by your imagination.
High end audio cables are big money. Some companies like Nordost and Audioquest sell speaker wire for $500 a pair! And that's only for 1m Cables! If you're like most people you may be asking what is so special about these wires that lets them charge $500?! The answer is simple: nothing! That's right, electrically these $500 speaker cables are no different from a $30 roll of speaker wire from Walmart. They can charge sky-high prices because they claim the geometry and the design of the wires will improve the quality of the sound of your system.
But what if you just want them because they look cool? With the amazing profit margin on these "high-end" speaker wires, companies can afford to put some pretty fancy gold-plated connectors, nylon mesh, colored heat shrink, and fancy designs on these cables. There's no denying they look great and can really bring an attention to detail to your system that you wouldn't otherwise have.
So what is the average educated consumer to do? You want the high end wires because of their amazing looks and designs, but you don't want to be the fool who spends $500 on speaker wires when regular wire will work just fine. The answer is to build your own! It's quite easy and in this how-to I will be walking you through the steps required to build your own 4 conductor braided speaker cables. I will be pointing out some tips I learned along the way so you don't have to make the same mistakes that I did. Enjoy!
Step 1: Make a Plan

The first thing to do before you go to the store or place any orders online is make a plan. You must consider what you want the final product to look like and what things you absolutely need to have. Some important things to keep in mind during this phase are:
- Overall length needed
- Style of cable (braided, twisted, heat shrunk, sleeved etc.)
- Number of strands per cable
- Gauge needed and gauge desired
- Colors
- Type of termination
Length
The overall length of the cable depends on how far your speakers are from your amplifier, for a desktop setup 1m cables should be fine for most situations, for a home theater or a listening room your will need to take specific measurements.
Style
The overall length of the cable is also dependent on the style of cable you wish to have. A braided wire requires longer wires than a twisted cable to end up with the same overall length. If you aren't able to buy large rolls of wire you may want to reconsider trying to make that 6m speaker cable with a tight 4 wire braid. If you're strapped for materials, a simple twisted pair of wires with a Techflex covering will work just a well as a 4 wire braid, and it will use much less raw materials to create.
Wires per cable
The number of wires per cable will directly affect how the final product looks, there are countless ways to weave and braid wires together. Using multiple lengths of thinner wire can allow a cable to be more flexible and still be used in high wattage setups. I personally prefer a 4 wire braid as I believe it looks the best, this is the method I will be demonstrating in this how-to, but as always you're free to use any method of braiding that you can think of! If you're not good at braiding a simple three wire braid of thick wire can be used, this method is easy for anyone to do. Simply only use two of the three conductors.
Gauge
The gauge of the wire is a measure of how thick the wire is. this is the diameter of a solid wire or how many individual copper strands are in a stranded wire. The gauge, length, and material used to make a wire tells us how much current we can put through a wire before it will get too hot and melt the insulation. For a speaker setup generally anything 24AWG or lower is fine. Note that gauge is an inverse scale, meaning that as the value increases the wire diameter gets smaller. For this project I will be using 4, 16AWG wires for each cable, two for the positive side and two for the negative side. This is major overkill, and frankly totally unnecessary, but the thick wires look much nicer than thin wires and they fit perfectly into the paracord. As long as your wires are at maximum 24AWG you should be fine. That means that the wires on the negative and positive side of the cable are at maximum 24AWG. You can use several thin wires and have the same effect, so long as the equivalent gauge is no larger than 24AWG. It should be noted that a general rule is that when two equal gauge wires are used in parallel the equivalent gauge is the gauge of one wire minus three. So the gauge of the cables I will be making is 13AWG equivalent.
EDIT 3/24/15: Many people in the comments have been saying that I'm wrong for recommending 24AWG wire, 24AWG wire is an absolute maximum recommendation. Do not exceed this number when picking a wire gauge. The resistivity of 24 AWG copper wire is 85 ohms per kilometer of wire. Therefore I maintain my statement that 24awg wire is acceptable to use for low power stereos.
Colors
The colors of the cable will depend on the color wire used and if you decide to sheath the cable in heat shrink, paracord, or Techflex. In this how to I will be using a combination of paracord and heat shrink tubing to make my cable. You may choose any method of coloration, some have even used Teflon tape as a way of turning their entire cable a pristine white color. Originally I was going to use Techflex but ended up deciding against it, the image above shows what Techflex looks like over a twisted pair or paracord sheathed wires. However the cheapest and easiest method is always leaving the wires bare.
Termination
The termination is completely up to you, if you're unsure you can always leave the ends of the wires bare and simply attach them to your system as you would regular speaker wire. I will be using banana plugs in this how to as all of my equipment has 5-way binding posts. If you're unsure of what kind of termination to use, check the wires that are already on your system now and use the same style of termination that is already on them. I personally recommend banana plugs as they are the easiest to work with if you ever have to move your system.
Step 2: Tools


To make the cables I will be demonstrating there are a few basic tools you will need:
- A pair of wire strippers that can accommodate the gauge of wire you are using (16 AWG in this case)
- A good pair of scissors and or wire cutters
- A lighter or heat gun
- A roll of duct tape, or similar strength tape (not pictured)
- A knife or a razor blade
- Tools to connect the terminations you are using (depends on the style of termination) In my case I used a small screwdriver.
- A permanent marker (also not pictured)
And that's it! This project doesn't require any fancy tools, in fact I have done almost all of the construction in my dorm room while at school.
Step 3: Materials


The materials you will need will depend mostly on what you want the final product to look like, I will be using the following materials.
- 72' of paracord in various colors ($8 Walmart)
- 25' of 16 AWG 3 conductor extension cable ($9 Walmart)
- 8 banana plugs ($16 Amazon)
- a large assortment of heat shrink tubing in the color of your choice ($5 Amazon)
Total cost of materials is $38
Some things to note:
Get the cheapest three conductor extension cord with 16 AWG conductors you can find. The cheaper cables are easier to disassemble cleanly. More expensive cables have the outermost layer of insulation tightly formed around the inner conductors, this will be much more difficult to remove. The cheap cables have the wires loosely inside the outer covering.
Go for an assortment of heat shrink tubing when buying as it can be hard to know exactly what size of heat shrink you will need. Also, if you can find it, some brands of heat shrink have a glue on the inside that when heated will stick to the wire as the tube shrinks. This will make a much stronger and more durable connection. Also opt for 3:1 heat shrink instead of 2:1. This ratio is the ratio of un-shunk size to shrunk size, the 3:1 tubing will be tighter when shrunk.
Step 4: Disassemble the Extension Cable


(1) First, grab your extension cable and cut off the plugs on the ends. These can be saved for a future project if you like. Inside the extension cable you will see three 16 AWG wires, these wires will become our speaker cables.
(2) Then use a sharp knife or a razor to slice a few inches lengthwise down the insulation at one end of the cable. Then pull the three conductors out, the outer insulation should just tear cleanly as you pull.
(3) Once the inner wires are free from the outer casing, you'll notice that the inner wires are loosely twisted together. Fold this in half and cut it, this should leave you with 6x 12.5' conductors.
(4) Now untwist the wires from each other and separate them by color.
(5) Now bearing in mind that each finished cable will use 4 wires, determine how many wires you will need to make the amount of cables you wish to end up with in the end. You'll notice that as it stands there aren't enough conductors to complete two cables, that's perfectly alright. Since I will be making two cables, I will need 8 conductors total, so I folded the black and white wires in half and cut them. You should now be left with 8x 6.25' wires, 4 white and 4 black, along with 2x 12.5' green wires.
I will be saving the green wires for another project in the future so I did not cut them in half, but if you did you could make three speaker cables from just one extension cable.
Step 5: Prep the Paracord


Now we must turn our attention to the paracord, the specific type of paracord I will be using in this Instructable is called paracord 550. This means that it's rated to 550Lbs, which is quite impressive in itself.
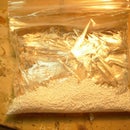
(1) Look at the ends of the paracord, you'll see that the end have been fused already to prevent fraying, using a pair of scissors, cut off the fusing from both ends of the paracord. It's very important to cut both ends or else this next step will not work.
(2) You will notice a few strands of nylon thread in the core of the paracord, this is what gives the paracord it's strength, but it is also in the way of where we want to put our wire. Simply pull this nylon core out of the paracord, it's not held in place by anything and should easily slide right out. You can save this if you'd like, as it is very strong and will make an excellent rope. Or you could recycle it.
(3) Repeat steps 1 and 2 for all of the colors of paracord that you will be using.
(4) When complete you should be left with a huge ball of nylon core and an equally large ball of colored paracord outer shells. This is what we want to save for the next step.
Step 6: Sleeve the Wires


Now it is time to cover out wires with the paracord we prepped earlier. However it's not as simple as just sliding the paracord over the wire.
The issue with attempting to just slide the paracord onto the wire is that the inner copper strands of the wire will inevitably catch on the woven nylon of the paracord. This is because as you are inching the paracord down the length of the wire it will also inch the wire's outer insulation down the inner conductor a bit too. This will cause the inner copper wire strands to poke out and catch on the paracord, making sliding it over the wire impossible.
The fix involves a lighter or some other source of heat. Warm up the end of the wire until it begins to melt, then roll the melted end of the wire between your fingers or on the table to form a rounded end. This will prevent the wire from catching on the paracord and make sliding the paracord over it much easier.
Slide the paracord over all the pieces of wire you will be using. Try to use lighter colored paracord on lighter colored wires and darker colored paracord on darker colored wires, this will make the colors appear more vibrant. In my case I put the silver paracord on the white wire I have, and the orange and black paracord on the black wire I have.
Make sure to leave a half inch of wire showing on one end, wrap a small piece of tape around this end. The tape will hold the paracord on the wire while we are braiding the strands later.
Step 7: Braid the Wires


There are tons of different ways you could weave your cables together, unfortunately I am not good with complex braiding techniques, so I opted for a very simple 4 strand braid.
Tape the 4 sleeved wires to the table as shown in the first image and begin to braid. If you are unsure how to braid the wires, you can check out this video by YouTuber OfDreamsAndSeams. Of course this isn't the only way to braid 4 wires, you're always free to use whatever method you'd like!
Some things to note:
- Do not pull the braid too tight, this will drastically shorten the final length of the wire. However if you have the resources available a tight braid looks much cleaner and nicer than a loose one in my opinion.
- Be prepared to have to restart a braid if it doesn't look right. I practiced on some spare wires and I still had to restart one of my braids because I skipped a step by accident. If you're going to invest this much effort into something a simple as a speaker wire, you might as well make it perfect :)
- Put several pieces of duct tape down to hold the wires to the table you're working on. It's quite annoying to have to re-tape the wires because they detached from the table mid-braid.
Once the wires have been completely braided all of the way down, un-braid the first and last 5" of cable and twist the like-colored wires together. The cable is now braided and close to complete!
Step 8: Adding Terminations


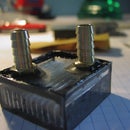
Now gather your terminations, your almost completed speaker wires, and any tools required to connect your terminations. I will be adding banana plugs, and the type of banana plugs I will be using only require a small flat-head screwdriver to attach.
(1) First twist the ends of your wires so the matching colors are twisted together like picture 2. Make sure they are as tight as you would like them to be in the finished product.
(2) Then measure 5' from the where the wires split and mark the paracord with a marker. This is how long the leads will be on the end of the cable. Use your wire cutters or scissors to cut the wires here.
(3) Now eyeball about how much wire will be consumed by the banana plug, mark the paracord at this spot. then put some heat shrink tubing so it covers this spot and shrink it down. Don't heat it up too much you want this to be a loose shrink.
(4) Now, using your knife cut through the paracord, and heat shrink tubing like in the 8th image. be careful to not cut through the insulation of the wire, go slowly and carefully when making these cuts. If done correctly, the paracord should be neatly tucked under the heat shrink tubing. Remove the excess paracord form the end of the wire.
(5) Now slide a medium sized piece of heat shrink over both of the wires, do not shrink this yet. Then slide the already shrunk heat shrink tubing down the length of the wire an inch or so to make room to attach the terminals. Strip the ends of the wires and twist them together.
(6) Slide on the outer casing of your terminals as far down as it will go. Then attach the rest of your terminal to the bare twisted wires. Mine simply required that I tighten down a small grub screw to hold the wires in place. Then screw your terminals together, making sure all the connections are tight and secure. It will be difficult to fix any issues once the cables are completed so double check everything now.
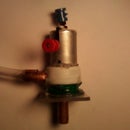
(7) Slide the small heat shrink tubing and the paracord up until it meets the base of the terminal. Then slide the medium sized piece of heat shrink up and shrink it. It should look like picture 16 when completed.
(8) Now slide a large piece of heat shrink tubing over the entire assembly like image 17. I used an entire piece of heat shrink and shrunk it around the body of the banana plug and the wires going into it. Doing it this way will add some strain relief to the cables. Make sure the tubing is completely shrunk all the way. After it is completed it should look like the 18th image.
(9) Repeat these steps for all 8 of the terminals. I recommend twisting the wires together again while the final piece of heat shrink is still hot, this will allow it to hold the twisted shape better.
Some tips:
-Make sure your blade is sharp it will reduce the risk of accidentally cutting through the insulation.
-go slow and be careful, if you mess up and cut a wire you will have to shorten the other terminal on that end of the cable too to keep it even.
-try to use a heat gun if you have access to one, the lighter can be a bit difficult to use without melting the paracord or burning the heat shrink.
-Use the smallest pieces of heat shrink that will comfortably slide over the wires for each step, this will make the termination stronger and less likely to break with time.
Step 9: Testing and Troubleshooting!
As always you should always test the integrity of your connections using a multimeter, before you attach them to your valuable stereo system.
(1) Set the meter to diode test mode and check the continuity of all of the wires. Make sure to check that there are no shorts between the negative and positive wires for each cable.
(2) Set the multimeter to resistance mode and check the resistance of each cable. The resistance values should be very low, if you see a value that is anything above 1 ohm that is cause for concern and means that there is a bad connection somewhere. Double check your terminals, if your terminals appear properly connected move onto step (2b).
(2b) If your terminals look ok remove them and check the resistance of the wires you are using. If the resistance of the wires is still high, that means you might have a bad conductor. Try to narrow down which wire it is by using your meter. Unfortunately there is no easy fix for this situation as it will require you to un-braid the entire cable and replace the bad wire. If the wires check out alright move onto step (2c).
(2c) If the wires test good this only leaves the terminals as possible culprits. Some times cheaply made terminals and connectors can have an oxide layer that would prevent a good connection. This is not usually an issue with solder-on terminals but with compression terminals (like banana plugs) this can cause real issues. Take your terminals and clean them with some isopropyl alcohol. This will help remove the oxidation layer, if that doesn't work a solvent like DeOxit should be your best bet at easily removing oxidation. If all else fails use some sandpaper to clean the surface and solder the wires in. This will make removing the banana plugs harder but it will ensure a perfect electrical connection.
(3) If your wires test good it's time to hook them up to your system and test them out! Attach the positive and negative terminals to their appropriate points and fire up some tunes! If your cables don't work well refer to the procedure listed in steps (2b) and (2c).
Step 10: Final Thoughts


Congratulations! If you've reached this point you now know how to make your own beautiful set of high quality, and durable speaker wires. The cables I described how to build in this tutorial are good for at least a thousand watts of power, and if properly built should last through many years of abuse.
The colors and style of your cables can be easily modified to match your existing decor, allowing the cables on your stereo to blend in with your room or stand out from the surroundings.
One possible use for these cables is a Bi-amp setup. A bi-amp setup is where two independent amplifiers are used to drive one speaker. One amp takes care of the low frequencies and one amp takes care of the high frequencies. By attaching 4 independent banana plugs to each end of each cable you can run only one cable to connect both amplifiers to each speaker, instead of running two lengths of speaker wire.
As always I cannot stress enough that these cables will not change the sound of your stereo, these are meant for decorative purposes only. These cables are great if you move your system around a lot or if your speaker wires are blatantly visible. This same method of construction can be scaled up or down to create wires for many different applications. Using thin flexible wires will allow you to make custom headphone cables for headphones with removable wires. Or using more wires per cable will allow you to make your own wires for PA systems or systems that deliver thousands of watts of power. This simple design is cheap and will allow you to make whatever custom cables you want for much less than it would cost to buy them.
I hope you have enjoyed my Instructable, this is my first post in many many years and I would love to hear your feedback! This has been entered in the DIY Audio & Music Contest so make sure to give me a vote :P Thanks!

Participated in the
DIY Audio and Music Contest


