

Introduction: Maker Faire Canopy Footing


A common sight at any outdoor event is the 10’x10’ canopy. Also referred to as a shelter or tent. They are great for keeping off the sun or rain, but they are prone to act like a sail in winds and fly away. It is common to use sand bags, concrete blocks, or even a bucket of water to hold the legs down. But these can be unsightly, and well, unimaginative when it comes to using the canopy at a Maker Faire. So when our maker group got a booth at the Seattle Mini-Maker Faire I volunteered to apply my maker attitude and design a footing that would solve any issues. Along the way I knew I would learn some new skills and have some fun.
Step 1: Understanding the Requirements
The Seattle Mini-Maker Faire was scheduled for late September, which in Seattle can be pretty random weather with winds always being an issue. Further, it was being held at the EMP (Experience Music Project) Museum which would mean we would be on concrete with no means to sink pins or posts into the ground. So a solution would have to keep it grounded by its weight alone. The Washington state rules for Farmers Market shelters is that they have a minimum of 27lbs per foot to hold the canopy down; so this became our minimum.
When we first setup our canopy to test it out for our needs, another issue arose. The height of the canopy sides would barely clear my head and at least one of our members would hit it every time they tried to go underneath it. So the solution would also need to increase the overall height of the canopy to make more head room. We wanted 6” minimum increase. This means that design I came up with, the legs of the canopy needed to sit on and be secured to the footing. A footing bolt would be required that would fit the foot of the canopy, which did have 3/8” hole in it.
While these footings had to be functional, I also wanted to create something esthetic. So I wasn’t about to just pour some simple block concrete footings or buy them from the local home improvement store. Since I always wanted to create a mold and caste concrete but never had a project that really fit the desire; this project seemed perfect to do just that.
Step 2: Design and Thinking
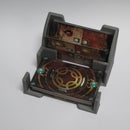
With the functional requirements set, I just needed a design. With a few design attempts starting with a simple roman columns, some back and forth with other maker group members, I came to the design of using the Open Hardware symbol and the general form of a gear for the footings.
With the approximate weight needed and the minimum depth, I used an online concreate calculator to find the diameter of the mold. With 35lbs, and 6” height, the calculator gave me an answer of around 8”. It’s only an estimate, as details of the form will take weight away from the final footing. So I went searching for the core of the mold that would provide the general cylindrical shape and would be sturdy enough to reuse a few times. I found a 2 gallon paint pale that while being cylindrical, it didn’t have completely vertical sides. I considered this a good thing to help the cured concrete be more easily removed from mold.
To be able to secure the canopy to the footings, I needed to be able to embed a bolt into the concrete. This bolt needed to be 3/8” so it would fit the canopy. It needed to be embedded into enough of the footing to provide lateral strength, so I went with 4 ½” length. It also needed to provide pull strength so it wouldn’t just be get ripped out of the concrete, so I used a large fender washer secured at the head end of the bolt so that when the concrete hardened around it, the only way it was going to be pulled out was to destroy the footing itself. I used stainless steel due to the outdoor nature of the solution, but a galvanized bolt could have worked. I was confident in this solution as it is a common way to create footings before specific bolts were being created. Unfortunately, these standard footing bolts are too large for my application as they are meant to keep a house attached to its foundation.
I then needed to add the details to the form, so I picked up a dense closed cell foam board of about 1” thick that I could cut and form, and then attach to base mold.
Step 3: Creating the Mold


The first thing I wanted to do was create the tooth pattern of the gear around the perimeter of the footing. I found that by ripping (cutting strips off of) the board with an alternating 30 degree angle would provide strips that could be used when attached to the side of the mold to provide the details of the gears. These are not perfect gear shapes, but I was working with concrete, the general shape was good enough. I then cut these to 6” long, and secured them to the side of the base mold (the 2 gallon paint bucket).
In general, all securing was done by using hot glue. I found that it was good enough to hold the foam to the mold, it provided a seal at the edge to keep any cement from getting between them, and it was removable so I could fix things if needed. I can’t stress enough how useful the “removable” feature was when dealing with the bolts.
I found online the vector file for the open source hardware icon, I pulled this into Inkscape and cleaned it up, sized it, and printed it out. I then attached the printout to the surface of the foam board using a tacky spray adhesive. I then used a scroll saw to cut out the shape. Finally, I “secured” the icon foam piece to the bottom of the mold, which will become the top of the footing.
To finish off the mold, I needed to drill a hole where the embedded bolt would stick through the bottom of the mold. This needed to be tight around the bolt to help hold it straight while the concrete is poured into the mold. I wanted the bolt to not be centered, as we were unsure how much clearance we would have between our canopy and the canopy of the maker booth beside us. But placing it offset from the center would allow us to rotate the footing either to inside of outside of the canopy foot. It also would allow of more the icon detail to be shown without a canopy foot obscuring it.
I calculated that a single bag of concrete would fill over two of my molds, so I created two duplicate molds so I could pour the complete bag in one sitting. This would require two sessions to get the final four footings, but this seemed like a good comprise on time, materials, and effort.
Step 4: Concrete

Picking the right concrete for the job is important. Understanding how your project fits to the applications defined by the manufactures is sometimes not obvious. They tend to list structural applications, but at least a few mentioned counter tops. But my project was both structural and I wanted fine details. Further, some list very short working times making it harder to maintain the fine details. I went with a product that provided high strength and was listed for use as countertops. It had 45 minute working time rather than 15 minutes or less. I used that handy online calculator to know how much to buy.
A few words on safety. The cement in concrete will burn your skin if left exposed to it, and getting the dust in your eyes and lungs doesn’t sound pleasant either. So use glasses and a dust mask, and put on some gloves. I always keep around nitrile gloves for such occasions. Doesn’t everyone keep nitrile gloves handy?
I wanted to add color so I also picked up a container of “charcoal” and another of “red” concrete dye. Note that one will be mixed in and the other will be used to give it surface “texture”.
Step 5: Preparing the Molds


First, the bolt needs to be inserted into the mold. This bolt will stay with the footing so it needs to be able to be pulled out from the mold. It only needs to stick out from the mold far enough for washers and nuts. I left 1” of the bolt sticking out.
I found that by having the hole being very snug to the bolt, and then using hot glue on the outside, allowed me to secure the bolt for pouring, but also allowed the hot glue to be pulled off and let the bolt slide back though the hole in the mold when done. With the bolt in place, the mold now had to be held away from the ground as the bolt stuck out of the bottom. Two scrap 2x4 pieces solved this problem, allowing the bolt to stick out between them.
I also wanted to be able to stack the finished footings for storage, and this bolt would stop that. So I needed to make sure there was a hole in the bottom of the footing, so I cut some 3/4" pipe to the length of 2” and put some duct tape on the end. These will be pushed into the concrete after it is poured to provide a spot of the bolt to be fitted into when stacking.
Then a releasing agent needs to be applied to the mold. You can buy mold releasing agent, but I have seen a few videos that just used a cooking spray product. I happened to have some of that spray and gave my molds a liberal and even coating. It worked well enough.
To give my footings an interesting look, I hand sprinkled in red dye into the molds before pouring in concrete. This will give the surface of the finished footing an irregular color. Those nitrile gloves came in real handy at this point.
The molds are now ready for the concrete to be poured.
Step 6: Mixing the Concrete


I didn’t have a power mixer, and the volume I was going to mix didn’t justify renting a concrete mixer. So I used a tray and a garden hoe. The hoe allows me to stay in a comfortable standing position and the open tray allowed the hoe to work really well in mixing the concrete. I used the hand trowels primarily for making sure the corners were mixed well.
To mix, drop a bag into the tray, gut it, ehmm, cut it open and dump its contents. Then I added the dry charcoal dye in and mixed this well with the hoe. After making sure the base color is mixed well, I made a depression in the middle of the dry concrete, added the water, and starting mixing.
NOTE: While I didn’t use this technique, I have heard since this project was finished that to get better detail from the mold, mix in a product that helps reduce the water needed, but still maintain the same amount of water the instructions on the concrete state This will make a soupier mix while retaining the concretes structural properties. This soupier mix will fill into the mold details better.
Once the concrete is evenly mixed, it’s time to pour. This is where having a longer working time helped. It gave me time to mix well and not be rushed to pour the concrete into the molds.
Step 7: Pouring the Molds

I found that instead of pouring specifically, scooping the mix by hand and pressing it into the molds was better. After a few scoops were added, I would poke the mix into the details with my fingers and around the bolt. I repeated this until the mold filled to the level I wanted, which was even with the gear tooth foam details.
Once I had both molds filled, I then lifted one mold on top of the other, and slowly let the bolt that was sticking out press into the still curing concrete. I repeated this with the other mold. This gave me a mark of where to insert those plastic pipe pieces that would give the final footing a hole for stacking. Then press into each mark the prepared plastic pipe piece. You can press it in flush to the surface.
One last step before you set them aside for curing is to agitate them. I simple shook the mold by hand. At least a good 30 seconds of shaking will let the concrete work into the details of the mold.
TIP: Something I learned afterwards, using a powered hand sander, without the sand paper, pressed to the outside of the mold, works well in agitating the concrete. Moving the contact spot around mold will ensure an even agitation.
Finally, make sure the plastic pipes that were inserted are still pressed flush to the surface and then put the molds away in a spot that protected from rain and sun. An average temperature and humidity is good for the curing and covering them with plastic for the first day will help retain the moisture and not allow them to dry out too quickly and become brittle.
Step 8: Demolding

After at least 12 hours of curing, I then removed them from the mold.
I first turned them over and peeled away the hot glue that held the bolt into position. Then with a rubber mallet I gently tapped along the sides and bottom to loosen everything. Then over a cushioned surface (some bubble wrap) I giggled the complete upside down mold down ward until the footing released and slide out.
I found that my open hardware icon detail foam came loose and stuck in the footing. They stuck so well I had to destroy them to get them out. I believe this was due to the right angle sides and the amount of detail they had. I should have formed the sides at an angle so footing would slide out freely.
The gear sides released well. I only had to reattach one gear tooth back into the mold before starting the second pour.
I then set them aside for another day as I prepared the molds and concrete for another pour.
Step 9: The Results

They came out looking great and they were very functional. They attached easily to the canopy, and they stacked well for storage.
We did get wind gusts at the Seattle Mini Maker Faire and while the other maker groups had to grab their canopies before they flew away, ours held up well even if the stuff on our tables went flying.
I hope that by sharing this that other makers will build their own custom designs and use them for the safety of our visitors who come to see what we make.

Participated in the
Concrete and Casting Contest


