

Introduction: Making Solid Padauk and Maple Bookshelf Speakers


I hope you enjoy the build log of these beautiful Padauk speakers which really came together way better than expected! I love experimenting with different designs of speakers and will be trying some more exotic ideas in the future so stay tuned for that!
for other projects and to see stuff that I make and sell: check out my Instagram and Etsy here:
Step 1: Note:
Although I am using my CNC fr a great deal of this project, it could most deffinitely be easily accomplished with a router and a jigsaw and a mitre saw would help!
Step 2: Planning/Design


I've been fascinated with unusual speakers recently and thought I would attempt a slightly quirky build of my own!
Traditional speakers tend to be very plain looking with traditional hard woods or just black exteriors. Some are designed typically to be heard but not "seen".
I wanted to design something unique yet not ostentatious like those horn speakers you tend to see at audio shows that cost thousands and thousands of dollars. Admittedly they sound incredible but that is besides the point for this exercise. I intend to pursue a solid sound quality using good quality drivers and components but you won't be able to hear god with these as thy say.
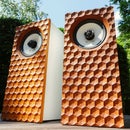
Utilising more exotic hardwoods such as Padauk combined with a more traditional Maple box I hope these will be very eye catching.
Step 3: CAD

After some initial sketching on paper I moved into CAD to set out my design properly.
I went with a design where the woofer is above the tweeter which adds more 'un-usualness' to the overall look
A simple mitered box with solid panel of Padauk as the baffle.
Some nice chamfers thrown in for a bit of aesthetic and I was happy with the design. The woofer I found for this project recommended a certain volume of enclosure and I got it roughly right!
Step 4: Preparing Wood


I planed some Padauk down with machined and by hand to produce two boards I could use for the speaker fronts.
I chose to use mdf backed maple for the box as the only maple I had was only 10mm thick. So i laminated it with a sheet of mdf 9mm thick to get roughly 20mm material thickness which was perfect for this build.
Step 5: CAM/CNC


Next, I produced some toolpaths in Fusion 360 and loaded them up on the CNC computer.
The CNC then did its magic cutting out all the parts for the box and the speaker fronts which produced a lot of red dust form the padauk!
Step 6: Making the Box


I used my mitre saw once the parts had been cut to size by the cnc to cut the 45 degree mitres I would use to assemble the box.
I then cut rabbits around one edge of the panels of the box to accept the back panel.
Step 7: Glue Up


Next it was just a matter of gluing it all up and using masking tape to help the mitres stay aligned properly. I used clamps to help keep the box square and once face flat too.
Step 8: Tip: Getting Nice Mitres


It is very hard to get absolutely perfect mitres with out a high quality table saw or machining them some other way so a trick I learned for getting really nice mitres and removing any gap at the edge is to use the shank of a screwdriver or anything smooth and round to bend the wood fibers together and close up the gap. Just run the screwdriver along the edge biased to one side and then the other and it should close up the gap nicely!
Step 9: Preparing the Front Panel


First a chamfer was cut around the speaker cutouts as in the CAD drawing. I then decided to install the woofer as it is a bit easier to do it before gluing on the front panel in small speakers.
I covered the driver in a very low density cotton fabric to protect the paper speaker cone during use. I stretched it tight then screwed the driver into the front panel.
Step 10: Glue and Trim


Next, I glued the front panel onto the box leaving a bit of excess all the way around so I could come back with a flush trim bit and get a perfect seam between then front panel and the box.
Step 11: Preparation and Finishing


I sanded the whole thing and then used some isopropanol to clean the dust out of the wood pores. This also gave me an idea of what the wood would look like finished!
Step 12: Clear Coat Spraying


Because I had already installed the woofer and speaker cloth I had to laser cut a disk of paper to cover the opening to protect the fabric form the spray lacquer.
I then used 3 coats of clear acrylic in the glossy format to protect the speakers and bring out the deep colours of the padauk.
After this was try, I installed some felt pad feet so I could stand them up to work on the back panel.
Step 13: Back Panel


The back panel was made form a single non-laminated with mdf piece of maple (10mm). The CNC cut the hole for the speaker terminal box and the profile. I then ran the piece over the chamfer bit on my router table to produce a nice edge. The panel is held on with 4 screws but I may use more in the future if the panel warps at all.
I glued some little block on the inside of the speaker box to allow the screws to be set a little bit in from the edge of the back panel. this means the countersinks don't interfere with the chamfer.
Step 14: Wiring


I soldered a crossover capacitor to the positive terminal of the tweeter. I haven't put an inductor in for the woofer yet as it hasn't arrived yet but I will solder that in when it arrives.
I then wired up the everything together using some thick copper wire with lots of strands. I then soldered up the terminal box and screwed it to the back panel.
Here is a link to a crossover calculator: https://www.diyaudioandvideo.com/Calculator/SpeakerCrossover/
Step 15: Finishing Touches / Future Changes


I added a piece of foam to the inside of the back panel directly behind the woofer to help reduce rebounding sound waves interfering with the woofer. I am not an audio engineer but this seemed logical to me. I intend to do more research into enclosure design in the future!
I added some foam gasket to seal the back panel and then screwed it in place!
And that's it done!!
Thing's I have learnt and might change:
- I will add the inductor for the crossover when it arrives.
- I will probably use some wadding to stuff the enclosure a bit and dampen the sound and help with low end performance. (?)
- Using maple laminated with mdf saved a lot of money on materials and produced good results
I am very happy with how they turned out in general! Thanks for reading and stay tuned for the next build!

Participated in the
Box Contest 2017

Participated in the
Audio Contest 2017


