

Introduction: Making Your Own Gambeson (Quilted Cloth Armor)


I recently decided I needed to pad out (get it?) my historical armory, and the idea of making a gambeson came to mind. A brief bit of history: a gambeson is a padded defensive jacket, worn as armor or combined with chainmail or plate armor. They were usually made from linen or wool and were stuffed and quilted to create a thick coat that protected the wearer. They were worn by many cultures in many time periods, and offered a less expensive and flexible means of not becoming a pincushion.
That being said, my version is almost solely for looks and is not at all historically accurate. It's the first article of "clothing" I've made, so the process was definitely trial and error, but fun nonetheless. I chose to hand sew the entire thing for the aesthetic, which is not necessary for the success of the project, and should only be attempted if you have large amounts of time and patience on your hands. Here we go!
Supplies


General supplies:
- Sewing pins (many)
- Scissors
- Pencil
- Fabric measuring tape
- Yardstick
- Heavy duty thread and needle or sewing machine
For the pattern:
- Butcher paper
- Dress or shirt to base your pattern off
- Fabric you don't care about
For the Gambeson:
- Pre-quilted fabric (Joann's Pre-Quilted Fabric- 3 yds long, 42'' wide)
- Leather
- Buckles (https://www.amazon.com/gp/product/B01MF9EIMK/ref=ppx_yo_dt_b_asin_title_o00_s00?ie=UTF8&psc=1)
- Pop rivets, rivet setter or pliers
- Leather punch
Step 1: Drafting the Pattern


Buckle up folks, this step is rather involved.
I made a quick sketch of what I wanted it to look like, I knew I wanted the base to be sleeveless and have a pointed front and back bottom hem. To start making the pattern, I found a dress of mine that fits closely throughout the torso, and then flairs a bit at the waist. For this step, any article of clothing that fits well in the torso will work, even something like a t-shirt, you just want to take curves into account. This dress was perfect for what I wanted, because it would give me a closely fitting top but have enough leg mobility.
I laid it flat on my roll of butcher paper and traced out the right side of the dress, then made a new line 1/2'' further out from the original to add seam allowance. I then folded my paper in half along the unfinished middle line, and cut out the shape to make two perfectly mirrored halves. This shape will serve as the back of the gambeson.
The front ended up being a good deal trickier, because I originally just replicated the back and cut it in half for the two front pieces. The only problem there is that the dress I used to make the pattern was stretchy and needed no darts, while the quilted cotton I was using was decidedly not. Basically, if you need to accommodate some sort of curve, you'll need darts in the bust of your pattern. Usually the dart starts at the fullest part of the bust and goes back to the side seam, or down to the waistline, but the great thing about darts is you can put them literally anywhere. I didn't know what I was doing so I made mine start in the right spot, but go to the middle seam. The only thing I actually measured was from the fullest part of my bust to the middle seam, and from there I just winged how wide my cut out needed to be. Essentially it ended up being a reverse french dart, and I could have fixed it but I kinda liked the look of the v shape it made. The great thing is, once you get to the mockup stage its pretty easy to figure out what needs to be changed.
Both of these videos were very helpful for understanding darts: https://www.youtube.com/watch?v=mdFUFPn6wbg, https://www.youtube.com/watch?v=mKcDjvujI7g
The long and short of it is, make a flat pattern roughly shaped like a bodice, and draw a line from the point representing the fullest part of your bust to whichever seam you chose. Then draw a second line to make a triangular shape with the point at the fullest part of your body. From the waist down the pattern followed the shape of the dress-just make sure it can accommodate your hips, and that all your edges have at least 1/2'' of seam allowance.
Step 2: Making a Mockup


Whatever you do, don't skip this step! After the trial and tribulation that was pattern making, this was relatively easy. I found some old and rather loud fabric to use for my mockup, and cut out the back and two front pieces by laying the pattens flat on the fabric and tracing them out (it helps to pin them to the fabric so they won't move). I then pinned the side edges, shoulders, and front darts and tried it on (pins on the outside-don't turn into a porcupine!). This is your time to figure out what you like, and what you don't. Move around, check your mobility, and look for any spots that don't fit well, because it's a lot easier to fix problems in this stage than with the real fabric.
I ended up having to remake the front pieces three times due to dart issues and I cut little sections off the sides because the hips were in the wrong spot. But once I got those little issues sorted out, I had a well fitting, very loud floral coat. Success!
You can change your paper patterns each time, but if you want speed, just use the final fabric mockups to pattern your actual fabric. It also helps to label the sides of your front pieces 'left' and 'right' so that you don't end up with all left or right front pieces in the next step.
Step 3: Making the Final Piece


Take your chosen fabric and lay it out so that it's folded along one of the long sides, this will allow you to cut symmetrical pieces. For the back piece, leave your pattern folded in half and put the folded edge against the fabric's folded edge. For the front pieces, trace them out and cut through the top and bottom layers so you'll have two cut outs. You'll need:
- 2 Back peices
- 2 Left front
- 2 Right front
If you want your gambeson to be thinner or thicker, add or subtract layers, but fair warning-it will be hard to sew if you go above 2.
To keep them together, I sewed the inside and outside layers in the marked spots with a diamond shape lined up with the quilting on the outside. This isn't necessary, but it will make things easier. Take your double-thick back and front pieces and lay them with their eventual insides facing out. Pin the shoulders, sides and front darts, and try it on again. This is your last chance to adjust it, and especially with the darts, to get the pinning just right so they don't bunch.
Once you're satisfied, get to sewing! Make sure you're using heavy duty thread. I hand sewed all the seams using a simple running stitch, trying to make them tiny and straight for strength.
Step 4: Edging


To hem all the edges of the gambeson, you will need to make a sort of edge binding. First, measure the length of the edge you are hemming, and add 1 to 1&1/2'' to the measurement. Fold your remaining fabric so it is double layered, and measure out the length of your edge strips on it. The measure the width, I made all of mine 2&1/4'' wide so that they would have plenty of overlap. I made sure they were an even width all the way down by marking the width at the top and bottom, and connecting the dots with a line drawn against a yardstick. When you cut out your strips, cut through the top and bottom layers so you will have two pieces of the same size, one for each matching side that needs to be hemmed.
Take your strip, and fold over the long edges on both sides about 1 cm all the way down and pin them in place. Your strip might start to curl up a little bit, but don't worry about it. To attach it to the body of your gambeson, you'll need to get your edge strip and fold it around the hem you are working on as snugly as you can. The diagram above should help, you want each side to be as even as possible so you can sew through all six layers. Make sure you get both layers of the main gambeson, it's a pain to take out stitches when your edge binding gets only one of them. Pin the binding in place, tucking the short ends of the strip under as well to create a finished edge. Sew it to the main body of the gambeson, and make sure it doesn't bunch up especially on the collar and arm seams since they are round and tend to pucker a bit.
You'll need:
- Neck
- 2 armholes
- 2 front edge
- 4 bottom edge (I did each panel separately)
Step 5: Fastenings


Once the entire gambeson is hemmed, you'll need a method of closure. The easiest method is to lace up the front or make simple cord ties down the front. I chose to make leather strap and buckle closures. I used a set of medieval looking buckles from Amazon, and some oil tanned leather scraps I had laying around; but any buckles and leather will do.
To start I put on the gambeson and found where I wanted the waist to be, and put a pin in both sides of the front at the same height (measure from the collar to make sure they are even). I wanted four buckles, so I took the total collar to waist measurement (for me, 17 & 1/4'') and divided it by four. All of the pins ended up being about 4 & 3/8'' apart. These pins mark where the buckle closures will be.
To make the leather straps, I measured the internal bar of my buckles-it's 5/8,'' which is how wide my straps can be. I made rough paper templates to figure out how long I wanted them, and they ended up being 2 & 7/8'' for the buckle side and 3 & 3/4'' for the strap side. These measurements were just based on what looked good, I basically just made strips the correct width, then put a hole for the prong in it. I wanted the leather to sick out about an inch past the points of the buckle, so that's where my measurements came from. Next I traced the patterns out on the back of my leather, and cut them out. If you want to burnish them to give them nice smooth edges you can. I made the holes for the prongs by punching a row of holes out with my rotating punch, and secured the buckles in place by sewing the flaps down with an x stitch. I then punched rivet holes in all my buckle straps at the same spot, and corresponding holes in the gambeson. I set the rivets nice and tight, and took a second to enjoy the fact that I'd just finished a project that I started back in February.
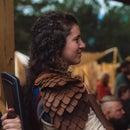
Step 6: Finished Product


You made it! There were definitely difficulties along the way and hand sewing it all gave me new calluses, but I'm very happy with it and surprised at how well it turned out. I might make and add sleeves eventually, but right now I'm happy with how it is.
A few learning points:
- If I make this kind of thing again, I'm definitely going to research proper dart methods before just launching into the deep end head first. I probably should have put a dart in the middle back as well, because it bunches a bit.
- I should have put the buckles up a bit higher, the last one now sits a little below my belt which isn't a huge problem, but the top gaps a bit.
- I finally figured out what I was doing wrong with my sewing machine so I need to practice using it to make larger scale projects like this.
It's done! It feels really nice to wear, it's warm and comfortable, and has great mobility. I went to a fight event and wore it fighting in the shield wall for two full days, and it wasn't bad at all (it also didn't break which was a plus). I also felt extremely cool.
Pair it with a sword belt, armor and a cloak and you're ready to go!
Feel free to comment with any questions, and please post pictures if you make your own, I would love to see them.
Thanks for reading!

First Prize in the
Sewing Challenge


