

Introduction: Making a Simple and Easy Charcoal/ Coal Forge


In this instructable you will learn how to make a charcoal / coal burning forge from firebrick, a few steel plumbing parts, a steel sheet, some cinder blocks and a blower
Unfortunately I ran out of money before i could finish the forge, in total it should cost around $ 50 USD depending how fancy you want it. The plans you will see are paint mock-ups from my actual design, i do not own a scanner so I had to make pictures.
This is what the finished forge should look like
Step 1: Why a Forge and Getting Started Up

When I first discovered wanting to take up blacksmithing as a hobby, I searched and searched for designs and a website to help me get started. Then i discovered AnvilFire, they have some F.A.Q.'s and a whole bunch of info on starting up. They also have a help section called "Guru's Den" you ask questions and they will answer them.
As a begainner at Blacksmithing they recommend to build a forge out of a Brake Drum I decided against it because I really didn't want to be using a rusty piece of junk to hold 3,000 degree charcoal and white hot iron.
So i asked the guru guy a lot of questions.
And I made plans on it
Basically its fire brick in a square pillar shape stacked like a brick wall
Step 2: What You Need
Okay this forge will be light to medium duty work, you can make knifes in it but definitely not swords because its not long enough, daggers maybe.
_What you need_
1. Fire bricks (number varies by size of brick and size of forge)
2. A Steel plate larger then the forge
3. Plumbing parts
a. 3-1 1/2 x 4 in steel pipe nipples
b. 1 1/2 x 8 in steel pipe nipple
c. 1 1/2 in T fitting
d. 1 1/2 in elbow fitting
e. 1 1/2 in cap
f. 1 1/2 in flanger
4. Cinder blocks
5. A Blower
Fire Brick- Its very important you get fire brick, do not even look at cement or concrete bricks, they will explode when heated. Firebrick is a little more expensive then normal brick because its a specialty item.
Steel Plumbing- Today I went to home Depot and they didn't sell fire brick or the 1 1/2 in pieces, so I would go to Loews or a similar home improvement store. Also if the plumbing your looking at is shiny make sure it is not galvanized, I can not stress how important it is not to use it. GALVANIZED METAL GIVES OFF FATAL AND TOXIC FUMES WHEN HEATED. Stay away from it and use the black, the electrical conduit is fine to use, but they need to thread and cut it for you.
Steel Plates- Your best shot would be to go to a junkyard and ask, your going to want a 1.5 ft x 1.5 ft steel plate for a decent size forge. Also its good to have the plate big because then there is a less of chance knocking something down, I am a klutz. make sure the plate is steel and around a half inch thick. This way it wont melt or get too soft.
Blower- It doesn't really matter what it is, but go to a hardware store and tell them what your doing and looking for. I have a blower but I have no idea what its called, maybe its called a blower. It needs to put out a decent bit of air though.
Flange- This is what connects the pipe to the steel plate and supplies the air to the charcoal, you're going to need to make a grate of some sort to keep the coals from falling down air pipe. But it needs to be big enough to let ashes fall to the ash trap. Otherwise it will clog up grate, letting in less air then needed.
Cinder Block stand- Basically its just some upturned blocks holding up the whole thing, just be sure to put fire block or another insulator between the cinder block stand and the steel plate. Other wise the concrete blocks will explode, which is not good, because there is going to be 3,000 degree coals and fire block all over the place.
Fuel- I live in the middle of a desert so we don't have a great coal supply, mostly because it doesn't get cold enough in the winter. So I decided to use Charcoal, I was told via Anvil Fire's Guru not to use the kind they sell at supper markets, aka pressed brickettes. This is because they are full of crap you don't need and they don't burn hot enough. The Guru said to find a restaurant supply co. and order real charcoal, the kind that looks like real burnt wood. I really have no idea how much you need, but buy more then you think you will need for the first time.
Step 3: Building the Forge

Okay now here is the easy part, not really.
Your going to have to drill a hole in the steel plate for the Flange to fit in, my advise would be to ask the person at the junk yard you got it from.
Oh i almost forgot, get the hole drilled about 4 inches from center, this way you can set the charcoal on the back wall.
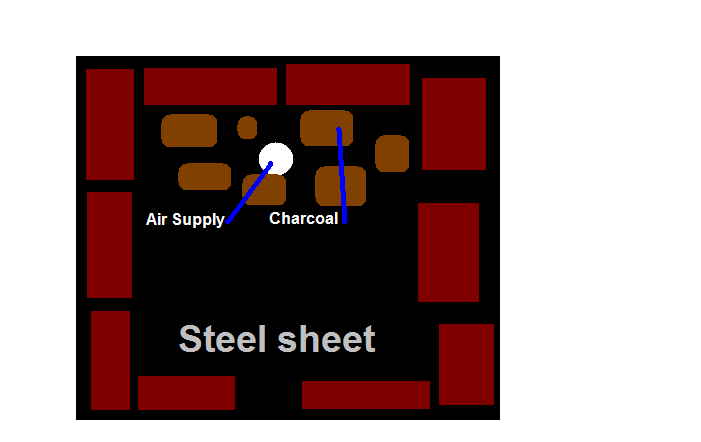
See the picture for what i mean it says "steel sheet" on it(OMG THERE IS COLOR IN IT)
remember when i said you needed to fit it together like a wall well here is the thing in 3-D, also i have not made it yet so i can't tell you how to place the bricks, you may need to cut some
Be sure to keep one missing in the bottom front, this way you will have good access to the heart of the fire for easier heating.
Do not attempt to put anything over the forge when it is running, it would alter the amount of air flowing out the top and have it go out the access. The result would be 3,000 degree air shooting out towards you. BAD!!!
Step 4: Putting Together the Air Supplie

Okay if u look at the picture is self explanatory. If your wondering how to attach your blower to the pipe, I would us duct tape. Also you can use as big of pipe as you want, the max being 2 inches wide.
I recommend to keep the Plumbing all attached together when not in use because its mostly flat, unlike the forge which you can just take apart when your not using it. It is also recommended to buy a pipe cleaner and run it though the whole thing after every use to get out all the ash and clingers especially if you are using coal as a fuel.
When running the blower make sure the ash trap cap has a good seal otherwise your going to be leaking air.
DO NOT USE GALVANIZED PIPE, YOU WILL DIE OR GET SICK
Step 5: Putting It All Together
Okay use common sense and look around, does anything not look right. If it doesn't fix it.
Its going to be heavy so i suggest putting the plate on the stand of cinder blocks before you put the fire brick forge on top. Then slip the flange in and attach the plumbing.
It should look some what like this
Step 6: Firing It Up

Okay its finally done.
Do not rush especially now when its done.
Were going to fill it up with charcoal about half way to the top and about to 2/3's of the way like in my picture.
Now douse it in lighter fluid and let it get going once its flames have died down a bit turn on the blower and restock the fire and make sure u don't add to much charcoal at a time.
Now heat your metal and forge it
If you want help an how-to's on forging to go AnvilFire
A gas forge can be found Here
And several different types of tongs
Simple
Complex
For more projects and Ideas visit the The Forge Group
This is my first Instructable so give me feed back on its quality


