

Introduction: Making a Simple Application Using the Win32 API

Often times the easiest way to learn how to use a programming interface is by coding a simple example. In this case, we will be learning the Win32 API by programming a simple integer calculator with the help of Visual Studio 2010. Since every Win32 application shares a lot of Win32 related code, Visual Studio allows you to use auto-generated code, which creates a framework that you can simply fill in to build your application. The calculator we will build supports the operations add, subtract, multiply, and remainder. Changing the operation will be accomplished through a drop down menu labeled "Operation". The finished product is shown above in actual size!
This instructable is for programmers of any skill level who know the basics of c++ and want to become familiar with the Win32 API.
To follow this instructable you will only need:
• Basic c++ knowledge
• A windows operating system with Visual Studio 2010 or Visual C++ Express 2010 installed
Attached to this instructable is an executable file with the finished calculator.

Step 1: Generate the Framework Code.

1. Open Visual Studio 2010 or Visual C++ Express 2010
2. From the menu, click File->New->Project. A new project wizard will appear.
3. From the installed templates menu on the left, select Visual C++->Win32. Now the center should show the options Win32 Console Application and Win32 project.
4. Choose Win32 Project, refer to picture 1-1 for help.
5. Enter a name for the project and the location you want the project to be stored in the fields at the bottom. When you are done, click Ok.
6. Click finish when the Win32 Application wizard pops up.
Step 2: Change the Window's Look and Style.


1. From the solution explorer on the right, double click Resource.h to open the resource header. We need to define identifiers for the menu items and window components that we want to use.
2. Define identifiers as shown in Picture 2-1.
Caution: Be sure that each identifier is a unique number, otherwise the window can't distinguish
between the two components with the same ID .
3. From the solution explorer on the right, right click on (“Your Project Name”).rc and select View Code. You are now looking at the resource file for our program.
4. Scroll down to where Menu is defined, it should be close to the top and have a big commented area above it that says "Menu".
5. Add the menu items for changing the operation, use picture 2-2 for guidance.
6. While we are in the resource file, scroll down to where StringTable is defined near the bottom. If you want to change the title that appears in the title bar of our program, which is by default set to the name of your project, edit the string to the right of IDS_APP_TITLE.
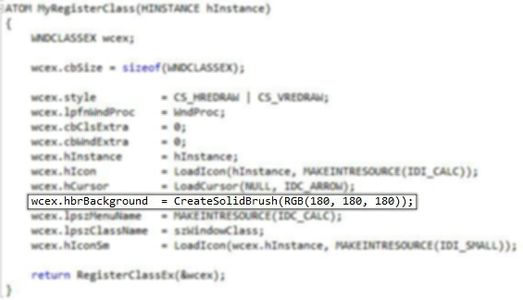
7. Back in (“Your Project Name”).cpp, scroll down to the function MyRegisterClass(). This function is used to register the main window’s class with the windows operating system.
8. Edit the line of code highlighted in picture 2-3 to
wcex.hbrBackground = CreateSolidBrush(RGB(180, 180, 180))
This changes the background color to from white to grey.
9. Scroll down to the function InitInstance() and locate where the function CreateWindow() is called. This is where the main window is created and where much of its look is determined. The parameters we will edit are 3, 6, and 7.
10. Edit parameters 6 and 7, which represent the width and height of the window respectively. I think 160x170 is a good size.
11. Edit parameter 3, which specifies the style of the window. We want to change the style of our window so that it cannot be re-sized. To do this, change parameter 3 from
WS_OVERLAPPEDWINDOW
to
WS_OVERLAPPED | WS_CAPTION | WS_SYSMENU | WS_MINIMIZEBOX
Look to picture 2-4 for guidance.
Step 3: Add Components to the Window.
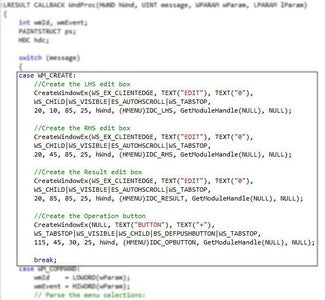
1. Scroll to the function WndProc(). This is the main window’s procedure function, which responds to all the messages sent by the window.
2. In the switch controlled by “message”, add the case WM_CREATE. This is the section of code that is executed when the window is created. We will add our components here.
3. Add the first text box using the following function call:
CreateWindowEx(WS_EX_CLIENTEDGE, TEXT("EDIT"), TEXT("0"),
WS_CHILD|WS_VISIBLE|ES_AUTOHSCROLL|WS_TABSTOP,
20, 10, 85, 25, hWnd, (HMENU)IDC_LHS, GetModuleHandle(NULL), NULL);
This places a text box with its upper left corner at (20,10) and with a width of 85 and a height of 25. It also assigns the identifier IDC_LHS that we defined earlier to the text box so that we can refer to the text box later. The TEXT() macro you see around all of the strings is simply used so that this code works whether your compiler is using unicode or not.
4. Add the other three components in the same manner. Refer to picture 3-1 for help.
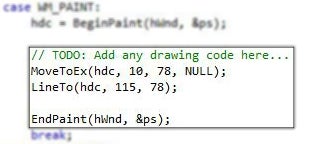
5. Scroll to the case WM_PAINT. This is where any drawing to the window will be done.
6. Draw the dividing line between the two inputs and the output by inserting the following code after the BeginPaint() function call, as in picture 3-2.
MoveToEx(hdc, 10, 78, NULL);â
LineTo(hdc, 115, 78);
This draws a line from (10, 78) to (115, 78).
Step 4: Give Functionality to the Menu Items and Components.


1. At the top of (“Your Project Name”).cpp, define the following enumeration and variable as shown in picture 4-1:
enum operation {ADD,SUB,MULT,REM};
operation op = ADD;
This will be used to keep track of what operation the user has selected.
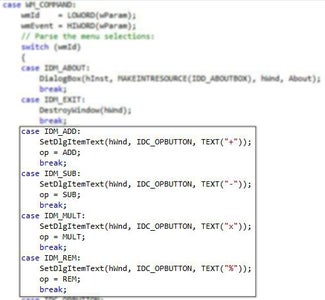
2. Scroll back down to the function WndProc(). We will add functionality to the components and menu items inside the WM_COMMAND case.
3. Inside the same switch statement, add the following case to handle the Edit->Operation->Add menu option:
case IDM_ADD:
SetDlgItemText(hWnd, IDC_OPBUTTON, TEXT("+"));
op = ADD;
break;
When Add is selected as the operation from the menu, this code sets the text on the operation button (which we gave an id of IDC_OPBUTTON) to “+” and sets our op variable to ADD.
4. Handle the other three operations similarly, using picture 4-2 as a reference.
5. In the same switch statement, add the case IDC_OPBUTTON as in picture 4-3 to handle the operation button. When the operation button is clicked, we try to get our operands from the two input text boxes. If we can’t, an error message is shown. Otherwise, the selected operation is performed, dealing with the special case of division by zero, and the result is sent to the result text box.
Step 5: Have Fun!

You have just built a simple calculator using Win32 API and Visual Studio 2010! You will find that producing a window with a specific style, adding components to the window, and giving functionality to the components involves basically the same process for more complex applications than the calculator you just built. Now that you have familiarized yourself with the Win32 API, go ahead and try build an application of your very own!


