

Introduction: Metal Lathe Toolbox


Welcome Friend. We've been frustrated with the amount of clutter around the metal lathe. There's a lot of auxiliary kit needed to make projects with it! Let's fix that with some full extension tool-box draws. The goal is to make a toolbox like the expensive ones you see in the shops, but that fits nicely inside this lathe. Oh, and I want to make it from scrap steel I already have.
Wrapped up in this organizational re-jig, is the task of moving and leveling the lathe. It's been quite a few years and we now have a good idea where in the shop we want it.
Supplies
I was lucky in that I already had some full extension drawer slides I could use for this project - We had a batch from e-bay years ago. If you need some look here for some heavy-duty ones https://ebay.us/w6a251
The sheet steel used to form the drawers was roughly 1.5mm (1/16") thick and came from various places, much of it was from an old gas boiler enclosure.
The threaded rods we used to level and mount the lathe were high tensile M14 like these: https://ebay.us/ClMigd
I'm using a MIG welder. Tig would probably be better for this thin sheet work, but just about any welder can be made to work.
Step 1: Moving


Deciding on the position of your big tools in a workshop is tricky and will impact the way you make things. It's worth considering carefully. In our case, the lathe had been in a sort-of convenient location for ages - the worst kind of not-quite-right, as it's hard to get motivated to change it. On the plus side, because we have lots of experience with how we tend to use it, we knew better where it should go.
We moved it with an engine hoist, a long lever, and some grunting. The lathe weighs ~750kgs (1650lb).
Step 2: Threaded Rod Mounting


We used a 'no-measure' method to attach the lathe to the concrete floor. It involved placing the lathe where we wanted it on some scraps of plywood. Marking the mounting holes on the ply, and drawing on the floor, around the ply sheets.
Step 3: Mistakes


The holes in the floor that would accept the threaded rod were drilled with an SDS drill, through the pre-drilled holes in the ply scraps. Unfortunately, one of the ply sheets was flipped over! So when we came to move the lathe onto the 'permanently' installed threaded rods it didn't even come close to fitting - OOPS
"Did you measure twice?" Sam asked me. "I didn't measure at all," says I.
Step 4: Position and Levelling


Once that was corrected (with the angle grinder) and redone, we used nuts and an engineer's level to carefully level the lathe. It took quite a while.
Step 5: Prep the Toolbox Frame (Lathe)


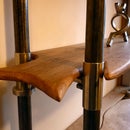
The lathe stand is made from bent and welded sheet metal. The two pillars on either side, that actually support the lathe, are quite thick metal, but I noticed while we were moving it how flimsy the central 'bracing' was. "It's all just wasted space," thought I. "Let's use the space more efficiently".
So centres were punched and holes were drilled and tapped. Then we attached the roller drawer slides that had languished at the back of the cupboard in deep storage for many years.
Step 6: Drawers A) Welding Scraps


We cut the metal with the angle grinder and the new(ish) cold cut saw. Scraps were welded together to make bigger bits that could form appropriately-large drawer shapes.
Before finalizing the dimensions, I attached the sliders to the sides and put them in place on the lathe. Then the base of the drawers was tack welded to the drawer sides in situ - so I knew the sides would be the right distance apart. They could then be taken away from the lathe for further welding.
Step 7: Drawers B) Fitting


A couple of notes on the fabbing process. It's easy to burn holes through thin sheet metal like this. My method was to 'stitch weld', which you can see in the video... It looks very rough at this point, but fear not, it will clean up a goodun.
It's probably not as strong to use lots of little off-cut pieces like this, but it does mean you are preventing the awkward bits becoming waste rather than creating more.
Step 8: Weight Testing

We put some heavy stuff in to see how things were.
Step 9: Drawers C) Reinforcing - Adding Strength

The centre of the drawers flexed more than we liked, so we added some bracing.
Step 10: Heavy Things in Cupboards


In general, it makes sense to store the heavier things, like big solid lumps of steel in non-moving places, like cupboards.
We cut a hole in the supporting pillar to make a cupboard. There was already a hole round the back, which allowed access to the coolant pump. That would be very difficult to get to with the lathe in its new position though.
The back hole was sealed up and some reinforcing was welded in to maintain/increase strength.
Step 11: Heavy Things in the Cupboard 2


The door was made from a scrap of 'showerwall' - it's a mica (I think) lined plywood that seems to come up in skips quite often. It's strong stable stuff. A small rare earth magnet is used as a closure.
Step 12: Drawer Handles


These were made from some scrap aluminium extrusion. Fixing them required some nut n bolt modding but turned out nicely.
Step 13: Rust Protection (snazzing Up)


Time to cover up all that horrible welding. Wire brush and sander were employed before wiping it all down with panel wipe (a solvent).
Any bare metal got etch primer, and then the whole thing became blue thanks to some left-over car paint from this project :)
Step 14: Foam Inserts (old Yoga Mat)


An old yoga mat was used to line the drawers. It works a treat to stop the tools from sliding around and keeps 'em snug at night.
Step 15: Organize Tools Into New Home!


Top drawer front - gets all the used very often tools
Top drawer back - less often in use, but still common
Middle drawer front - bigger items, used often
Middle drawer back - big, lesser used items
Bottom drawer - bigger items still, least often used.
Quite a specific 'able this one, but hopefully you got some idea or interest from it. Thanks for looking :)

Runner Up in the
Organization Contest


